Followers

Wednesday, 15 February 2012

DT Call over at Fab'n'Funky Challenges

Unfortunately, the lovely Sharon has had to resign from our DT at Fab'n'Funky Challenges

This means we are now recruiting 2 new members to the DT and welcome applications from everyone regardless of whether or not you have had previous DT experience.

The only main requirements are:

  1. You have an active blog
  2. Can create a new challenge to "go live" every Wednesday
  3. Comment on participants entries - we have a number rota system
  4. Host your own challenge week every 8 to 10 weeks
If you feel you can commit to all of the above, leave a comment on the Challenge blog post for the DT call, stating your blog address and an email address where we can contact you.

This DT post will stay open for the next 7 days.

Good luck everyone.

Happy crafting,
Rachel x

Trying Something New

Hope you've all had a good week.  We've had no snow here so far but I think it's threatening to arrive on Friday.  Just in time for the weekend!  What a loved up bunch you all are!  We had a great response to our Love is in the air challenge last week and don't forget top pop over to the Fab'n'Funky blog to see if you were one of our lucky winners. 

Now on to the next Challenge and it's a cracker! 

Try Something New

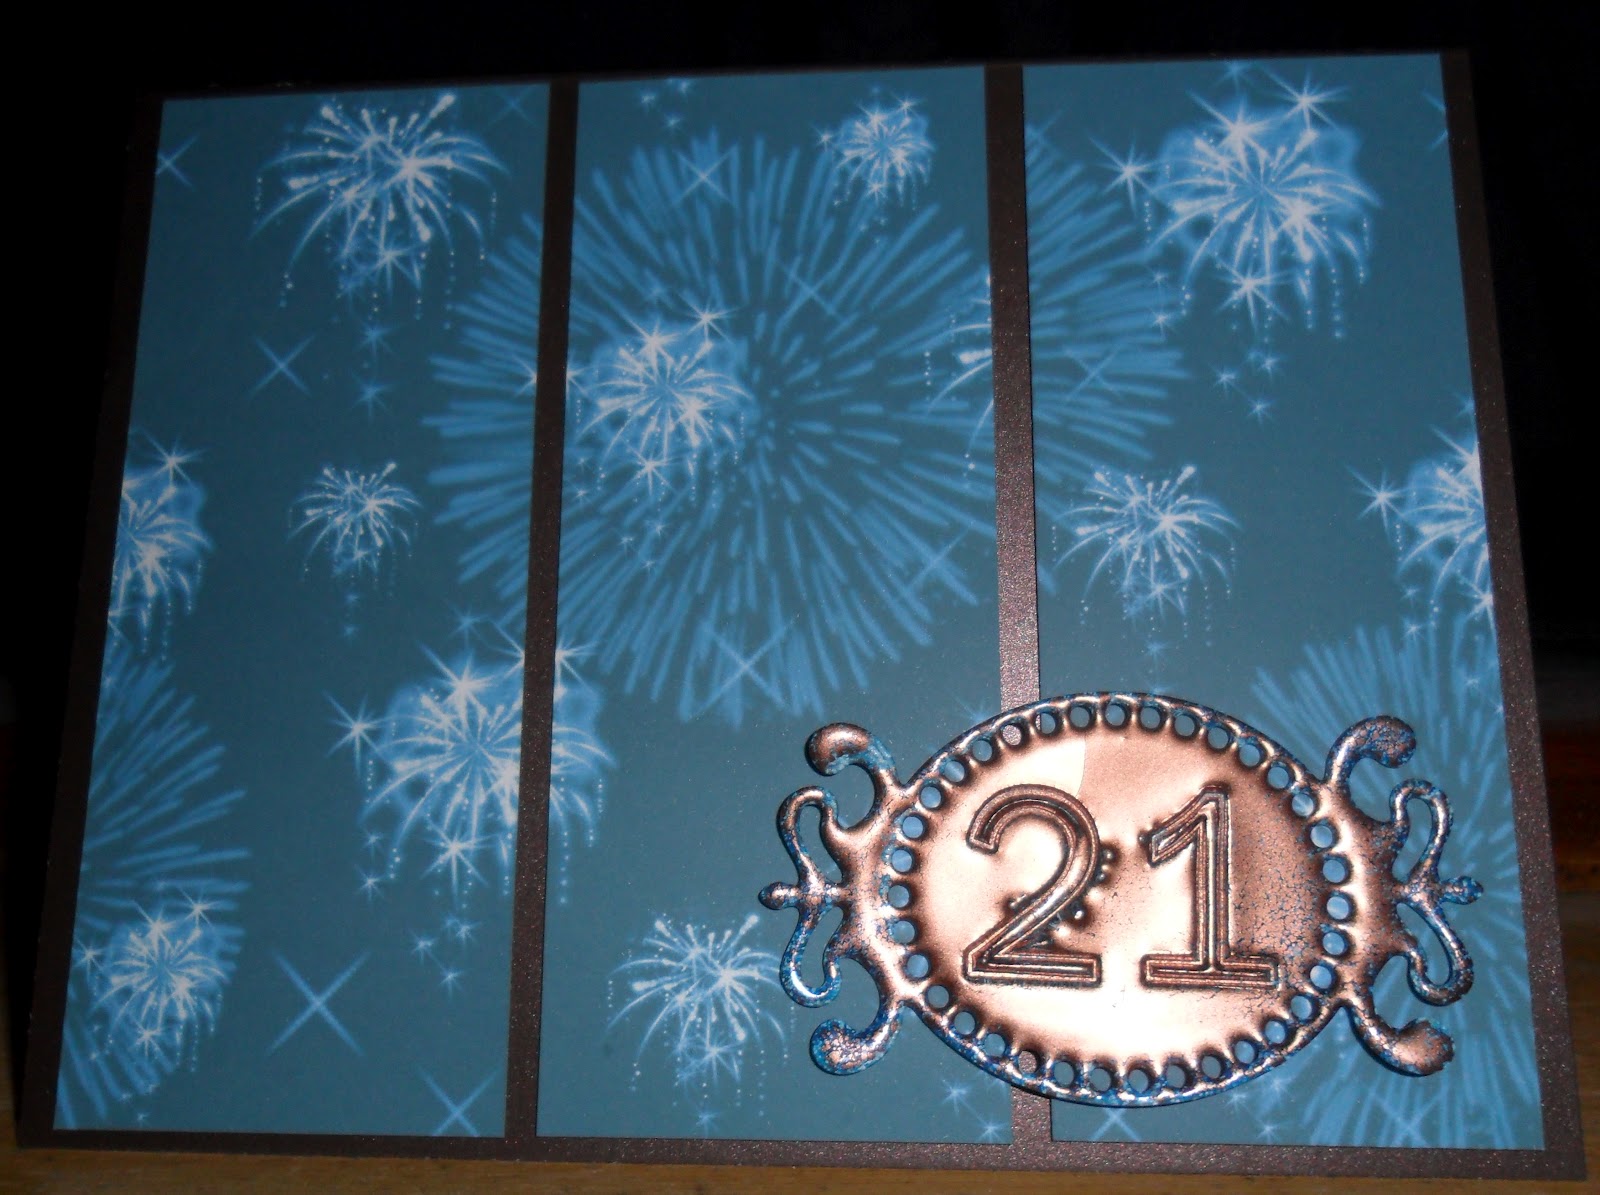
This could be a new technique or a completely new craft.  Looking forward to seeing what you're all trying this week.  I gave Metal Magic a go and this was the result:-


I'll be honest and say that Debbie Moore does make it look incredibly easy on the TV.  It wasn't too hard but I did have a couple of goes before I was happy.  Top tip - die cut before using Metal Magic!

This is actually my first commissioned card.  My Mam asked me to make a card for my cousin's 21 birthday at the beginning of next month.  I know that she likes turquoise so I thought I would make that the focus of the card.  It was a stroke of luck really that I had some brown and turquoise Metal Magic powder to match. 


I die cut the shape using Spellbinders Fancy Tags Three and then covered entirely with Perfect Medium clear ink.  Once I had poured the Metal Magic over the shape, I carefully tipped the excess back into the pot.  It is important not to tap as the powder will simply fall off. 

Using my heat tool, I heated from the back and watched as the magic happened!  I did this same process a second time and then quickly stamped the numbers before it hardened.  The background paper is from Debbi Moore's Glitter and Glitz Paris Glamour CD-ROM.  I love Debbi Moore's ranges - very glitzy and so elegant.  I've got lots of ideas for cards, I just need a few more days in the week!  I cut the paper into three using my Tonic guillotine and attached with foam tape.

Happy Crafting
Rachel x

Wednesday, 8 February 2012

Love is in the air...

Judging by the number of entries for last week's challenge, you all love your digi images!  Great entries all round too.  Check out Fab'n'Funky Challenges for the winners and our latest challenge.  Its a good un!

And without further ado lets get onto the next challenge:-

Love is in the air...

The DT had two great images from our sponsor Phindy's Place to play with and they were utterly adorable.  Here is my take on the theme:-


The card blank is actually made from Core'dinations.  I wasn't sure if this would be strong enough but it has stood up to four layers of foam tape!  Yes, I think I went a bit mad!  This is also my first attempt at blonde hair!  I think some extra practise is in order!  Maybe about half way there!  I used Promarkers in almond, blush and rose pink (skin), primrose, ivory and lemon (hair), cobalt blue and indigo blue (dress) and amethyst (top, leggings and shoes).  I also used a new technique for the heart and dug out my bottle of Glossy Accents.  I was really impressed with how easy this was to use.  The wings were sparkled with MCS glitter. 

I cut out the base for the image and the sentiment with Spellbinders Labels 20.  I added baker's twine tied in a knot near to the top edge of the card. The blue card is actually plain white card coloured with a Promarker in Indigo Blue to get the perfect colour match.  This is a really handy technique which I seem to be using more and more.  I embossed a piece of the same Core'dinations with a flowery Crafts Too embossing folder run through my Cuttlebug.  This was sanded to show the core colour.  The three pearls were from Create and Craft and came free when I bought a storage carousel.  Nothing better than something for free!

Happy crafting
Rachel x

Sunday, 5 February 2012

Turquoise, Brown and Cream

Second card of the day!  I love Sundays like these!  I saw that the Penny Black and More Allsorts challenge blog were doing a bit of bingo playing this month and thought I would join in the fun.  This is their bingo grid below:-


I chose the top line and went with a cream, brown and turquoise card. 


I've had this embossing folder for a few months and kept thinking of ideas but never really got round to making them.  Well, finally I have today.  I think this folder is just beautiful.  I ran it through my Cuttlebug with Core'dinations cardstock and then lightly sanded it.  I love having texture on my cards.  The ribbon around the bottom was actually rescued from the packaging of a pair of pyjamas.  I stamped the greeting with turquoise ink and matt and layered in the same colours I used for the base card. 

Happy crafting
Rachel x

Tatty Ted Likes Butterflies Too

Tatty Ted is so cute and I couldn't resist making this card for my friend's birthday next week.  Fingers crossed she doesn't decide to look up my blog before I give it to her! 


I designed the card using the DoCrafts Digital Designer (DD) software and the inspiration for the sketch was something I found a while ago on the internet.  I can't remember where I found it though.  I made sure I shadowed each layer to make them jump off the page.  Once I had printed and cut out the design, I attached three turquoise gems to the top corner.  Simples!

In case there are any other crafters who have had difficulty in printing their creations straight from the DD software, I thought I would share with you how I fixed this problem.  I exported the whole file as an image and saved it in my pictures directory.  Then I used the Windows print function, making sure to uncheck the fit picture to frame box.  The gave me a border around the card and I was able to print knowing that the image would be perfect.  My printer isn't the best but does have an option to print borderless.  However, this didn't work for the DD software.  Hope this can help anyone with the same problem.

Happy crafting
Rachel x

Wednesday, 1 February 2012

Rules Were Made To Be Broken!

It's that time of week again and what a great response to our last challenge over at Fab'n'Funky Challenges.  I loved using the stunning photo for inspiration and by the looks of things, everyone else was inspired too. 

This week's challenge is sponsored by the Stamp Fairy and the design team were lucky enough to have two lovely images to use.  Our theme for the challenge is:-

use a digi image

and this was the perfect match with our sponsor.  I chose the Nelly in Love digi and I think I'm in love! 


Rules were made to be broken as they say and I think this card fits the bill!  I coloured the image before choosing my papers and I've placed the topper in the centre of the card, ignoring the rule of thirds.  I hope it works though.

The base is green pearlescent card from Create and Craft which I used to cover the card blank.  The flowery paper came free with Issue 84 of Quick Cards Made Easy.  I did a faux stitching effect using the fine liner pen from the Promarkers.  This is the first time I used this technique and I'll definitely be trying it again.  The gingham paper was from my stash and I think it was originally bought from eBay.  I coloured the image with Promarkers in Forest Green, Rose Pink (dress), Walnut, Cinnamon, Henna (hair), Satin, Blush and Dusky Pink (skin).  The little images inside the heart were coloured with the Promarkers in Forest Green and Rose Pink and just stamped as normal using an acrylic block. 

I cut the pink heart using one of the X-Cut dies and was really impressed with the embossing result.  The flourishes were cut from Spellbinders Flourish Accents and Twisted Metal Tags and Accents.  I coloured the back of the large flourish with the Forest Green Promarker to get a perfect colour match.  The lovely image was cut using Spellbinders Labels H.  I also used this for the sentiment stamp.  I had a major tidy up of my stamp collection at the weekend.  Found a few that had been forgotten in the back of the drawer.  My project this year is to make my crafty space more user-friendly as I'm constantly looking for things that I know I've bought but have no idea where I've hidden! 

Happy crafting,
Rachel x

Saturday, 28 January 2012

Is That Really Me?!

It's hard to believe we were ever this small but here is the evidence to prove it!  I think I was about 18 months old in this photo and probably still mastering the whole walking thing.  Slow learner!


I designed this digital page using Serif Craft Artist Professional (CA).  It is an awesome piece of software and a must-have for every crafter.  I started off with a layout from the Botanique - Bumper Digikit and to be honest, I didn't even mean to craft this but once I had started I couldn't stop until it was finished!  The colours were very different but the basic layout is the same.  I recoloured the elements to match the photo.  Looking at it now I think it could have done with some more shadowing.  The journalling was a little tricky.  I really struggle with writing about myself.  Thankfully the photo did most of the talking!  Enjoy the rest of your weekends everyone.

Happy crafting.
Rachel x

Thursday, 26 January 2012

Get Ready Glasgow...

I'm coming!  Just booked my flight, accommodation and tickets for the Hobbycraft show at the SECC in March.  Can't wait!  Must save some pennies for all the lovely goodies I'm sure to find.  Just a shame the baggage allowance is only 20kg!  The last time I went to the Hobbycrafts show (in 2004 or maybe it was 2005!), my crafting left a lot to be desired.  I remember buying some lovely beads though and then just last year I did a jewellery making evening class.  The picture below is a set that I made using a purple and sparkle bead.
 

My Granny actually wore the set at my cousin's wedding in August.  It matched her outfit perfectly.  I've not been able to make much jewellery recently but I'm hoping to get some time next week.  We have an annual public holiday next Wednesday, after Up Helly Aa - I'll fill you all in on that next week!  Watch this space!

Happy Crafting.
Rachel x

Wednesday, 25 January 2012

Photo Inspiration Challenge

Another week and another great challenge at Fab'n'Funky Challenges.  We are having a Photo Inspiration Challenge and what a photo!


I absolutely love it!  So, on to my card, I took inspiration from the colours used in the photo and also the butterfly. 


I began by embossing the front of the card using my Cuttlebug and the Swiss Dots embossing folder.  I coloured the three rows to the left with Promarkers in Rose Pink, Canary and Grass.  The black die cut is from Spellbinders Butterfly Circles and was cut and embossed with my Grand Calibur.  I used the Stamping Up! Embosslits to cut the butterflies and then sanded them with my sanding block.  The coloured card was originally bought from Create and Craft TV and I have used it in many projects.

The sentiment was computer generated as I didn't have a stamp for this greeting.  I made this card for my friend Katie-Ann who is recovering from having her wisdom teeth removed.  Ouch!  She was really dreading it so I hope this cheers her up.  I cut the greeting with another of the Spellbinders Butterfly Circles dies.  This set is truly beautiful and if it is possible to have favourites this is definitely in my Top 3!

Happy Crafting,
Rachel x 

Wednesday, 18 January 2012

Two Little Birdies

It's that time of the week again - another great challenge from Fab'n'Funky Challenges.  For the challenge this week we are playing bingo


I went for the top line - Handmade embellishment, Digi Image and 2 different papers.  


I used a black, white and grey stripey paper from a selection designed by Anna Stemplewska.  The designer papers are very usable and I just couldn't resist so I bought one in every colour!  Of course I used my favourite silver mirri-paper to layer the computer generated sentiment and the base layer. 

The doily started off as plain white but I couloured it with my Promarkers in Cerise and Cyan to match the colourings on the digi image, which is from one of our Challenge Sponsors.  Check out their amazing designs here.  To make the concertina folds, I cut the doily in half and then folded from the centre out to each end.  I also coloured the tops of the hat pins with the same Promarker colours.  I used the Spellbinders Labels Four to cut out the digi image.

The flowers were made from die cuts.  I used my DoCrafts flower die which I won in July last year as part of the Creativity Club Prize Draw.  I made two large flowers and a small one but they were too big so I switched it to three small flowers.  To get the perfect colour match I actually coloured a piece of super smooth paper with the Promarkers and then cut four of each colour for the pink and blue flowers.   The middle flower is made from the stripey designer paper.

Hope you can join us this week for a game of bingo.

Happy crafting,
Rachel x