Word Verification is GONE! I tried for about an hour the other day to get it turned off but the option was just nowhere to be found. Looked just now and it had magically appeared. If anyone else would like to turn theirs off, here is the route:-
Settings
Posts and Comments
Word Verification
No/Off
I would like to say a huge thank you to everyone who takes the time to comment on my posts. It really means a lot. I hope I will get more commenting done soon.
Happy crafting and commenting,
Rachel x

Wednesday, 21 March 2012

Fab'n'Funky Challenge #113 - Honour your Mum
What a lucky DT we were last week with all of your wonderful entries. Green was a popular choice but the Irish themed cards were great. Check out the Fab'n'Funky Challenge Blog to see if you were our lucky winner.
This week we have chosen to celebrate Mother's Day and our theme is...
Our wonderful sponsor Doodle Pantry gave the DT some super images to use and this is my make...

What a cute little birdie! This is my first straight easel card as I've only ever made twisted easels in the past. I covered the inside and front with paper from DCWV and then cut the edge of the front using the Spellbinders Classic Ric Rac die. I held the die almost a centimetre above the edge and then used my Quickie Glue Pen to add glitter. I used Diamond Sparkles in Butterfly Kisses.

The birdie was coloured with Promarkers in Cyan, Grass and Bright Orange. I mounted the image into plain white card and then orange Core'dinations and distressed the edge with my new Tim Holtz Paper Distresser. The sentiment is computer generated and mounted with foam tape using the Spellbinders Classic Diamonds to match the main image. I added three co-ordinating flowers that I recently bought from eBay to finish it off and add another girly touch.
Hope all the yummy mummies out there had a great Mother's Day. I spent most of the day at my parents house and had a lovely meal and a good giggle with my Mam.
If anyone was watching Create and Craft on Saturday morning during the 11am show, you might have heard Martyn read out my email. I asked if he could wish my Mam a happy Mother's Day and he did a splendid job. She was bowled over! Next thing I knew my email had been pulled out of the cup of chance and I won the beautiful card that Tina Cox (parchment guru!) made during the show.
Anyway enough of my ramblings! Enjoy your week everyone.
Happy crafting,
Rachel x
This week we have chosen to celebrate Mother's Day and our theme is...
Honour Your Mum
Our wonderful sponsor Doodle Pantry gave the DT some super images to use and this is my make...

What a cute little birdie! This is my first straight easel card as I've only ever made twisted easels in the past. I covered the inside and front with paper from DCWV and then cut the edge of the front using the Spellbinders Classic Ric Rac die. I held the die almost a centimetre above the edge and then used my Quickie Glue Pen to add glitter. I used Diamond Sparkles in Butterfly Kisses.

The birdie was coloured with Promarkers in Cyan, Grass and Bright Orange. I mounted the image into plain white card and then orange Core'dinations and distressed the edge with my new Tim Holtz Paper Distresser. The sentiment is computer generated and mounted with foam tape using the Spellbinders Classic Diamonds to match the main image. I added three co-ordinating flowers that I recently bought from eBay to finish it off and add another girly touch.
Hope all the yummy mummies out there had a great Mother's Day. I spent most of the day at my parents house and had a lovely meal and a good giggle with my Mam.
If anyone was watching Create and Craft on Saturday morning during the 11am show, you might have heard Martyn read out my email. I asked if he could wish my Mam a happy Mother's Day and he did a splendid job. She was bowled over! Next thing I knew my email had been pulled out of the cup of chance and I won the beautiful card that Tina Cox (parchment guru!) made during the show.
Anyway enough of my ramblings! Enjoy your week everyone.
Happy crafting,
Rachel x
Sunday, 18 March 2012
What a Blast!
A couple of months ago I mentioned that I was heading to Glasgow this month for the Hobbycrafts and Creative Stitches show. Well that was last weekend and I think I've just about recovered from all the shopping now! As we don't have much in the way of shopping here, when I get let loose on the big smoke I tend to make the most of it! My luggage was actually 5kg over the weight restriction coming back and from this photo you might see why!
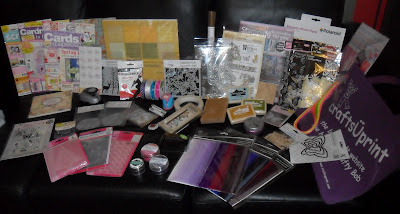

I went with my Mam and we had such a good weekend. We also managed to fit in a bit of shopping on Argyle Street and Sauchiehall Street too! It's no wonder my bag was overweight! Whilst we were there I also had my final bridesmaid dress fitting. The wedding is on 20 April and time sure is marching on! Look out for a post about the wedding invites soon. Now that have gone out I can share them with you all.
Did anyone else make it to the show in Glasgow? The place certainly was packed. We managed to catch a bit of the fashion show on Saturday afternoon in the Creative Stitches hall. Some of the pieces, especially those inspired by the 1950s were really great. Others weren't really my taste but very creative.
I'm itching to get back down for the next one and have suggested that we make another trip in October for the Christmas version of the show but Mam isn't commiting just yet!
Happy crafting
Rachel x
Wednesday, 14 March 2012
Fab'n'Funky Challenge #112 - The Luck of the Irish
Thanks to everyone who took part in our last challenge. There are a lot of yellow fans out there and who knew there were so many shades! We loved your varied yellow themed entries. Pop over to the Fab'n'Funky Challenge Blog to see if you were our lucky winner.
Since it's almost St Patrick's Day, the theme for this week is...


Since it's almost St Patrick's Day, the theme for this week is...
The Luck of the Irish
We also have Nitwits as our fabulous sponsor. So come on, join in the fun!

As you'll see from my card, I've gone for the colours of the Irish flag as my inspiration and I'm sure those little girls have the luck of the Irish being able to play outside! I designed the background and faux matting and layering in Serif's Craft Artist Professional. I picked the two contrasting patterned papers for the "flag" to give a bit of interest and also to make it more girly. The main image is a freebie from the Free Vintage Digi Stamps Blog. I just came across this blog recently and totally by accident. I love this image as it could be used for so many different occassions.
I haven't used Flower Soft before but those with a keen crafty eye will see some on the leaves of the tree.

I used the glue that came with the Flower Soft set and it was really easy once I realised I was being too careful with it! I printed the sentiment out from the software and simply cut this with scissors. The good old fashioned way! The layers are all mounted with foam tape or foam pads.
Happy crafting,
Rachel x
Wednesday, 7 March 2012
Fab'n'Funky Challenge #111 - Mellow Yellow
What a lot of leaping we were all doing last week! Check out the Fab'n'Funky Challenge blog to see if you were our winner. Great entries all round.
This week we are celebrating St David's Day. So our theme is aptly named:-
We were given some lovely digi images by our sponsors:-

and this is my creation:-

The yellow card hasn't show up very yellowy in the photo but it is definitely YELLOW! I used the Spellbinders Grand Labels Eleven to make a card blank and then cut a piece of yellow card two sizes smaller to match. I wrapped yellow and white baker's twine around and secured with sticky tape. This layer was then mounted using foam tape. I coloured my image with Promarkers but forgot to write them all down for you. Must remember to do that next time!
The three circles were cut using my X-Cut circle dies. To achieve the green, I coloured a piece of paper with the same Promarker used for the flower stem and then ran it through my Grand Calibur to cut and emboss the shape. I can't remember where the sentiment stamps came from but they have been invaluable.
Top Tip for Newbie Crafters - invest in a set of varied sentiment stamps in a range of sizes. Consider generic sentiments such as "Thinking of You" which can be used for a wide range of occasions, for both male and female projects.
Happy crafting,
Rachel x
This week we are celebrating St David's Day. So our theme is aptly named:-
Mellow Yellow
We were given some lovely digi images by our sponsors:-
and this is my creation:-

The yellow card hasn't show up very yellowy in the photo but it is definitely YELLOW! I used the Spellbinders Grand Labels Eleven to make a card blank and then cut a piece of yellow card two sizes smaller to match. I wrapped yellow and white baker's twine around and secured with sticky tape. This layer was then mounted using foam tape. I coloured my image with Promarkers but forgot to write them all down for you. Must remember to do that next time!
The three circles were cut using my X-Cut circle dies. To achieve the green, I coloured a piece of paper with the same Promarker used for the flower stem and then ran it through my Grand Calibur to cut and emboss the shape. I can't remember where the sentiment stamps came from but they have been invaluable.
Top Tip for Newbie Crafters - invest in a set of varied sentiment stamps in a range of sizes. Consider generic sentiments such as "Thinking of You" which can be used for a wide range of occasions, for both male and female projects.
Happy crafting,
Rachel x
Wednesday, 29 February 2012
I'm a Candy Winner!
Yip, I won some lovely candy and not just from anyone but from the Cardmaker of the Year 2011! I noticed Sharon Callis had a giveaway for some Oriental stamps and papers and I thought I would give it a go! Sharon has wonderful card ideas and makes a mean Cricut card! Here is a picture of my winnings and the lovely handmade card from Sharon:-

The stamps are great and I had been looking for a set with lanterns for a while. The papers are actually foiled vellums and every design is just stunning. Can't wait to use them on a card. Here is a close-up of Sharon's lovely card:-


The stamps are great and I had been looking for a set with lanterns for a while. The papers are actually foiled vellums and every design is just stunning. Can't wait to use them on a card. Here is a close-up of Sharon's lovely card:-

Isn't he cute? Such a lovely thought.
So, if you are thinking to enter any candy giveaways, just give it a go!
Happy crafting,
Rachel x
Black and Gold Birthday
Another day, another card! This one was made in my lunch hour! Been so busy recently and the time has just flown so when my Mam's birthday rolled around this Tues I was a little behind in my cardmaking. I'm planning something rather spectacular for Mother's Day though so keep your eyes peeled!

I stated with an A4 sheet of card and scored it in half with my Ultimate Pro. I'm not sure how I ever made a card without it. Then I covered with the gold and black paper which I printed from Debbi Moore's Glamour and Glitz New York CD-ROM. I cut out the decopage image a couple of weeks ago and was surprised at how easy the layers were to cut out. I used mounting foam to give the layers some dimension.
The sentiment tag was made with the Spellbinders Ribbon Banners covered in Perfect Medium ink and then dusted with Metal Magic. I did two layers and then added a gold peel off. It hasn't shown up very well in the photo and now that the card is sitting on the mantelpiece at my parents house, taking a close-up won't be so easy! When I get one, I'll add it to this post though.
Happy crafting,
Rachel x
Challenge #110 - Leap into action...
We loved looking through your entries for the Green, White and Blue challenge last week over at Fab'n'Funky Challenges. Who knew there were so many shades of green and blue! Thanks to everyone who entered. Pop over to the blog to see if you were our lucky winner.
As most of you will know, we have an extra day this month, making 2012 a Leap Year! The theme this week is based around this and we want you to...
You can choose anything that leaps or jumps and this theme is perfect to let your creative juices flow and see what you end up creating. The lucky winner will receive crafty goodness from Joanna Sheen.
I have chosen a frog and here is my card:-

As most of you will know, we have an extra day this month, making 2012 a Leap Year! The theme this week is based around this and we want you to...
Leap into Action
You can choose anything that leaps or jumps and this theme is perfect to let your creative juices flow and see what you end up creating. The lucky winner will receive crafty goodness from Joanna Sheen.
I have chosen a frog and here is my card:-

Now, I know what you're thinking - "Last week was green, white and blue!" Well, I didn't set out to make a card with these colours but this is how it turned out and I kinda like it! I cut a piece of the Anna Stemplewska black and white dotty paper and attached with double sided sticky tape.
To get the water effect, I crumpled up a piece of copy paper and then inked up my speedball brayer in Big and Juicy Waterfall and ran it over the crumpled paper. Then I bayered over the bottom part of the card. I waited a little while to let the ink dry and then put the top half of the card inside the Happy Birthday embossing folder and passed it through my Cuttlebug. I attached this with foam tape. The frog was cut with my Cricut Expression 2 from the Paisley cartridge and added using foam pads. I coloured the American seam binding with my Cyan Promarker.
Hope this challenge does send you all hopping mad!
Happy crafting,
Rachel x
Wednesday, 22 February 2012
Challenge #109 - Green, White and Blue
What a great response to our 'Try Something New' challenge last week at Fab'n'Funky Challenges. So many ideas and a wide range of techniques and projects to tickle our fancy! Check out the blog to see the lucky winner.
Challenge 109 is well and truly here and it's a colour combo challenge. We've chosen...
A great, fresh colour combo and open to so many possibilities. This is my version:-

This was make it and see card! I started with the digi image, courtesy of Bugaboo Stamps who are our great sponsor this week. I cut the image out using Spellbinders Grand Labels Twenty Three and then inked the edges with Tim Holtz Distress Ink in Bundled Sage. The green heart background cardstock started out as black and white but I rubbed the surface with the same Bundled Sage Distress Ink and changed it to green. I dabbed all over with a piece of kitchen roll to give a nice textured look. I was really pleased with the vibrancy of the colour. To make the blue background paper, I took a photo of the green cardstock and used the My Craft Studio software to find a blue tone that complimented. I set the canvas to this colour and then simply printed onto Super Smooth paper. The lace was bought from my local craft shop, Nimble Fingers.

I made the rosette by taking a piece of white cardstock and pressing it into the Bundled Sage Distress Ink and then scored using two of the score lines on the Ultimate Pro (tri-fold A4 and half fold A5). I glued with Pinflair Glue Gel and used my Cuttlebug to hold in place. I punched the heart from the same blue background paper and attached with more glue gel. Every layer is attached using mounting foam. I really love using the foam as it gives dimension and is really easy to use. Finally I added some MCS glitter to the butterfly trails with a Quickie Glue Pen.
I would like to enter this card into Sketch Saturday's Challenge #195.
I hope you can join us for this colour combo challenge and look forward to seeing all of your entries.
Happy crafting,
Rachel x
Challenge 109 is well and truly here and it's a colour combo challenge. We've chosen...
Green, White and Blue
A great, fresh colour combo and open to so many possibilities. This is my version:-

This was make it and see card! I started with the digi image, courtesy of Bugaboo Stamps who are our great sponsor this week. I cut the image out using Spellbinders Grand Labels Twenty Three and then inked the edges with Tim Holtz Distress Ink in Bundled Sage. The green heart background cardstock started out as black and white but I rubbed the surface with the same Bundled Sage Distress Ink and changed it to green. I dabbed all over with a piece of kitchen roll to give a nice textured look. I was really pleased with the vibrancy of the colour. To make the blue background paper, I took a photo of the green cardstock and used the My Craft Studio software to find a blue tone that complimented. I set the canvas to this colour and then simply printed onto Super Smooth paper. The lace was bought from my local craft shop, Nimble Fingers.

I made the rosette by taking a piece of white cardstock and pressing it into the Bundled Sage Distress Ink and then scored using two of the score lines on the Ultimate Pro (tri-fold A4 and half fold A5). I glued with Pinflair Glue Gel and used my Cuttlebug to hold in place. I punched the heart from the same blue background paper and attached with more glue gel. Every layer is attached using mounting foam. I really love using the foam as it gives dimension and is really easy to use. Finally I added some MCS glitter to the butterfly trails with a Quickie Glue Pen.
I would like to enter this card into Sketch Saturday's Challenge #195.
I hope you can join us for this colour combo challenge and look forward to seeing all of your entries.
Happy crafting,
Rachel x
Saturday, 18 February 2012
Say it with an Umbrella!
I saw loads of great digi images on the D'Arcy's Diaries blog and they brought so many ideas to mind that I couldn't resist snapping them up. This card is made using the 'Under my Umbrella' image. It was really easy to colour as the shading was a great help. I'm not too confident with my colouring yet but practice makes perfect as they say.

I mat and layered some silver mirri-paper and then made my own background paper using stamps from the Stampin' Up! Artistic Etchings set. I originally planned to include an Eiffel Tower but this will just have to be saved for another card. The black flourish borders were cut from the Spellbinders Parisian Accents and I attached them with Cosmic Shimmer glue.

I coloured the image with Promarkers in:-
Almond and Blush (skin)
Cinnamon and Henna (hair)
Black, Cool Grey 4, Rose Pink, Blossom and Cerise (dress and boots)
Rose Pink and Blossom (umbrella).
I also coloured a length of American seam binding with the Rose Pink Promarker to match and tied the bow by hand. The flowers were from a selection from 3Birds. I used brads in the centre and then attached using super sticky tape. I didn't want the back of the brad showing on the inside of the card.
The sentiment was cut out using Spellbinders Labels Four Small. I inked the edges of the sentiment and image tags with the same ink used for the sentiment. I used the Debbi Moore foam applicator block which came with the first edition of her stamping techniques magazine.

I would like to enter this card into the following challenges:-
Allsorts Challenge Blog - Anything Goes
Secret Crafter Saturday Challenge - Bingo (Brads, Flowers and Bow)
Sarah Hurley Challenge Blog - Die-Cuts
Happy crafting,
Rachel x
Subscribe to:
Posts (Atom)