Hi Everyone,
I have my first showcase post on the Hope and Chances blog today. I'm still amazed I made it onto the team. A dream come true!
I used the Spellbinders Holly Tags set which is lovely and so versatile. You can find this set in the Hope and Chances Creativity store here. They have great offers on Spellbinders and other crafty goodies too. I used the oval tag for this card:-
I started with a 7" card blank and layered up a piece of red Core'dinations cardstock. My patterned paper is from Craftwork Cards and I edged with Pebeo gold gilding wax. My three layers are made up of a banner using Spellbinders Holiday Magic M-Bossabilities folder in red with gold gilding wax applied. The gold card has been stamped with a JustRite Holly Background stamp in Tim Holtz Distress Ink - Mowed Lawn. My third layer is a piece of green ribbon with a gold interference.
For my main sentiment topper, I started with 300gsm white card and die cut and embossed the oval holly tag from Spellbinders. I added gold gilding wax again to the embossed sections by stenciling through the die. I stamped the sentiment in the same Distress Ink to give a lovely bright focal point and added dimension with 3D foam pads.
Looking forward to sharing more projects with my favourite crafty brand. Keep a look out at the Hope and Chances blog.
Happy Crafting,
Rachel x
Followers
Showing posts with label Coredinations. Show all posts
Thursday, 8 October 2015
Monday, 28 April 2014
Get Krafty with JustRite
Hi Everyone,
Long time, no blog! I have been pottering away at times but the crafting is taking a back seat the moment. However, I have been playing with my new Spellbinders products (I couldn't resist!) and the card I have for you today features one of the new 3D embossing folders paired with JustRite Stamps.
I started by making a card blank from kraft card. My main image was created with the Ornate Labels One embossing folder. I inked up the folder with Versamark before adding a piece of bright green Coredinations cardstock and running through the Grand Calibur. Next, I poured gold embossing powder over the top and heat embossed. I really like the effect and the way the intricate detail at the bottom has been picked up. Love this folder!
I distressed the edges of the layer and card with the Tim Holtz Paper Distressing Tool. My topper was cut with Spellbinders Labels One and my sentiment stamp is from the All in the Family Large Sentiments set by JustRite. I also used the gold detail powder here. My butterfly came from the Fleur De Lis Labels Twenty set. I stamped it onto the same Coredinations cardstock and then fussy cut with scissors.
I would like to enter this card into the following challenge:
JustRite Friday Challenge #119 - Get Krafty
Happy crafting,
Rachel x
Long time, no blog! I have been pottering away at times but the crafting is taking a back seat the moment. However, I have been playing with my new Spellbinders products (I couldn't resist!) and the card I have for you today features one of the new 3D embossing folders paired with JustRite Stamps.
I started by making a card blank from kraft card. My main image was created with the Ornate Labels One embossing folder. I inked up the folder with Versamark before adding a piece of bright green Coredinations cardstock and running through the Grand Calibur. Next, I poured gold embossing powder over the top and heat embossed. I really like the effect and the way the intricate detail at the bottom has been picked up. Love this folder!
I distressed the edges of the layer and card with the Tim Holtz Paper Distressing Tool. My topper was cut with Spellbinders Labels One and my sentiment stamp is from the All in the Family Large Sentiments set by JustRite. I also used the gold detail powder here. My butterfly came from the Fleur De Lis Labels Twenty set. I stamped it onto the same Coredinations cardstock and then fussy cut with scissors.
I would like to enter this card into the following challenge:
JustRite Friday Challenge #119 - Get Krafty
Happy crafting,
Rachel x
Wednesday, 11 December 2013
Fab'n'Funky #197 - Snowflakes
Good Morning Crafters,
We are back with a brand new challenge for you at Fab'n'Funky Challenges today and I am your host but first, we had a fantastic response to last week's "A Touch of Frost" challenge. Thank you to everyone who entered their wonderful creations.
Now, without further ado let me introduce my chosen challenge for this week:-
Snowflakes
I'm sure this doesn't need any explanation and we can't wait to see what you all create.
Our lovely sponsor this week is StampArt Design by Kathryne
Prize: 5 Digis and A GDT spot
The DT are so lucky to be able to work with images from StampArt Design by Kathryne. I chose to use a bonus sentiment that comes with the Alannah image. You can find it here.
I started with a piece of Coredinations cardstock and ran this through an embossing folder (sorry, I don't know the brand). I used the Crafter's Companion Sand It Accessory Pack to sand the snowflakes. I matted this onto red Coredinations cardstock and then onto a handmade cardblank.
My main image was printed on Super Smooth paper and then coloured with ProMarkers in Apple Green, Lemon, Sleigh Bell, Ruby and Cocoa. I cut it out with Spellbinders Labels Thirty One.
I added some MCS glitter to the edges of the die cuts with a Quickie Glue Pen. The snowflakes are a combination of Spellbinders and Crafter's Companion. They were actually cut out with wax paper. I finished off with a Creative Expressions pearl.
I really hope you can join us for our Snowflake challenge. This will actually be my last challenge at Fab'n'Funky. I'm really sad to leave and wish all my teamies the very best.
Happy crafting,
Rachel x
Wednesday, 27 November 2013
Fab'n'Funky Challenges #195 - Cute Critters
Hello Crafters,
Well after the excitement of our birthday celebrations at Fab'n'Funky Challenges, we would like to say THANK YOU to everyone who entered a card or project during the fortnight of Anything Goes. We had a lot of fun checking out the entries. The winners are all on the blog now so be our guest and take a peek!
The show must go on as they say and we are back with another great challenge. Ginny is our talented host and she has chosen a theme for all the animal lovers!
Well after the excitement of our birthday celebrations at Fab'n'Funky Challenges, we would like to say THANK YOU to everyone who entered a card or project during the fortnight of Anything Goes. We had a lot of fun checking out the entries. The winners are all on the blog now so be our guest and take a peek!
The show must go on as they say and we are back with another great challenge. Ginny is our talented host and she has chosen a theme for all the animal lovers!
CUTE CRITTERS
We would like to see animals on your projects - the cuter the better!
Our sponsor this week is the fabulous:-

Who are offering a fab prize of a $10 voucher to spend in
The StampFairy shop
I've mixed it up a bit this week! I haven't made a card but a hanger. When I saw this super cute image called Monkeys Bananas 1 from StampFairy I just knew it would be perfect for my cousin's little boy. My cousin would never be without her cuddly monkey when we were young so this totally fitted the bill for her son!
I started with my image and coloured him using ProMarkers in Summer Sun, Lemon, Primrose, Sand Dune, Cocoa, Cinnamon, March Hare and I dotted the Blender pen for texture. I cut out my image using Spellbinders Labels One and also cut one of these in kraft card. I used my guillotine to slice this in half and then punched two holes in each piece and four in my topper. I threaded the baker's twine through the three sections and secured in place with Cosmic Shimmer glue. The letters were cut out using Spellbinders Alphabet set and inked with Vintage Photo Distress Ink. The yellow card is Coredinations. Finally, I added my stars which came from American Crafts.
Here is a close up of the cute little guy!
I really hope you can join us for our Cute Critters challenge this week at Fab'n'Funky Challenges.
Happy crafting,
Rachel x
Saturday, 23 November 2013
Fab'n'Funky Challenges #194 - Birthday Challenge Reminder (Anything Goes)
Morning!
We are still celebrating turning 4 at Fab'n'Funky and the DT are back with more inspiration for our Anything Goes challenge. If you haven't done so already, head on over to the Fab'n'Funky Challenges blog to see our brilliant sponsors and what the team have created for you this time.
The challenge this week continues to be about as easy as it can get!
Anything Goes
Anything Goes
So play along! It may be you who will win one of the Prizes that we have on offer for you:
Our wonderful sponsors
and
Prizes
and
Prizes
Hello! My name is Joanna Munster, owner/designer/illustrator of Inspired by Stamping. I started crafting 12 1/2 years ago when I started capturing my daughter’s special moments with scrapbooking. I quickly fell in love with all things crafty including cross stitch, crocheting, knitting, drawing, jewelry making but my love has always been towards the paper crafty industry. It is a place where I can lose myself in creating for hours.
Three years ago, my hubby, myself and our three children moved from the United States to Australia. While waiting for my working visa, I started drawing and paper crafting full time with my blog. One of my dear friends suggested that I make a stamp set with one of my drawings and this is where Inspired by Stamping started.
We love every moment of working in this industry from the beautiful women and men that we meet daily, to the amazing and creative designs that we see when a friend uses an Inspired by Stamping set.
You as our customer will ALWAYS be our top priority! If you have any questions or if something is not right, please let us know. We will get back to you ASAP! Our email is customerservice@inspiredbystamping.com

Prize is 3 digis of the winner's choice
Prize - 5 digis of the winners Choice
- and a GDT spot at Fab'n'Funky Challenges
Prize is a class of the winner's choice
Prize is 3 digis of the winner's choice

Prize is 3 images of the winner's choice from the Lacy Sunshine Shop
For this reminder post I chose to use a Lili of the Valley image. I have loads of their gorgeous stamps but I decided to try out one of the new Art Pads. I chose a cute baby image from Art Pad 11 as my friend had a little boy on Tuesday. Well, maybe not so little at 8lb 10oz! Here is my card:
I started with an 8" cardblank and embossed the front using Sue Wilson's Basket Weave folder. I covered in Tim Holtz Distress Ink in Orange Marmalade. My topper, DCWV patterned paper and Coredinations were layered onto kraft card with my Perfect Layers tools. I inked around the edge of the main topper with the same Distress Ink and then used a micron pen to draw the faux stitching.
My sentiment banner was cut using Spellbinders Tags and Banners and I inked with is the Orange Marmalade DI too. I attached this and the topper with foam pads. My finishing touch was the wooden heart which came from American Crafts.
I really hope you can join in and party by linking up to Fab'n'Funky this week. You have until 8pm (UK time) on Tuesday 26 November. You've got to be in it to win it!
Happy crafting,
Rachel x
Saturday, 16 November 2013
Fab'n'Funky Challenges #193 Reminder - It's Our Birthday (Anything Goes)
Hi All,
We are back at Fab'n'Funky Challenges with our mid-way reminder for our Anything Goes challenge to celebrate turning 4 years old. What a fantastic response so far and thank you to everyone who has linked up and/or left us a comment. We feel very blessed.
Now for a quick reminder of the brilliant sponsors this week

Prize - 5 digis of the winers Choice - and a GDT spot at Fab'n'Funky Challenges
.jpg)
The first South African online digital image store was launched in 2010 – Digistamps4Joy (or DS4J)http://www.digistamps4joy.co.za/eshop/ . In February 2012, Margy Kieser took over ownership of DS4J, and there are now two South African artists who contribute to the more than 500 images available. Margy has taken the store to new heights and the store now stocks digis that are cute, whimsical, artistic, sometimes serious, and sometimes humorous. The store has PAYPAL and EFT (South African) facilities. Digistamps4Joy offers a monthly freebie on the first Friday of every month, and holds regular bi-weekly card challenges on our blog (http://digistamps4joy-sa.blogspot.com )that draw entries from many international card makers. Feel free to join us in our challenges!
- the prize is 5 images of the winners choice from DS4J shop

Prize is 3 images of the winners choice from the Lacy Sunshine Shop
Inky Impressions

prize is 3 digis of the winners choice
The fabulous Flonzcraft

prize - $20 voucher to spend in store - with free shipping!
I used a Digistamps for Joy (DS4J) image this time round called Welcome Home which I think is so pretty.
I made a kraft cardblank using Spellbinders Grand Labels One and then embossed some Tim Holtz Coredinations cardstock with the Spellbinders M-Bossabilities folder Twisted Hearts. I sanded this back to reveal the core. My ribbon is from The Ribbon Kings.
I coloured my image with ProMarkers in Marsh Green, Apple Cider, Dusky Rose, Budding Rose, Pale Pink, Cinnamon, Satin and Walnut. I used the Scalloped Labels One from Spellbinders to cut it out and then inked with Tim Holtz Distress Ink in Bundled Sage. I layered the image with kraft card and coredinations. My die cut words are from the Tattered Lace Sentimentals range. To finish I added three pearls to the top left corner.
Hope to see you at the Fab'n'Funky Anything Goes party!
Happy crafting,
Rachel x
We are back at Fab'n'Funky Challenges with our mid-way reminder for our Anything Goes challenge to celebrate turning 4 years old. What a fantastic response so far and thank you to everyone who has linked up and/or left us a comment. We feel very blessed.
Now for a quick reminder of the brilliant sponsors this week

Prize - 5 digis of the winers Choice - and a GDT spot at Fab'n'Funky Challenges
.jpg)
The first South African online digital image store was launched in 2010 – Digistamps4Joy (or DS4J)http://www.digistamps4joy.co.za/eshop/ . In February 2012, Margy Kieser took over ownership of DS4J, and there are now two South African artists who contribute to the more than 500 images available. Margy has taken the store to new heights and the store now stocks digis that are cute, whimsical, artistic, sometimes serious, and sometimes humorous. The store has PAYPAL and EFT (South African) facilities. Digistamps4Joy offers a monthly freebie on the first Friday of every month, and holds regular bi-weekly card challenges on our blog (http://digistamps4joy-sa.blogspot.com )that draw entries from many international card makers. Feel free to join us in our challenges!
- the prize is 5 images of the winners choice from DS4J shop

Prize is 3 images of the winners choice from the Lacy Sunshine Shop
Inky Impressions
prize is 3 digis of the winners choice
The fabulous Flonzcraft
prize - $20 voucher to spend in store - with free shipping!
I used a Digistamps for Joy (DS4J) image this time round called Welcome Home which I think is so pretty.
I made a kraft cardblank using Spellbinders Grand Labels One and then embossed some Tim Holtz Coredinations cardstock with the Spellbinders M-Bossabilities folder Twisted Hearts. I sanded this back to reveal the core. My ribbon is from The Ribbon Kings.
I coloured my image with ProMarkers in Marsh Green, Apple Cider, Dusky Rose, Budding Rose, Pale Pink, Cinnamon, Satin and Walnut. I used the Scalloped Labels One from Spellbinders to cut it out and then inked with Tim Holtz Distress Ink in Bundled Sage. I layered the image with kraft card and coredinations. My die cut words are from the Tattered Lace Sentimentals range. To finish I added three pearls to the top left corner.
Hope to see you at the Fab'n'Funky Anything Goes party!
Happy crafting,
Rachel x
Wednesday, 30 October 2013
Fab'n'Funky Challenges #191 - Halloween
Boo!
Can you tell that we are celebrating Halloween over at Fab'n'Funky Challenges this week?! Angelique is our very talented and kind host and you're going to be spooked by her chosen challenge...
It couldn't be simpler! Just make a Halloween themed project and link it up. We also have a brilliant sponsor this week too - Bugaboo Stamps.
They are offering 7 digis to the randomly chosen winner. So make sure you're in it to win it! I chose to use Magical Tidbits Bookshelf from Bugaboo and really love the versatility of this image.
I coloured my image with ProMarkers in Bright Orange, Soft Melba, Tropical Sunrise, Black, Forest Green, Apple Green, Green Shoot and all the Cool Greys. To get the shape, I used Spellbinders Labels Twenty Five and then created a faux layer by drawing around the die and cutting out with scissors.
My stripey paper is from Bo Bunny's Vicki B Collection. The black card is from Creative Expressions and I embossed it using an Embossalicious folder. To finish I added three green gems from Create and Craft which are a really light lime green but haven't shown up too well in the photo.
I really hope you'll come along to spook us this week at Fab'n'Funky Challenges.
Happy Crafting,
Rachel x
Can you tell that we are celebrating Halloween over at Fab'n'Funky Challenges this week?! Angelique is our very talented and kind host and you're going to be spooked by her chosen challenge...
Halloween
It couldn't be simpler! Just make a Halloween themed project and link it up. We also have a brilliant sponsor this week too - Bugaboo Stamps.
They are offering 7 digis to the randomly chosen winner. So make sure you're in it to win it! I chose to use Magical Tidbits Bookshelf from Bugaboo and really love the versatility of this image.
My stripey paper is from Bo Bunny's Vicki B Collection. The black card is from Creative Expressions and I embossed it using an Embossalicious folder. To finish I added three green gems from Create and Craft which are a really light lime green but haven't shown up too well in the photo.
I really hope you'll come along to spook us this week at Fab'n'Funky Challenges.
Happy Crafting,
Rachel x
Wednesday, 23 October 2013
Fab'n'Funky Challenges #190 - Distress
Hi Crafters,
I hope you've been crafting away, enjoying using all your stash. I've been in the kitchen instead of my crafty space - my friends and I started our annual Come Dine With Me last weekend and I was the first to host (things can only get better!). I'm not known for my culinary skills but it seemed to go down a treat!
We have a super new challenge for you over at Fab'n'Funky Challenges with the winners and Top 3 from last week's Spots and Stripes challenge having been announced. Take a peek at the blog to see if you were chosen.
For this week, the wonderful Beccy is our host and she has chosen a great challenge that I'm sure you're going to love.
I coloured my image with ProMarkers in Marsh Green, Fresh Meadow, Walnut, Cinnamon, March Hare, Satin, Rose Pink, Pink Mittens, Blush and Dusky Pink. To create the frame I cut out using Spellbinders Labels Twenty-Nine which I thought resembled an open book. So that it stood out I inked through the die with Tim Holtz Distress Ink in Bundled Sage.
My mat was created from a piece of Coredinations cardstock which is also what I used for the Eiffel Tower, sanding it back to reveal the core. This die came from the Spellbinders French Frills set. I already had the doily coloured using a ProMarker and it seemed to match so I just used it to save colouring another. I found the satin ribbon in my stash and I think it might have come from Create and Craft. My DP is from Wild Rose Studio's Letters from Paris set. It's a gorgeous collection of papers with a pink and green colour scheme. I distressed the layers with a pair of scissors because, of course, I couldn't find my Tim Holtz paper distresser when I needed it! Finally I finished with three square gems in the top right corner. I bought these from my local craft shop when they were reduced to £1. Bargain!
I hope you can join in our distressing this week at Fab'n'Funky Challenges.
Happy crafting,
Rachel x
I hope you've been crafting away, enjoying using all your stash. I've been in the kitchen instead of my crafty space - my friends and I started our annual Come Dine With Me last weekend and I was the first to host (things can only get better!). I'm not known for my culinary skills but it seemed to go down a treat!
We have a super new challenge for you over at Fab'n'Funky Challenges with the winners and Top 3 from last week's Spots and Stripes challenge having been announced. Take a peek at the blog to see if you were chosen.
For this week, the wonderful Beccy is our host and she has chosen a great challenge that I'm sure you're going to love.
Distress
I don't think this one needs any explaining! We also have two great sponsors this week - Flonzcraft and Lacy Sunshine. Both have fab prizes on offer for the random winners. Plus there will be a Top 3, as always.
I chose to use a Lacy Sunshine image, my first from this designer and I just fell in love with this Parisian image called Adele - Paris City Girl.
I coloured my image with ProMarkers in Marsh Green, Fresh Meadow, Walnut, Cinnamon, March Hare, Satin, Rose Pink, Pink Mittens, Blush and Dusky Pink. To create the frame I cut out using Spellbinders Labels Twenty-Nine which I thought resembled an open book. So that it stood out I inked through the die with Tim Holtz Distress Ink in Bundled Sage.
My mat was created from a piece of Coredinations cardstock which is also what I used for the Eiffel Tower, sanding it back to reveal the core. This die came from the Spellbinders French Frills set. I already had the doily coloured using a ProMarker and it seemed to match so I just used it to save colouring another. I found the satin ribbon in my stash and I think it might have come from Create and Craft. My DP is from Wild Rose Studio's Letters from Paris set. It's a gorgeous collection of papers with a pink and green colour scheme. I distressed the layers with a pair of scissors because, of course, I couldn't find my Tim Holtz paper distresser when I needed it! Finally I finished with three square gems in the top right corner. I bought these from my local craft shop when they were reduced to £1. Bargain!
I hope you can join in our distressing this week at Fab'n'Funky Challenges.
Happy crafting,
Rachel x
Sunday, 20 October 2013
Cabbage Rose Butterfly Card
Hi Everyone,
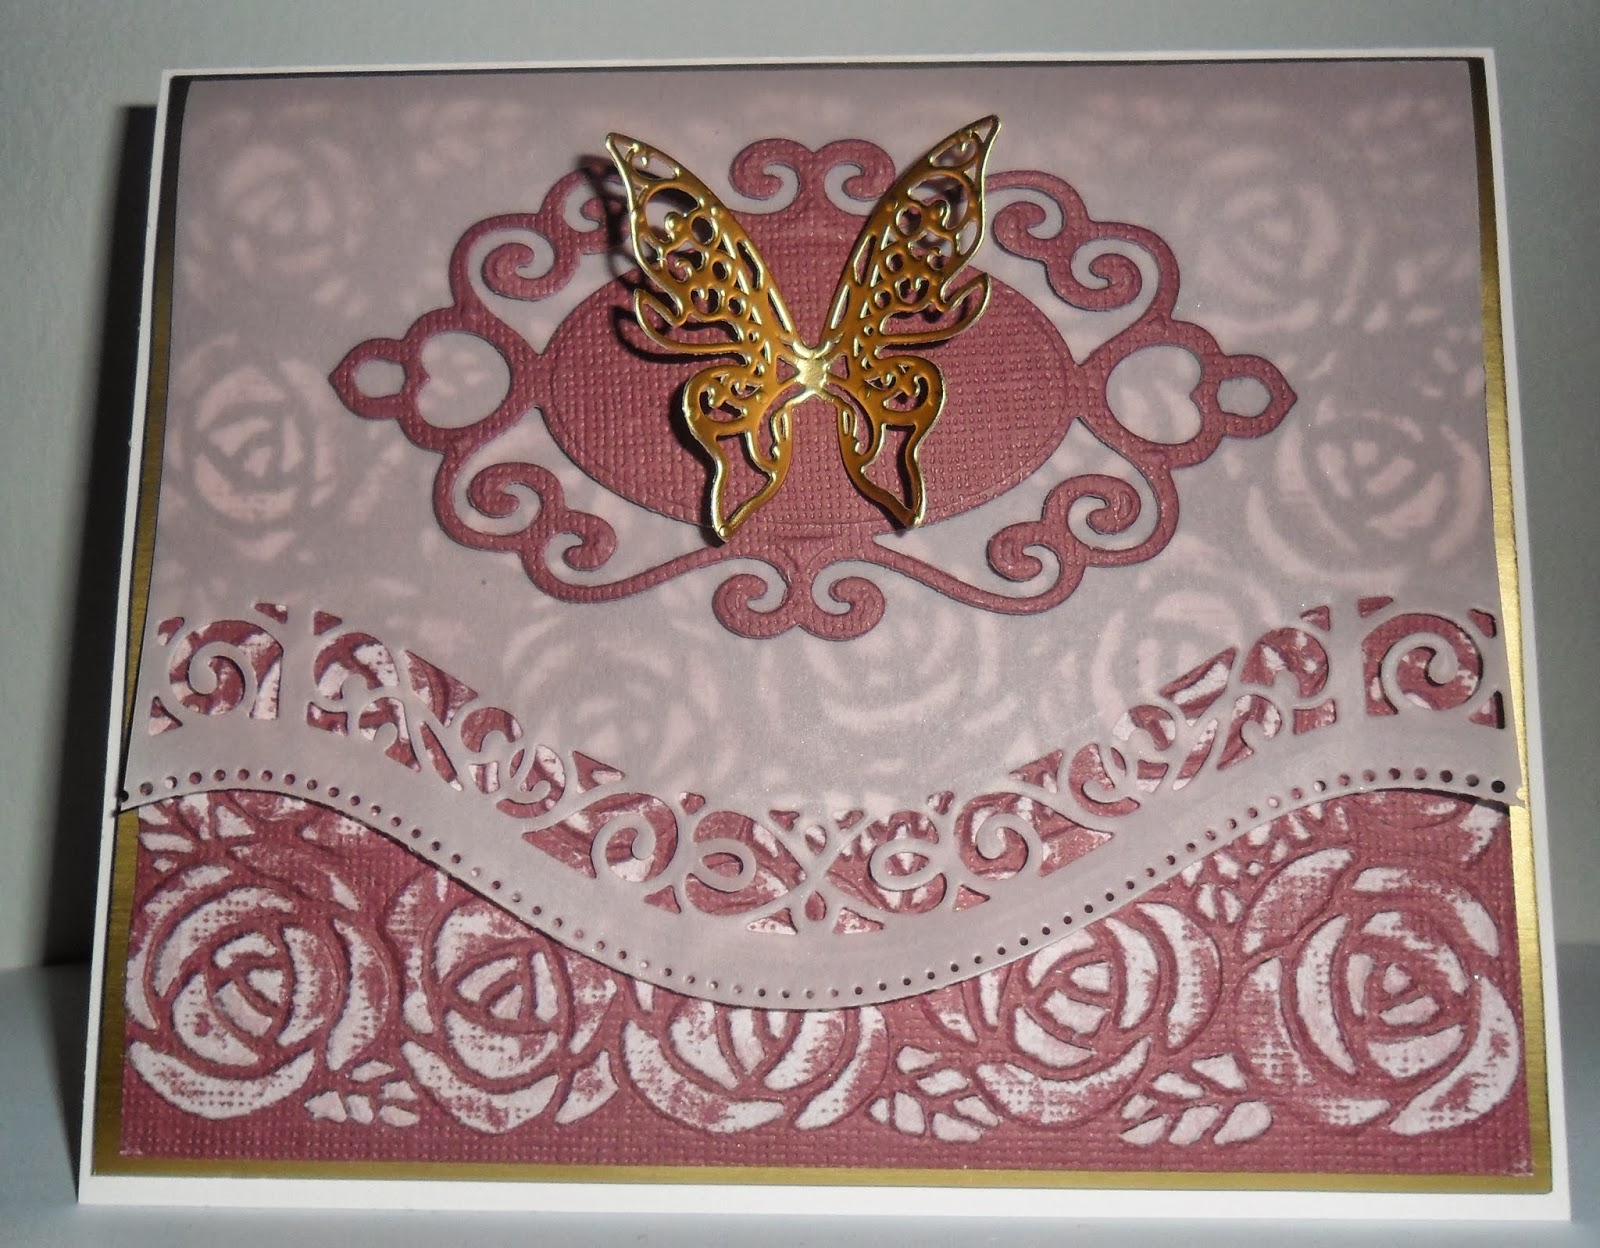
I have another Spellbinders butterfly card for you today. My very favourite type of card to make. If you were eagle-eyed you might have spotted this card on the Tool Shed on Create and Craft TV a few weeks ago. I had my email read out and my card shown whilst Sue Wilson was making a gorgeous creation.
I started with a piece of Creative Expressions Coconut White cardstock and scored on my Ultimate Pro to make the card blank. I added a piece of mat gold card and then to make my "topper", I embossed a piece of Coredinations with the Spellbinders Cabbage Rose M-bossability folder and sanded back. My vellum was cut using the Spellbinders Borderabilities Curved Borders 2. I added a Spellbinders Fancy Tags Two die and finally finished off with a butterfly from Les Papillion die cut in the same mat gold card.
I hope you like my card.
Happy crafting,
Rachel x
I have another Spellbinders butterfly card for you today. My very favourite type of card to make. If you were eagle-eyed you might have spotted this card on the Tool Shed on Create and Craft TV a few weeks ago. I had my email read out and my card shown whilst Sue Wilson was making a gorgeous creation.
I started with a piece of Creative Expressions Coconut White cardstock and scored on my Ultimate Pro to make the card blank. I added a piece of mat gold card and then to make my "topper", I embossed a piece of Coredinations with the Spellbinders Cabbage Rose M-bossability folder and sanded back. My vellum was cut using the Spellbinders Borderabilities Curved Borders 2. I added a Spellbinders Fancy Tags Two die and finally finished off with a butterfly from Les Papillion die cut in the same mat gold card.
I hope you like my card.
Happy crafting,
Rachel x
Wednesday, 9 October 2013
Fab'n'Funky Challenges #188 - It's All Rock and Roll to Me (Music)
Hi Fellow Crafters,
We have the pleasure of launching a brand new challenge over at Fab'n'Funky Challenges today. First though, we have winners from our Ribbon challenge from last week. They are up on the blog now so head on over to take a look and see if you were lucky this time.
The very talented and kind Judith is our host this week and she has chosen a brilliant theme...
We would like you to make a project with a music theme. It can be hip hop, dance, rap, heavy metal, pop or any other genre you fancy. Our sponsor this week is the fantastic Kenny K.
I just love these images and the DT were lucky to be able to work with Kenny K images. I chose to use Rock Chick. Here is my finished card...
Isn't she cool?! I started with an 8" card blank but honestly I cut my DP too small and ended up making a slightly smaller card. I mat and layered with Coredinations and then some dotty paper for DCWV. To make the broken disc I cut up an old CD and then coloured it with a black ProMarker. The music notes were cut using the Cricut ages ago so I'm not sure of the cartridge as it was just by chance that I found them in time to add them to my card!
My image layer is a piece of silver textured card which I embossed using a Craft Concepts embossing folder and then cut out using Spellbinders Matting Basics B. I coloured my image with ProMarkers in Ruby, Lipstick Red, Sky Blue, True Blue, Arctic Blue, Cool Greys 1, 3 and 5 and then fussy cut. Before adding my image with foam pads I glued on the music note die cut from Memory Box.
I hope you'll join us with your tune this week at Fab'n'Funky Challenges.
Happy crafting,
Rachel x
We have the pleasure of launching a brand new challenge over at Fab'n'Funky Challenges today. First though, we have winners from our Ribbon challenge from last week. They are up on the blog now so head on over to take a look and see if you were lucky this time.
The very talented and kind Judith is our host this week and she has chosen a brilliant theme...
It's All Rock and Roll to Me
We would like you to make a project with a music theme. It can be hip hop, dance, rap, heavy metal, pop or any other genre you fancy. Our sponsor this week is the fantastic Kenny K.

I just love these images and the DT were lucky to be able to work with Kenny K images. I chose to use Rock Chick. Here is my finished card...
Isn't she cool?! I started with an 8" card blank but honestly I cut my DP too small and ended up making a slightly smaller card. I mat and layered with Coredinations and then some dotty paper for DCWV. To make the broken disc I cut up an old CD and then coloured it with a black ProMarker. The music notes were cut using the Cricut ages ago so I'm not sure of the cartridge as it was just by chance that I found them in time to add them to my card!
My image layer is a piece of silver textured card which I embossed using a Craft Concepts embossing folder and then cut out using Spellbinders Matting Basics B. I coloured my image with ProMarkers in Ruby, Lipstick Red, Sky Blue, True Blue, Arctic Blue, Cool Greys 1, 3 and 5 and then fussy cut. Before adding my image with foam pads I glued on the music note die cut from Memory Box.
I hope you'll join us with your tune this week at Fab'n'Funky Challenges.
Happy crafting,
Rachel x
Wednesday, 25 September 2013
Fab'n'Funky Challenges #186 - Button It
Hi All,
I hope you are well and crafting with plenty of lovely goodies. We have a great new challenge over at Fab'n'Funky Challenges but firstly, I'd like to thank everyone who entered our Leaves challenge last week. We had a lovely time looking at all the wonderful creations. The winner and Top 3 are over on the blog now so check it out soon.
On to this week and Wendy is our brilliant host with a great theme that you can really put your own spin on...
We would like you to use buttons on your project. They can be real, paper, digital or just mahoosive! Our sponsor this week is one of my favourite digital stamp companies - The Paper Shelter. The random winner will receive a $20 voucher to spend in their online store. I'm ever so slightly jealous!
The DT were very lucky to be able to work with The Paper Shelter images this week and I chose to use Rhythm Everywhere.
I started with a 6" scalloped card blank and my first layer was made using kraft card and a piece of Pebbles backing paper. I then embossed the blue Coredinations with a Spellbinders M-bossability folder called Hearts. This layer was also matted with kraft card. My ribbon was recycled from some pajamas packaging! My buttons were created with a die from the Spellbinders Sewing Elements set.
I used Spellbinders Circles to cut out my main image and layer and then mounted on foam pads from Hunkydory. The little shiny bursts are the waste from another card! I used a Memory Box die (Snowflake Burst) with Centura Pearl cardstock and they just went perfectly.
I really hope you can join us for our Button It challenge this week at Fab'n'Funky Challenges.
Happy crafting,
Rachel x
I would like to enter this card into the following challenges:
Allsorts Challenge Blog #225 - Button Up
Card Mania Challenge #30 - Cute as a Button
I hope you are well and crafting with plenty of lovely goodies. We have a great new challenge over at Fab'n'Funky Challenges but firstly, I'd like to thank everyone who entered our Leaves challenge last week. We had a lovely time looking at all the wonderful creations. The winner and Top 3 are over on the blog now so check it out soon.
On to this week and Wendy is our brilliant host with a great theme that you can really put your own spin on...
Button It
We would like you to use buttons on your project. They can be real, paper, digital or just mahoosive! Our sponsor this week is one of my favourite digital stamp companies - The Paper Shelter. The random winner will receive a $20 voucher to spend in their online store. I'm ever so slightly jealous!
The DT were very lucky to be able to work with The Paper Shelter images this week and I chose to use Rhythm Everywhere.
I started with a 6" scalloped card blank and my first layer was made using kraft card and a piece of Pebbles backing paper. I then embossed the blue Coredinations with a Spellbinders M-bossability folder called Hearts. This layer was also matted with kraft card. My ribbon was recycled from some pajamas packaging! My buttons were created with a die from the Spellbinders Sewing Elements set.
I used Spellbinders Circles to cut out my main image and layer and then mounted on foam pads from Hunkydory. The little shiny bursts are the waste from another card! I used a Memory Box die (Snowflake Burst) with Centura Pearl cardstock and they just went perfectly.
I really hope you can join us for our Button It challenge this week at Fab'n'Funky Challenges.
Happy crafting,
Rachel x
I would like to enter this card into the following challenges:
Allsorts Challenge Blog #225 - Button Up
Card Mania Challenge #30 - Cute as a Button
Wednesday, 11 September 2013
Fab'n'Funky Challenges #184 - Sweet Treats
Hi Crafters,
Well we are on Wednesday again and that means a brand new challenge at Fab'n'Funky. It is my turn to host this week and as we are sponsored by the fabulous Digi Darla Designs, I picked a foodie-related challenge
Sweet Treats
You can use cake, chocolate, sweets or even a fruity cocktail in your design. We would love for you to satisfy your sweet tooth with us!
The winner, picked by random.org, will receive 5 images of their choice from Digi Darla Designs.
Here is my card this week...
I used a pre-coloured image called Chocolate Cake from Digi Darla Designs and cut it out with my Spellbinders Romantic Rectangles. I inked through the die with Tim Holtz Distress Ink in Red Brick. My background paper is from DCWV and I embossed this with a Crafter's Companion Embossalicious folder. I added a piece of Coredinations in dark pink which was embossed with a "Happy Birthday" folder and then sanded back. The pearls came from Creative Expressions and my flowers were also from Crafter's Companion.
While I was thinking of my card design, I decided to make some sweet treats of my own and here is the end result - a chocolate cupcake with strawberry flavoured chocolate frosting. This is for the true chocoholic!
The cupcakes in the background are actually my kitchen wallpaper - I really do love cupcakes!
I really hope you can join us in our Sweet Treats challenge this week at Fab'n'Funky.
Happy crafting,
Rachel x
Wednesday, 12 June 2013
Fab'n'Funky Challenges #175 - Birthday
Hi Crafters,
It's Wednesday again and that means a new challenge at Fab'n'Funky but first, head on over to the blog to see our winner from last week's fruity challenge. We loved your great designs.
I predict a lot of love for our challenge this week! The very talented Dawn is our host and she has chosen the theme of...
Simples! I don't think this one needs any explaining! Our sponsor is the totally awesome Mayzyart and the DT were so lucky to work with her fab images. I used Maurine with Tea for my card.
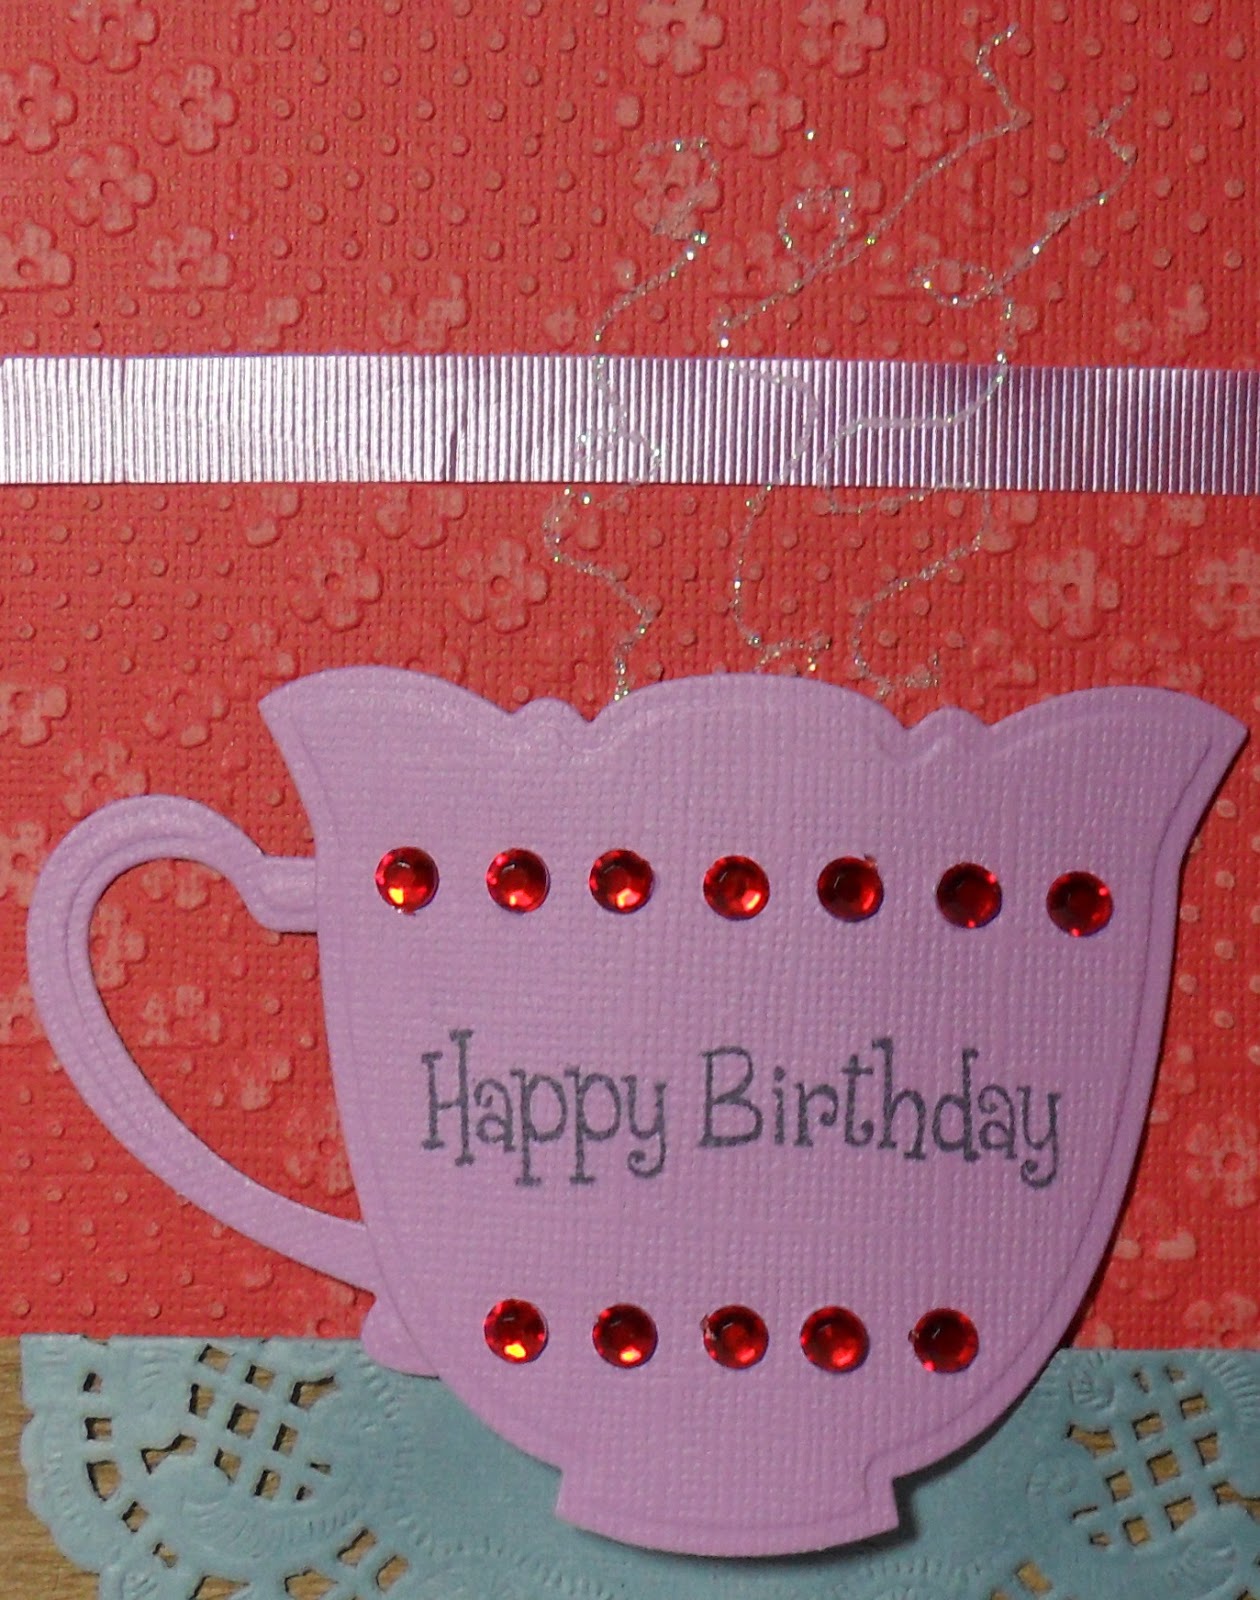
I started with a piece of Coredinations cardstock and I embossed this several times to extend the pattern with an embossing folder that I received free with the last Crafter's Companion magazine. I really like the flower and dotty patchwork pattern. To reveal the core I sanded back using the Crafter's Companion Coredinations Accessory Kit. The lilac ribbon was on sale at Hobbycraft a few years back and this is the first time I've used it.
I used Creative Expressions crinkle paper for the bottom and then added half a doily coloured using the Twilight Sky ProMarker. My cup was made from Spellbinders Tea Cups and I stamped the sentiment with Momento Tuxedo Black ink. The gems were affixed by hand using Cosmic Shimmer dries clear glue.
I coloured Maurine with ProMarkers in Blush, Dusky Pink, Caramel, Cocoa, Henna, Ruby, Lipstick Red, Indigo Blue, Reef Blue, Twilight Sky, Polar Blue, Amethyst, Peony and Lilac. I cut down some Hunkydory foam pads to attach her to my card. I finished by adding some glitter to make stream from the tea cup.
I really hope you'll join us this week to celebrate someone's birthday. The more the merrier!
Happy crafting,
Rachel x
It's Wednesday again and that means a new challenge at Fab'n'Funky but first, head on over to the blog to see our winner from last week's fruity challenge. We loved your great designs.
I predict a lot of love for our challenge this week! The very talented Dawn is our host and she has chosen the theme of...
Birthday
Simples! I don't think this one needs any explaining! Our sponsor is the totally awesome Mayzyart and the DT were so lucky to work with her fab images. I used Maurine with Tea for my card.
I started with a piece of Coredinations cardstock and I embossed this several times to extend the pattern with an embossing folder that I received free with the last Crafter's Companion magazine. I really like the flower and dotty patchwork pattern. To reveal the core I sanded back using the Crafter's Companion Coredinations Accessory Kit. The lilac ribbon was on sale at Hobbycraft a few years back and this is the first time I've used it.
I used Creative Expressions crinkle paper for the bottom and then added half a doily coloured using the Twilight Sky ProMarker. My cup was made from Spellbinders Tea Cups and I stamped the sentiment with Momento Tuxedo Black ink. The gems were affixed by hand using Cosmic Shimmer dries clear glue.
I coloured Maurine with ProMarkers in Blush, Dusky Pink, Caramel, Cocoa, Henna, Ruby, Lipstick Red, Indigo Blue, Reef Blue, Twilight Sky, Polar Blue, Amethyst, Peony and Lilac. I cut down some Hunkydory foam pads to attach her to my card. I finished by adding some glitter to make stream from the tea cup.
I really hope you'll join us this week to celebrate someone's birthday. The more the merrier!
Happy crafting,
Rachel x
Wednesday, 29 May 2013
Fab'n'Funky Challenges #173 - One for the Girls
Hi Everyone,
We are back to Wednesday again and I'm not sure I like how fast this year seems to be going! I doubt it will slow down though!
Wednesday means a new challenge at Fab'n'Funky Challenges but it also means that the winners and Top 3 from last week have been chosen. All the details can be found over at on the F'n'F blog.
We have our blogging Mama as our host this week - the fabulous Judith. I love the theme this week as it it totally me! So without further ado our theme is...
Just make a female-themed project and link it up - couldn't be simpler! We have two sponsors this week too. My Creative Classroom and StampArt Design by Kathryne. Two sponsors means two winners so let's get crafting!
This is my card for the challenge - the girly elements are the butterflies, pearls and decorative edging.
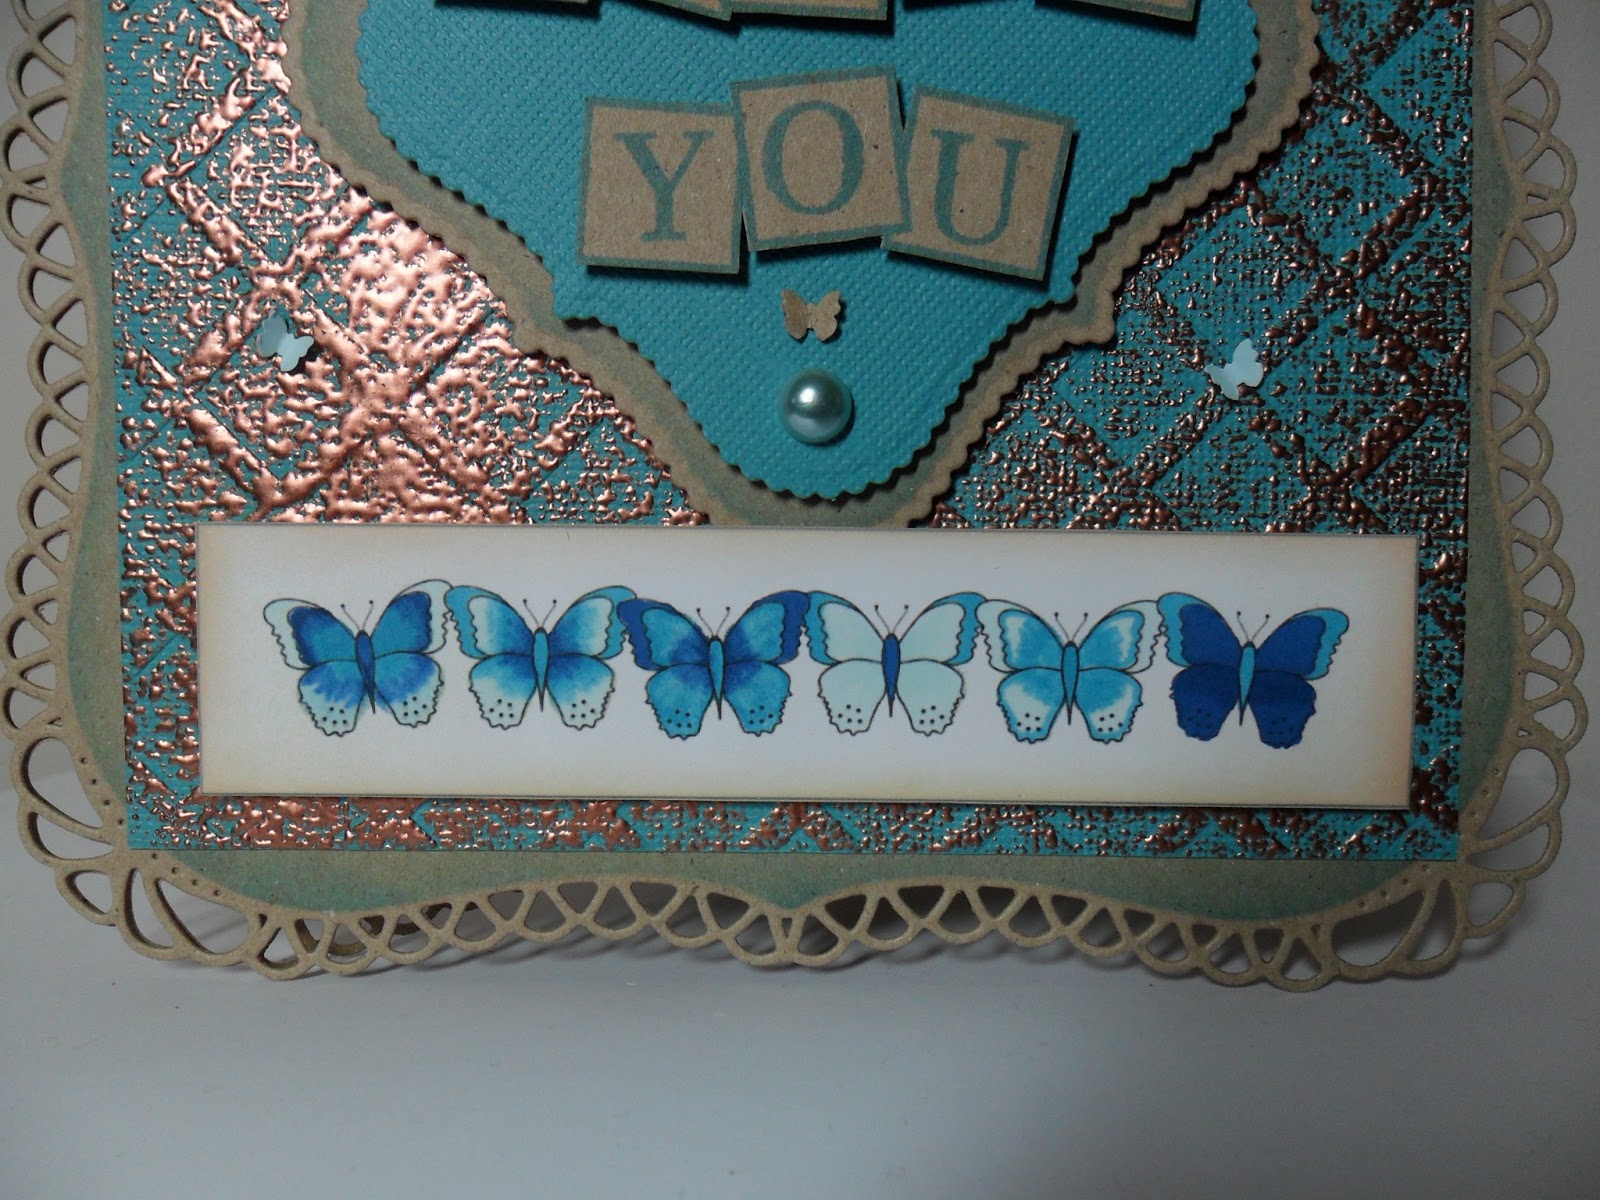
I used a StampArt Design by Kathryne image for my card called Butterfly Border 1 and coloured with FlexMarkers in Aquamarine, Surf Blue and Navy Blue. I inked the edge with Tim Holtz Distress ink in Antique Linen for an aged effect.
My base card was made from two of the Spellbinders Grand Decorative Labels One cut in kraft card. I attached with the super stick red liner tape. While still in the die I inked through with Tim Holtz Distress Ink in Broken China. My main background was made with Coredinations cardstock. I embossed using the lattice Embossalicious folder from Crafter's Companion and then lightly brushed a Versamark inkpad over the top. I added Debbi Moore's metal magic and heated from behind with a heat tool. I really like the effect that this has created.
My sentiment topper was created with Spellbinders Scalloped Labels One in kraft and Coredinations. Using Claritystamp's Letterbox Alphabet set and Broken China Distress Ink I made the sentiment as I wanted. The squares come as triple, double and single boxes so I after stamped the triple box, I masked it off and then used the double box stamp to create a five letter space for my wording. Claritystamps really are the best quality I've ever had the pleasure to use. My tiny butterflies were punched using a Tonic punch and I just coloured a piece of super smooth paper with the Aquamarine FlexMarker to get the perfect match. The pearls came free from Create and Craft a while back.
I really hope to see you join us for our girly challenge this week.
Happy crafting,
Rachel x
I'd like to enter this card into the following challenge:-
Shelly's Images - Show Us What You Got
We are back to Wednesday again and I'm not sure I like how fast this year seems to be going! I doubt it will slow down though!
Wednesday means a new challenge at Fab'n'Funky Challenges but it also means that the winners and Top 3 from last week have been chosen. All the details can be found over at on the F'n'F blog.
We have our blogging Mama as our host this week - the fabulous Judith. I love the theme this week as it it totally me! So without further ado our theme is...
One for the Girls
Just make a female-themed project and link it up - couldn't be simpler! We have two sponsors this week too. My Creative Classroom and StampArt Design by Kathryne. Two sponsors means two winners so let's get crafting!
This is my card for the challenge - the girly elements are the butterflies, pearls and decorative edging.
I used a StampArt Design by Kathryne image for my card called Butterfly Border 1 and coloured with FlexMarkers in Aquamarine, Surf Blue and Navy Blue. I inked the edge with Tim Holtz Distress ink in Antique Linen for an aged effect.
My base card was made from two of the Spellbinders Grand Decorative Labels One cut in kraft card. I attached with the super stick red liner tape. While still in the die I inked through with Tim Holtz Distress Ink in Broken China. My main background was made with Coredinations cardstock. I embossed using the lattice Embossalicious folder from Crafter's Companion and then lightly brushed a Versamark inkpad over the top. I added Debbi Moore's metal magic and heated from behind with a heat tool. I really like the effect that this has created.
My sentiment topper was created with Spellbinders Scalloped Labels One in kraft and Coredinations. Using Claritystamp's Letterbox Alphabet set and Broken China Distress Ink I made the sentiment as I wanted. The squares come as triple, double and single boxes so I after stamped the triple box, I masked it off and then used the double box stamp to create a five letter space for my wording. Claritystamps really are the best quality I've ever had the pleasure to use. My tiny butterflies were punched using a Tonic punch and I just coloured a piece of super smooth paper with the Aquamarine FlexMarker to get the perfect match. The pearls came free from Create and Craft a while back.
I really hope to see you join us for our girly challenge this week.
Happy crafting,
Rachel x
I'd like to enter this card into the following challenge:-
Shelly's Images - Show Us What You Got
Wednesday, 1 May 2013
Fab'n'Funky Challenges #169 - LOTS of Pink
Hi Everyone,
I can't believe we are back to Wednesday again! Where are these weeks going? - maybe it's just a sign I'm getting older! I hope you've all had plenty of crafty time over the last few days. I seriously need to get my crafty stash in order as it is slowly taking over my house!
Thank you to everybody who entered our challenge last week. We really felt the love! If you would like to check out the winner and Top 3, head over to the Fab'n'Funky Challenges blog now.
Our challenge this week is one that filled me with glee when I saw it! The brilliant Wendy is our host and I'm sure many of you know I'm partial to some pink on my cards and the theme this week is...
That's right - just use plenty of pink on your project and link it up. I had so much fun deciding how to incorprate the pinks into my card.
We also have two great sponsors this week - Lili of the Valley and StampArt Design by Kathryne. I used a LOTV image called Garden of Wishes and it's the first time I've inked her up...
I started with a 6" square scalloped card blank and then added a piece of star embossed card that I had inked with Tim Holtz Distress Ink in Picked Raspberry (my favourite DI colour). My plain card is piece of Coredinations cardstock and I added three gems to the top right corner. I bought the ribbon from The Ribbon Kings at the SECC craft fair last year and I love the shimmer it gives.
I coloured my image with ProMarkers in Satin, Blush, Sunkissed Pink, Vanilla, Pineapple Crush, Soft Green, Cerise, Pink Lobster and Pink Mittens. To cut my image I used Spellbinders Labels H and then stenciled through the die with the same DI. I added glitter with a Quickie Glue Pen. The pink glitter was from Lakeland who used to have a craft range. The clear glitter was from My Craft Studio. I attached my topper with foam pads to give dimension.
I really hope you can join us for our Pink extravaganza this week.
Happy crafting,
Rachel x
I can't believe we are back to Wednesday again! Where are these weeks going? - maybe it's just a sign I'm getting older! I hope you've all had plenty of crafty time over the last few days. I seriously need to get my crafty stash in order as it is slowly taking over my house!
Thank you to everybody who entered our challenge last week. We really felt the love! If you would like to check out the winner and Top 3, head over to the Fab'n'Funky Challenges blog now.
Our challenge this week is one that filled me with glee when I saw it! The brilliant Wendy is our host and I'm sure many of you know I'm partial to some pink on my cards and the theme this week is...
LOTS of Pink
That's right - just use plenty of pink on your project and link it up. I had so much fun deciding how to incorprate the pinks into my card.
We also have two great sponsors this week - Lili of the Valley and StampArt Design by Kathryne. I used a LOTV image called Garden of Wishes and it's the first time I've inked her up...
I started with a 6" square scalloped card blank and then added a piece of star embossed card that I had inked with Tim Holtz Distress Ink in Picked Raspberry (my favourite DI colour). My plain card is piece of Coredinations cardstock and I added three gems to the top right corner. I bought the ribbon from The Ribbon Kings at the SECC craft fair last year and I love the shimmer it gives.
I coloured my image with ProMarkers in Satin, Blush, Sunkissed Pink, Vanilla, Pineapple Crush, Soft Green, Cerise, Pink Lobster and Pink Mittens. To cut my image I used Spellbinders Labels H and then stenciled through the die with the same DI. I added glitter with a Quickie Glue Pen. The pink glitter was from Lakeland who used to have a craft range. The clear glitter was from My Craft Studio. I attached my topper with foam pads to give dimension.
I really hope you can join us for our Pink extravaganza this week.
Happy crafting,
Rachel x
Wednesday, 27 March 2013
Fab'n'Funky Challenges #164 - Boxed In
Hi Crafties,
We are on Wednesday again! It'll be summer soon! Okay, I've really jinxed it now! I really feel for all the people who have been battling the snow. We've been so lucky so far and are enjoying some sunshine this week. It is ever so cold though.
Fab'n'Funky Challenges are back with a brilliant new challenge. We have announced last week's winner and Top 3 over on the blog if you fancy checking it out.
For this week, our host is the talented Ciska who always makes the inside count! Click here to see her wonderful cards. Ciska has chosen a great challenge and this week we are...
So, we would like you make a box for your project this week. I'm sure you'll all have lots of fun with this one. Our sponsors is the fabulous Stamp Fairy. They have lots of cute digis over on the Stamp Fairy website - click here to head on over.
This is my boxed in project...
I've gone Christmassy! I started by using the Tags, Bags, Boxes and More 2 Cricut cartridge and cut the box on page 47 in Coredinations cardstock at 11.5". This one has an interlocking snowflake on top. My image is from Stamp Fairy and is called Santa World 1. I used ProMarkers to colour him up in Amethyst, Fuchsia Pink, Blossom, Blush, Satin, Gold and Cocoa. For the sparkle I added Flower Soft Glitter Frosting and finally attached my image with foam pads.
I really hope you can join us at Fab'n'Funky Challenges to get Boxed In! Be sure to take a look at my teamies creations.
Happy crafting,
Rachel x
We are on Wednesday again! It'll be summer soon! Okay, I've really jinxed it now! I really feel for all the people who have been battling the snow. We've been so lucky so far and are enjoying some sunshine this week. It is ever so cold though.
Fab'n'Funky Challenges are back with a brilliant new challenge. We have announced last week's winner and Top 3 over on the blog if you fancy checking it out.
For this week, our host is the talented Ciska who always makes the inside count! Click here to see her wonderful cards. Ciska has chosen a great challenge and this week we are...
Boxed In
So, we would like you make a box for your project this week. I'm sure you'll all have lots of fun with this one. Our sponsors is the fabulous Stamp Fairy. They have lots of cute digis over on the Stamp Fairy website - click here to head on over.
This is my boxed in project...
I've gone Christmassy! I started by using the Tags, Bags, Boxes and More 2 Cricut cartridge and cut the box on page 47 in Coredinations cardstock at 11.5". This one has an interlocking snowflake on top. My image is from Stamp Fairy and is called Santa World 1. I used ProMarkers to colour him up in Amethyst, Fuchsia Pink, Blossom, Blush, Satin, Gold and Cocoa. For the sparkle I added Flower Soft Glitter Frosting and finally attached my image with foam pads.
I really hope you can join us at Fab'n'Funky Challenges to get Boxed In! Be sure to take a look at my teamies creations.
Happy crafting,
Rachel x
Subscribe to:
Posts (Atom)