Followers

Tuesday, 20 November 2012

The Cuttlebug Spot DT Card - Feathers

Hi Everyone,

Firstly a huge welcome to my new followers.  Thanks to everyone for checking out my blog and all your lovely comments.  I'm on my way to the big 100 and I'm planning to put together a little giveway when I reach that milestone :)

Can you believe that it is already my second post for The Cuttlebug Spot?  Nope, neither can I!  Well this week we are all using...

Feathers

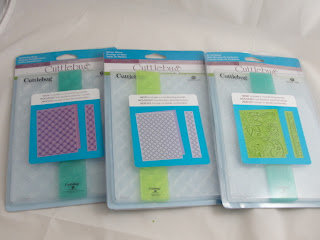
So all you have to do is use a feather on your project and link it up.  We also have two special prizes.  The first one is a set of three 5x7 Cuttlebug Folders.  This set will go to the winner of the random project entry using the Linky.
Geometric Rings, Wicker Weave and Bit of Paisley 
5x7 includes coordinating border 

The second prize is a $20.00 gift card to Michaels Craft Store.  All you need to do to enter to win this prize is simply leave a comment at The Cuttlebug Spot and tell us what is on your Black Friday shopping list.... and if you comment after Black Friday...do tell us if you got what you wanted.  


So I had better show you my feathery inspiration...


I started with some brown pearlescent cardstock and used the Spellbinders M-bossability Venetian embossing folder to add the pattern.  I took a sanding block and ran all over to reveal the pattern further.  I covered this with Tim Holtz Distress Ink in Fired Brick and then attached to a custom-made card blank. 

I used my Cuttlebug to cut three diamond shapes with Spellbinders Classic Diamonds from orange and red cardstock and then attached these over the edge of the card.  The focal point of my card came from the Spellbinders Venetian Accents.  I used the Classic Diamonds with my Cuttlebug again and then cut two of the borders on my Grand Calibur.  I inked the diamond and borders with the Fired Brick DI.  This is the first time I've used the flourish mask (from Venetian Accents) and it looks so great cut out of different kinds of cardstock.  Can't wait to play again.


I used foam pads for the main topper and left enough space to slot in my feathers.  These are from an embellishment pack by My Craft Studio.

I hope I've given you an idea of how you can incorporate feathers into your creations.  Do check out my teamies creations - brilliant work, girls!  Can't wait to find out what you create.  Don't forget our comment prize too.

Happy crafting,
Rachel x

Thursday, 15 November 2012

Fab'n'Funky Challenges #146 - Let's See Those Bears

Hi Lovelies,

Firstly I must apologise for the lateness of this post.  I can't blame Blogger this time though.  My internet at home is completely knackered so I'm having to travel to my parents house to use theirs this week.  Fingers crossed it is sorted for our next challenge.

I hope you've all had a great week.  Thank you again to those who entered our last challenge.  The winners are up on the blog now so check them out at Fab'n'Funky Challenges.

Our wonderful host this week is Wendy and she has chosen a fantastic theme to show off our furry friends...

Let's See Those Bears!

So all you have to do is include a bear on your project and then link it up.  Simples!  Our sponsor is the brilliant Doodle Pantry and the DT were lucky enough to receive some images to use.  They were all so gorgeous, I really had trouble choosing!


Eventually I settled on this pre-coloured cutie.  I love the bright green, blue and yellow accents.  Doodle Pantry were also kind enough to send us a couple of matching papers and I have used the checked one on my card. 

I started by embossing the card blank with a dotty embossing folder run through my Cuttlebug.  I added washi tape in three colours to co-ordinate.  This is the first time I've used washi tape and I think it's fab.  The colours were such a great match too. 


I used Spellbinders Labels Twenty Six for my layers and then added a couple of layered flowers.  The centre gem came free with a magazine last month.  I may add a sentiment later but at the moment I've kept it sentiment-free.

I hope you can join us for some beary fun this week.  Can't wait to check out your great projects.

Happy crafting,
Rachel x

Tuesday, 13 November 2012

Exciting News and A Brand New Challenge at The Cuttlebug Spot

Hi Everyone,

As you can probably guess from the title of my post I have some very exciting news for you.  I am now a proud member of The Cuttlebug Spot DT.  Yippie!  Be sure to check out the wonderful designs from my teamies and join in with our great new challenge which launches today.

Well what is this great challenge that you speak of, I hear you ask!  This week we would like you to...

Use 3 different die cutting/embossing items

Here is my card for inspiration


I have only recently discovered the joy of kraft card but boy what a joy it is to use!  I started with a 5" kraft card blank and debossed a row of snowflakes down the outer edge using my Cuttlebug.  I then took some Tim Holtz Distress Ink in Salty Ocean and added that to the edges of the card. 

I used my Cuttlebug again to cut the Spellbinders snowflake shapes.  These are a random mix from 2010, 2011 and 2012.  My final piece of embossing came in the form of the sentiment and I also added some ink to the edge of this piece of card.  To achieve the raised effect I rolled it over the edge of my table in two different directions.  I attached with a lot of Pinflair glue gel!


I hope you like my inspiration and can join us this week at The Cuttlebug Spot.  Can't wait to see your great crafty projects.

Happy crafting,
Rachel x

Wednesday, 7 November 2012

Fab'n'Funky Challenges #146 - Bingo

Hi Everyone,

Wow!  What a response to our Die Cuts/Punches challenge last week.  We had so many brilliant entires.  I don't know how Pat K managed to choose her top 3 but choose she did!  Head over to the Fab'n'Funky Challenges blog to see the wonderful winners and fab Top 3.

This week is my turn to host our challenge and I have gone with a bingo board...

 
Shaped card blank

Charm

Distressing

Lace

Vintage

Flourish

Twine

Embossing

Kraft card

Just use any line - across, up, down or diagonal and let us know which line you have used.

We have a fantastic sponsor this week - it's Stamp Fairy!

The DT were able to use super Stamp Fairy images from their new winter digis.  There are so many lovely images on the site so make sure you check them out.

From the bingo board, I chose twine, embossing and kraft card on my project and it's not a card!


Nope, it's a gift bag!  My Dad gave me some of these brown paper bags for my first craft fair last sunday and I knew it would be perfect for this challenge.  My checked and dotty papers are from Papermania's Deck the Halls paper pack.  I used Spellbinders Holly Accents for the holly border and inked through the die with Tim Holtz Distress Ink in Mowed Lawn.  This ink pad is actually from the seasonal summer set but really worked well with my Christmas papers. 


I printed my image straight onto kraft card and then added twine in red and green using Cosmic Shimmer dries clear glue.  I mounted my lovely little gingerbread man onto Spellbinders Labels Twenty Eight with foam tape.  My embossed greeting was made using an embossing folder and Centrura Pearl Snow White card.  The folder is made up of lots of different Christmas greetings so I just cut it out with scissors and then cololured with the distress ink again.  I really love the shimmer from this card.


So get your dabbers at the ready and lets play bingo!  Can't wait to see all of your creations.

Happy crafting,
Rachel x

Wednesday, 31 October 2012

Fab'n'Funky Challenges #145 - Die Cuts/Punches

Hello Crafty Friends,

I hope you are all well and that my American friends are safe in the midst of Hurricane Sandy.  The weather can be so ferocious.

I think we have a few animal lovers in our following!  We loved your entries last week.  Check out the Fab'n'Funky Challenges blog to see our lucky winners and Top 3.

Now on to our current challenge and we have the super talented Pat K as our host.  She has chosen a theme that I think has to be a favourite of many...

Die Cuts/Punches

Our sponsors this week are the ever versatile Joanna Sheen and the brilliant StampArt Design by Kathryne.  Check out their sites by clicking the links and you'll be in crafty heaven!

So I have a wedding card for you today.  The wedding was back in September so I've also included a photo of the happy couple on their big day.


I started off with an A4 piece of card and scored to make a gatefold card.  I inserted a heart die into the middle so that I could cut the heart from the front.  I added my image but I can't remember for the life of me where it came from.  I used some glitter on the bride's flowers to make them stand out.  The die cuts are Spellbinders Moroccan Accents.  I used the insert of the Spellbinders Fancy Tags Three for the sentiment which has been glittered with MCS ultra fine glitter.  I also added this glitter around the edge of the hear aperature. 


Here are the happy couple - Katie-Ann and Ewan.  They had gorgeous weather and we were all thrilled for them.  It was a truly lovely day.

Now it's over to you - show us your die cuts or punched shapes for our challenge to be in with a chance of winning one of our great prizes.

Image:  StampArt Design by Kathryne

Don't forget that we have our Birthday Extravaganza coming up in a few weeks time.  There will be loads of prizes up for grabs over the fortnight of celebrations.  Hope you can join us.

Happy crafting,
Rachel x

Thursday, 25 October 2012

Fab'n'Funky Challenges #144 - Animals

Hello Everyone,

I hope you are all well.  I'm still recovering from a terrible bout of flu but on the mend now.  I have a craft fair coming up next weekend and it's my first one so I need to be fitting fit for that. 

If you are curious about our challenge winners from last week, check out the Fab'n'Funky Challenges blog.  There were so many wonderful entries and great colour combos.

This week we have the lovely Sue as our host and you really should check out her amazing card for this week.  It's so cute!  Now then, Sue had chosen a fab challenge...

Animals

So dig out those animal-themed stamps and papers and get crafting!  Our brilliant sponsors this week are Crimson Cloud and DigiDarla Designs.  What a treat!  Two sponsors mean two prizes! 

The Design Team also had fab images from DigiDarla Designs to use for our challenge this week.  I chose this cute little dog with an envelope.


Apologies for the terrible colouring job in this little puppy.  I've been really poorly with the flu and hadn't made anything in advance.  I am slightly embarrassed at how bad this has turned out! 

I started with a 6" square scalloped card and then mat and layered brown cardstock and paw print paper.  I coloured the doily with my Putty ProMarker and attached with a tape runner.  The image was also coloured with ProMarkers in Putty, Satin, Caramel, Pale Pink and Dusky Rose.

My flowers are from a set by 3Birds.  I used a embossing folder to add the textured pattern.  I cut the sentiment and image using Labels Twenty  from Spellbinders.

I hope you'll be able to join us this week in celebrating all things animal.

Happy crafting,
Rachel x

Wednesday, 17 October 2012

Fab'n'Funky Challenges #143 - Orange, Black and Choice

Hi All,

Hope you've all had a productive week.  I'll still be in Glasgow when you are reading this!  The wonders of technology!  Fingers crossed it goes to plan.

If you entered our Vintage challenge last week over at Fab'n'Funky Challenges then head over to the blog to see our lucky winners. 

This week our challenge is hosted by the lovely Jackie and she has picked a great colour based challenge...

Orange, Black and a colour of your choice

Our sponsor this week is Pink Cat Studio and the DT were lucky enough to be able to use their images for the challenge.  Check out their great designs here.

My colour of choice is green and I think this suits my little halloween guy really well.


I designed this entire card in Craft Artist Professional 2.  I started with the Spooktacular digikit and used an old Sketch Saturday layout. 


I found the cobweb embellishment and then made it into a punch.  I punched out one cobweb from the bright green material and then with the Stamp Mode on, I positioned the next two in a row.  I added the ribbon next but recoloured the orange one as it wasn't bright enough. 

The backing for my image is simply made from materials.  I also used a piece of material to highlight the text.  I used the Troutkings BTN font.  The pumpkins were individual embellishments which I resized and flipped to make a group of three. 

I used the Cutout Studio for the first time on my image and it was a piece of cake!  I applied the shadow feature on all the elements but this hasn't shown up too well.

Once I had the card printed out I used my ProMarkers to cololur the image.  I used the following colours - Forest Green, Grass, Bright Orange, Black, Cool Grey 4, Almond, Cinnamon, Lemon and the blender pen.

It's really easy to make an insert in CAP and I made a quick one for this card.


I just copied elements from the main image and added them to the insert.  Simples!

Can't wait to see all the wonderful combinations that you enter. 

Happy crafting,
Rachel x

Wednesday, 10 October 2012

Fab'n'Funky Challenge #142 - Vintage

Hello Everyone,

I hope you've all had a good week.  I've been busy crafting when I should be packing as I'm away on Sunday for a few days to Glasgow.  Yay!

We had a great response to our "No Patterned Papers" challenge last week over at Fab'n'Funky Challenges.  I'm always inspired by all the ideas you use to showcase your lovely images. 

Well, I had better tell you all about our next exciting challenge.  The wonderful Shirley is our host this week and she has a fab challenge for us all...

Vintage

I know there are many vintage fans out there so now is your time to show off!  We have the fantastic Flonzcraft as our sponsors.  They are a rubber stamp company based in New Zealand.  Their catalogue of images is varied and ever expanding so check out their site here.  The challenge winner will receive a $20 voucher to the Flonzcraft store with free shipping too.  There is also 12% discount for anyone entering the challenge.  Sounds good to me!

Now, onto my card and the DT had wonderful Flonzcraft stamps to use for this challenge.  I chose to use the Perfect Peacock and was really impressed with the great quality image. 


I made a 7" card blank using white cardstock as I didn't have any to hand.  The papers are all printed from the Summer Peacock digikit in Serif's Craft Artist Professional 2.  I used the Tim Holtz paper distresser to rough up the edges of my pieces.  I also went over the gold mirri layer with an emery board.  I tried using a fine sandpaper but it just took the gold off completely. 

To show off the wonderful peacock I used gold detail embossing powder.  I used baby powder to dust over my card and stop the static first and then stamped in Versamark ink.  I love this ink!  Once I had covered in the embossing powder and poured the excess back into the pot, I heated from underneath with a directional heat tool.


I was really happy with how this turned out.  I may have even done a little happy dance a la Sue Wilson!

My sentiment is from Lili of the Valley and I also used the gold embossing powder to tie in with the image.  I cut the sentiment out with a 1.5" circle punch.  The feather was part of a large embellishment collection from My Craft Studio when they were still at Create and Craft.  I finished off with some aqua gems also from Create and Craft.


I would like to enter this card into the following challenge:-

Sketch Saturday #228 - Donna's DT Week with Little Claire's

Hope you're already planning your vintage creation for our challenge.  Have fun creating.

Happy crafting,
Rachel x

Saturday, 6 October 2012

Spellbinding Fun!

Hi Crafty People,

I'm having a rather lazy Saturday.  It started off great with a workout and then some crafting but I've really done nothing this pm!  I thought I would show you what I've been working on this weekend though.  I sent in an email to Leonie on Create and Craft this morning but I think I was just out of time.  :(  There's always next time though.

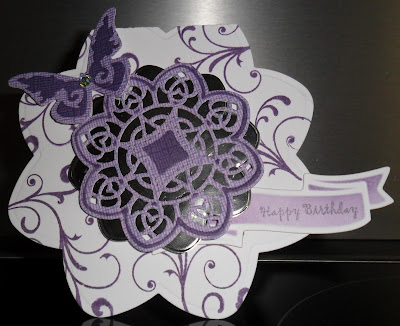
The world exclusive Spellbinders Pick of the Day that was on C&C a couple of weeks ago was just to die for!  Geddit?!  The dies are called D-Lites as they are smaller but more intricate in style.  I can't chose my favourite yet but this one is definitely in my top 5!


I used the smallest of the Spellbinders Grand Dahlia dies to make my card blank and then stamped around with Tim Holtz Dusty Concord Distress Ink, using a Debbi Moore flourish stamp.  The centrepiece is made from the D-Lites and this is Medallion Four.  The base is silver-mirri paper and then topped with an inked purple layer.  I cut the sentiment stamp from the Ribbon Banners set and then inked thought with DC DI again.  The butterfly is also a Spellbinders die and came from the Butterflies Two set, which was inked within an inch of it's life too!  I added a diamante to the centre of the butterfly for extra bling. 


I would like to enter this card into the following challenges:

Totally PaperCrafts #137 - Let's See Those Shapes
Make It Monday #109 - Anything Goes
By The Cute and Girly - Birthdays

Thanks for stopping by.  I hope you are having a great World Card Making Day 2012.

Happy crafting,
Rachel x

Wednesday, 3 October 2012

Fab'n'Funky Challenges # 141 - No Pattered Papers

Hi All,

What an overwhelming response to our last challenge.  Who knew there were so many things that start with F?!  We loved pouring over your creations and what wonderful ideas.  Check out the Fab'n'Funky Challenges blog to see our winner and Top 3.  Don't forget to pick up those badges too.

Now, lets get going with the next challenge and we have a super theme this week picked by the wonderful Ginny...

No Patterned Papers

You can use whatever you like but just make sure that no patterned papers sneak in there! We also have a brilliant sponsor this week in the form of Stamp Fairy - just click on their name and check out their super designs. 

I've had a notion to make an acetate card for a while and this just seemed like the perfect opportunity to try it out. 


I hope you an see this properly.  I used snowfall acetate from Hunkydory, then I cut two of the Spellbinders Grand Ovals in silver mirri-paper, one from the front and one for the back to cover my 3D foam tape.  The topper on the front is also from Hunkydory and was part of their Cute at Christmas collection.  I used Three Kings ribbon at the top and secured with super sticky tape to create a faux bow.  I added the snowflake topper with some Cosmic Shimmer glue.  This little topper also came from the Hunkydory kit. 


I hope you have as much fun making your creations this week as I have with mine.  Looking forward to seeing your designs.

Happy crafting,
Rachel x