Hi!
I have another card on the Hope and Chances blog today and I've included a tutorial for the Spellbinders Create a Sunflower die set. Here is my card:-
And here is the side view to show off the dimension of the sunflower
I started with 7" card blank and added layers in yellow and pearlescent brown. My pattered paper is from the Lawn Fawn Sweater Weather pad and this is definitely my favourite! I used the Spellbinders A2 Curved Borders One die set to create my wave between the two patterned papers. My sentiment came from Spellbinders Phrase Set One and its layered onto a cut down die cut from Spellbinders Labels Thirty Seven and the speech bubble from Spellbinders Snapshot.
My sunflower was made from the Spellbinders Create a Sunflower die set and I loved watching it take shape. I started by cutting all the petals and centres.
Then I shaped around my finger before gluing in place with Cosmic Shimmer dries clear glue.
It's important to offset each layer to give a full flower.
I'm sure this would look great in different colours and no one needs to know it's meant to be a sunflower! I attached my sunflower to my card with some 3D foam pads for added dimension. If you fancy having a go, head on over to the Hope & Chances Shop to pick up the sunflower die set and it's on sale.
Happy crafting,
Rachel x
Followers
Showing posts with label Cosmic Shimmer. Show all posts
Thursday, 11 February 2016
Monday, 14 October 2013
A Beautiful Birthday
Hello All,
I have something a bit different for you today. I have finally tried out my gilding flakes! I must have bought my very first one pot about two years ago but have never had the guts to get them out and play. Well, after seeing Sue Wilson on the Tool Shed this month, I just knew it was time to get gilding. Oh what fun they are but boy do they go everywhere! I think my gluing technique could be improved but it wasn't too shabby for a first attempt! Anyway, I'm waffling and I'm sure you'd like to see the card in question so here goes!
I stared with a piece of black card and the Leafy Background Stamp from JustRite. I inked up my stamp with the Cosmic Shimmer Flake and Glitter Glue and then quickly pressed it onto the card. You have to be quick or the card will tear. I know this from experience - it only happened the second time though!
Once the glue was in position I cleaned my stamp under the tap and then left to air dry. This is an important step as you don't want the glue to dry on your stamp. I added the Cosmic Shimmer gilding flakes in Sunrise Dawn and rubbed clean with my scoochy sponge from IndigoBlu. For added texture I ran the piece of card through a Sizzix embossing folder which looks like a vintage sunrise. Sorry, I don't know the name of the folder.
Nearly all of my cardstock is from Creative Expressions but the gold card is from Create and Craft's own brand. I would love a large stock of this but I'm down to my last two sheets. Sob! I used my Ultimate Pro to make the card bland and then attached my topper with super sticky tape to the bottom part of the easel. The ribbon was from my stash and matched so well I just had to use it.
For the main sentiment I stamped using JustRite's Enjoy the Day Vintage Labels Four in Versamark and then heat embossing in gold. I cut out with scissors, leaving a tiny border of plain cardstock. My butterfly is from Spellbinders Les Papillion. The gems came from Create and Craft.
I would like to enter this card in to the following challenge:
Justrite Challenge #107 - Easel Cards
I hope you are all having a great start to your week. I have thoroughly enjoyed my playtime this evening and can't wait to start on my next project.
Happy crafting,
Rachel x
I have something a bit different for you today. I have finally tried out my gilding flakes! I must have bought my very first one pot about two years ago but have never had the guts to get them out and play. Well, after seeing Sue Wilson on the Tool Shed this month, I just knew it was time to get gilding. Oh what fun they are but boy do they go everywhere! I think my gluing technique could be improved but it wasn't too shabby for a first attempt! Anyway, I'm waffling and I'm sure you'd like to see the card in question so here goes!
I stared with a piece of black card and the Leafy Background Stamp from JustRite. I inked up my stamp with the Cosmic Shimmer Flake and Glitter Glue and then quickly pressed it onto the card. You have to be quick or the card will tear. I know this from experience - it only happened the second time though!
Once the glue was in position I cleaned my stamp under the tap and then left to air dry. This is an important step as you don't want the glue to dry on your stamp. I added the Cosmic Shimmer gilding flakes in Sunrise Dawn and rubbed clean with my scoochy sponge from IndigoBlu. For added texture I ran the piece of card through a Sizzix embossing folder which looks like a vintage sunrise. Sorry, I don't know the name of the folder.
Nearly all of my cardstock is from Creative Expressions but the gold card is from Create and Craft's own brand. I would love a large stock of this but I'm down to my last two sheets. Sob! I used my Ultimate Pro to make the card bland and then attached my topper with super sticky tape to the bottom part of the easel. The ribbon was from my stash and matched so well I just had to use it.
For the main sentiment I stamped using JustRite's Enjoy the Day Vintage Labels Four in Versamark and then heat embossing in gold. I cut out with scissors, leaving a tiny border of plain cardstock. My butterfly is from Spellbinders Les Papillion. The gems came from Create and Craft.
I would like to enter this card in to the following challenge:
Justrite Challenge #107 - Easel Cards
I hope you are all having a great start to your week. I have thoroughly enjoyed my playtime this evening and can't wait to start on my next project.
Happy crafting,
Rachel x
Friday, 25 January 2013
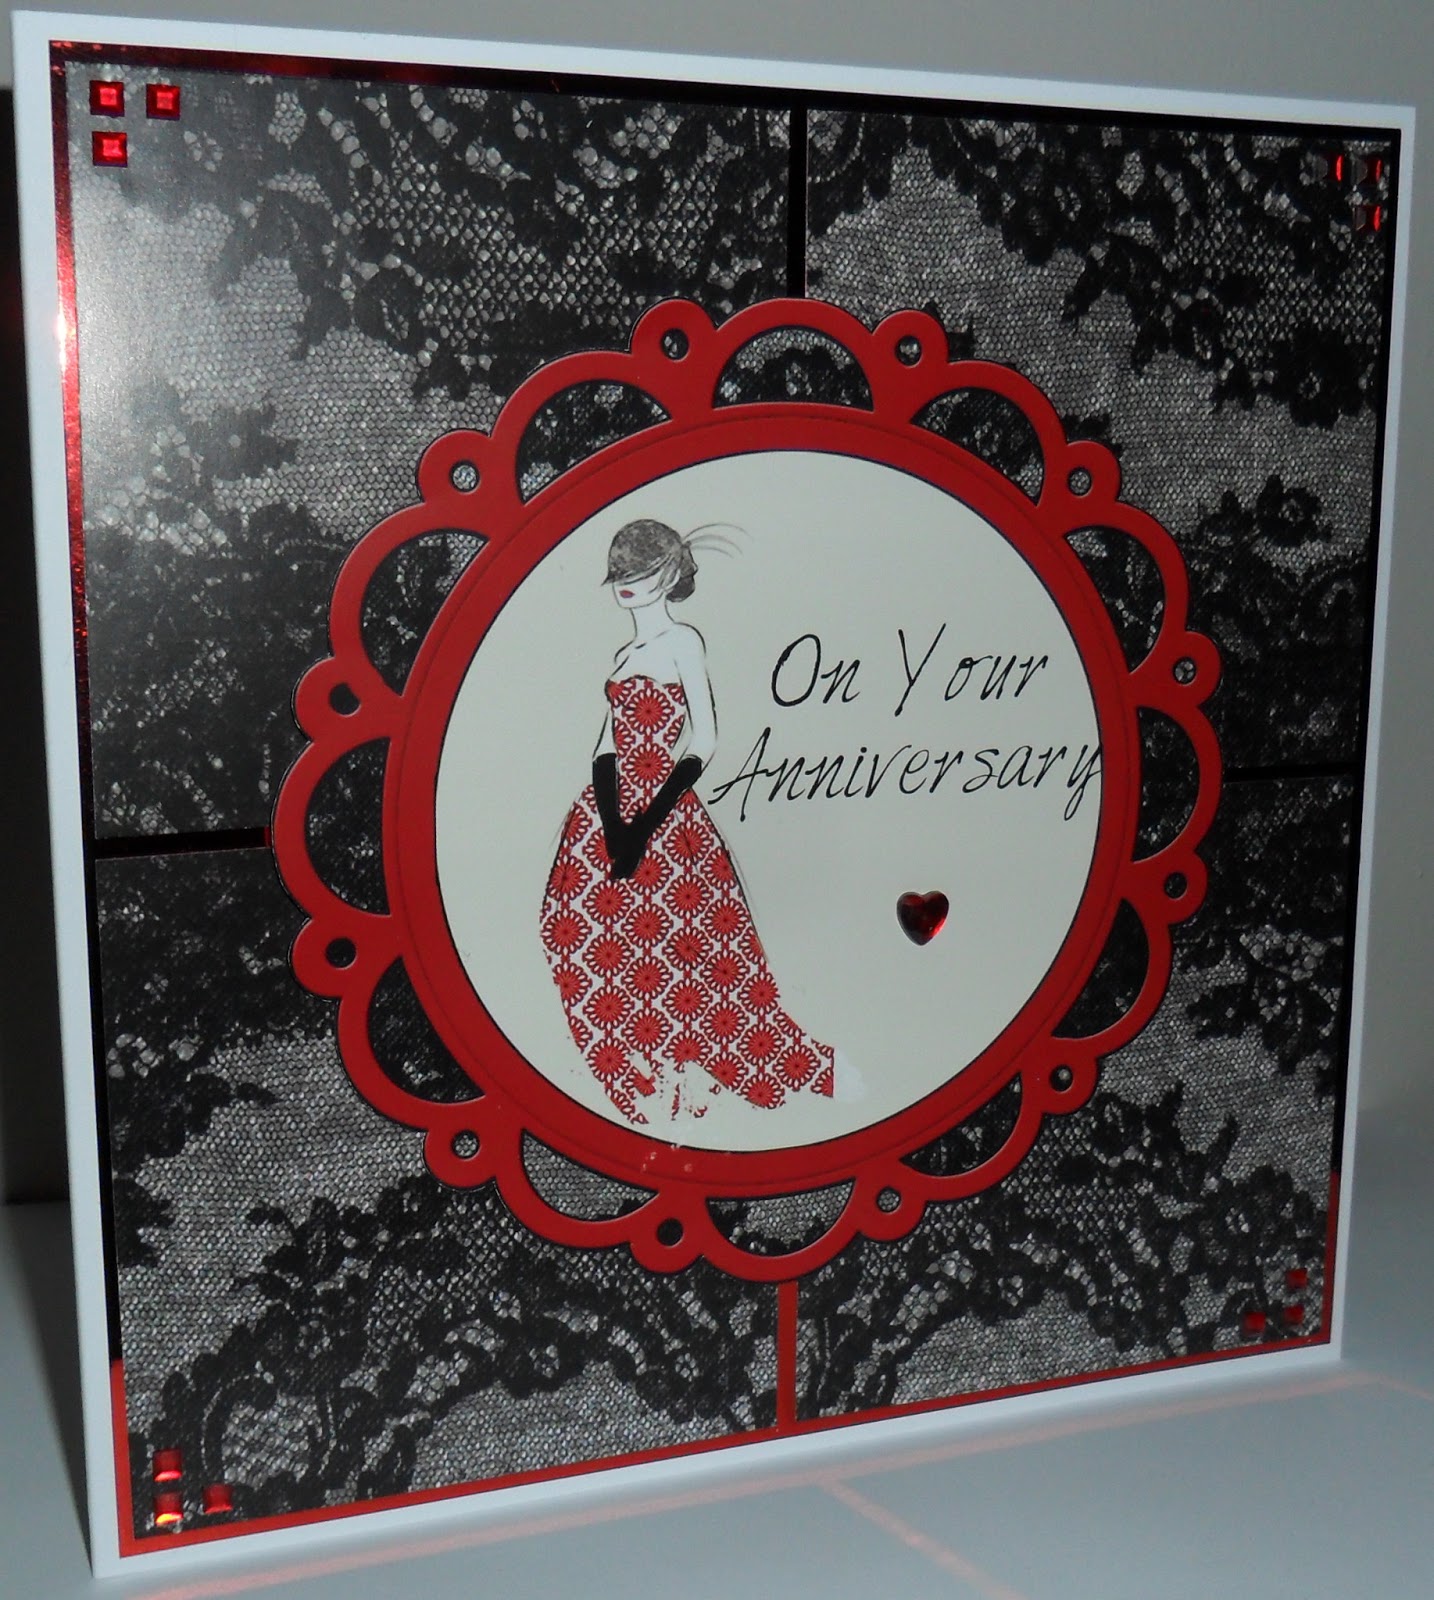
On Your Anniversary - Debbi Moore
Hi Everyone,
It's the weekend! Yippie! That means non-stop crafting for me! Well, I might have to give in and tackle the ironing at some point!
I've been playing with the paper kit that came with my latest Debbi Moore Inspirations magazine and have made an anniversary card for you tonight.
I went with the red and black colour combo and really like the papers that came in the magazine. I have to admit that I have ordered the matching Create and Craft Pick of the Week even though the crafty budget has been well and truly blown this month. Oh well, it's an investment!
I started with an 8" cardblank but cut it down to 7.5" square on my Tonic guillotine. I certainly couldn't craft without my guillotine. I added a layer of red mirri-card and then topped with the four squares of lacy patterned paper. I fussy cut the topper and added with shaker tape for a slightly raised look. I topped with a red heart gem using Cosmic Shimmer glue to adhere.
My finishing touch was to add the three gems to each corner. These weren't self adhesive so were a little bit fiddly. I used the same glue here.
Here is a close-up of that lovely topper
And now for a sideways view
I hope you are all having a great weekend and have avoided the dreaded snow. We've been really lucky here and only had a little flurry that hasn't stuck around. I really hate the ice though and that has appeared a bit more than I would have liked. Anyway, wishing you all a great and crafty weekend.
Happy crafting,
Rachel x
It's the weekend! Yippie! That means non-stop crafting for me! Well, I might have to give in and tackle the ironing at some point!
I've been playing with the paper kit that came with my latest Debbi Moore Inspirations magazine and have made an anniversary card for you tonight.
I went with the red and black colour combo and really like the papers that came in the magazine. I have to admit that I have ordered the matching Create and Craft Pick of the Week even though the crafty budget has been well and truly blown this month. Oh well, it's an investment!
I started with an 8" cardblank but cut it down to 7.5" square on my Tonic guillotine. I certainly couldn't craft without my guillotine. I added a layer of red mirri-card and then topped with the four squares of lacy patterned paper. I fussy cut the topper and added with shaker tape for a slightly raised look. I topped with a red heart gem using Cosmic Shimmer glue to adhere.
My finishing touch was to add the three gems to each corner. These weren't self adhesive so were a little bit fiddly. I used the same glue here.
Here is a close-up of that lovely topper
And now for a sideways view
I hope you are all having a great weekend and have avoided the dreaded snow. We've been really lucky here and only had a little flurry that hasn't stuck around. I really hate the ice though and that has appeared a bit more than I would have liked. Anyway, wishing you all a great and crafty weekend.
Happy crafting,
Rachel x
Wednesday, 3 October 2012
Fab'n'Funky Challenges # 141 - No Pattered Papers
Hi All,
What an overwhelming response to our last challenge. Who knew there were so many things that start with F?! We loved pouring over your creations and what wonderful ideas. Check out the Fab'n'Funky Challenges blog to see our winner and Top 3. Don't forget to pick up those badges too.
Now, lets get going with the next challenge and we have a super theme this week picked by the wonderful Ginny...
You can use whatever you like but just make sure that no patterned papers sneak in there! We also have a brilliant sponsor this week in the form of Stamp Fairy - just click on their name and check out their super designs.
I've had a notion to make an acetate card for a while and this just seemed like the perfect opportunity to try it out.
I hope you an see this properly. I used snowfall acetate from Hunkydory, then I cut two of the Spellbinders Grand Ovals in silver mirri-paper, one from the front and one for the back to cover my 3D foam tape. The topper on the front is also from Hunkydory and was part of their Cute at Christmas collection. I used Three Kings ribbon at the top and secured with super sticky tape to create a faux bow. I added the snowflake topper with some Cosmic Shimmer glue. This little topper also came from the Hunkydory kit.
I hope you have as much fun making your creations this week as I have with mine. Looking forward to seeing your designs.
Happy crafting,
Rachel x
What an overwhelming response to our last challenge. Who knew there were so many things that start with F?! We loved pouring over your creations and what wonderful ideas. Check out the Fab'n'Funky Challenges blog to see our winner and Top 3. Don't forget to pick up those badges too.
Now, lets get going with the next challenge and we have a super theme this week picked by the wonderful Ginny...
No Patterned Papers
You can use whatever you like but just make sure that no patterned papers sneak in there! We also have a brilliant sponsor this week in the form of Stamp Fairy - just click on their name and check out their super designs.
I've had a notion to make an acetate card for a while and this just seemed like the perfect opportunity to try it out.
I hope you an see this properly. I used snowfall acetate from Hunkydory, then I cut two of the Spellbinders Grand Ovals in silver mirri-paper, one from the front and one for the back to cover my 3D foam tape. The topper on the front is also from Hunkydory and was part of their Cute at Christmas collection. I used Three Kings ribbon at the top and secured with super sticky tape to create a faux bow. I added the snowflake topper with some Cosmic Shimmer glue. This little topper also came from the Hunkydory kit.
I hope you have as much fun making your creations this week as I have with mine. Looking forward to seeing your designs.
Happy crafting,
Rachel x
Wednesday, 29 August 2012
Fab'n'Funky Challenges #136 - Birthday Sketch
Hi Crafters,
Here we are again - on Wednesday already! We have another new challenge for you over on the Fab'n'Funky Challenges blog. We had loads of lovely leafy wonders last week and Pat K has chosen her Top 3 so head over to the blog to see the lucky winners.
We have lovely Shirley as our host this week and she has chosen to do a fab sketch to celebrate her daughter's birthday and here it is...
A great sketch and so many different possibilities. There are two sponsors for our challenge this week - StampArt Design by Kathryne and Joanna Sheen. So two sponsors means two winners! Double the fun! Be sure to check out their websites for great crafty goodies.
When I saw Shirley's great sketch, this image just popped into my head and I knew I wanted to use it. I hope Shirley doesn't mind that I twisted her sketch to fit my image *crosses fingers*!
And here is my card...
Isn't she lovely? Isn't she wonderful?! Just as well you can't hear me singing! This Saturated Canary image is called Springtime and is a favourite of mine. I've loved the cards that I've seen using this digi and hope my effort is up to standard. I coloured her using ProMarkers and FlexMarkers in Blush, Dusky Pink, Cinnamon, Henna, Caramel, Watermelon, Cocktail Pink, Sunflower, Soft Green, Tea Green, Apple and Leaf Green. I cut out my image and matting layer using Spellbinders Grand Ovals.
My papers are from Heidi Swapp and are just scrumptious! I was really loathe to cut them up but isn't that just a good excuse to buy more! To make my card blank I cut a piece of 350gsm card to 8" square and then covered with the flowery paper. I measured up the two triangles and then left a centimetre extra on the edge to attach to the back of the base card. The coloured card is strong enough to stand up as it is such good quality. The flowers were made using Spellbinders Bitty Blossoms from the flowery paper and here is a close-up.
I started by twirling the end around my pokey tool and just kept rolling using my fingers, making sure that the base was kept straight. I glued with Cosmic Shimmer Dries Clear Glue. My little butterflies were from a Tonic punch. I also glued these on with the CSDCG.
Do you fancy a peek at the inside now? Well here you go!
I typed up my sentiment on the computer using My Craft Studio and then printed it onto Super Smooth decoupage paper. I used the same Spellbinders Grand Oval to cut it out and then attached with double sided sticky tape so that the card can still close.
Hope you have fun with this great sketch and can't wait to see all the different variations. If you are looking for inspiration, my teamies have done wonderful examples so check them out.
Happy crafting,
Rachel x
Here we are again - on Wednesday already! We have another new challenge for you over on the Fab'n'Funky Challenges blog. We had loads of lovely leafy wonders last week and Pat K has chosen her Top 3 so head over to the blog to see the lucky winners.
We have lovely Shirley as our host this week and she has chosen to do a fab sketch to celebrate her daughter's birthday and here it is...
A great sketch and so many different possibilities. There are two sponsors for our challenge this week - StampArt Design by Kathryne and Joanna Sheen. So two sponsors means two winners! Double the fun! Be sure to check out their websites for great crafty goodies.
When I saw Shirley's great sketch, this image just popped into my head and I knew I wanted to use it. I hope Shirley doesn't mind that I twisted her sketch to fit my image *crosses fingers*!
And here is my card...
Isn't she lovely? Isn't she wonderful?! Just as well you can't hear me singing! This Saturated Canary image is called Springtime and is a favourite of mine. I've loved the cards that I've seen using this digi and hope my effort is up to standard. I coloured her using ProMarkers and FlexMarkers in Blush, Dusky Pink, Cinnamon, Henna, Caramel, Watermelon, Cocktail Pink, Sunflower, Soft Green, Tea Green, Apple and Leaf Green. I cut out my image and matting layer using Spellbinders Grand Ovals.
My papers are from Heidi Swapp and are just scrumptious! I was really loathe to cut them up but isn't that just a good excuse to buy more! To make my card blank I cut a piece of 350gsm card to 8" square and then covered with the flowery paper. I measured up the two triangles and then left a centimetre extra on the edge to attach to the back of the base card. The coloured card is strong enough to stand up as it is such good quality. The flowers were made using Spellbinders Bitty Blossoms from the flowery paper and here is a close-up.
I started by twirling the end around my pokey tool and just kept rolling using my fingers, making sure that the base was kept straight. I glued with Cosmic Shimmer Dries Clear Glue. My little butterflies were from a Tonic punch. I also glued these on with the CSDCG.
Do you fancy a peek at the inside now? Well here you go!
I typed up my sentiment on the computer using My Craft Studio and then printed it onto Super Smooth decoupage paper. I used the same Spellbinders Grand Oval to cut it out and then attached with double sided sticky tape so that the card can still close.
Hope you have fun with this great sketch and can't wait to see all the different variations. If you are looking for inspiration, my teamies have done wonderful examples so check them out.
Happy crafting,
Rachel x
Tuesday, 17 July 2012
Oh Christmas Tree
Hello Crafty Friends,
Second post this week already! Can you tell I've been on holiday since last week?! I said I was going to make 3 Christmas cards a day while I was off but I've only managed 3 so far and I've been off for a week! Ah well, it's only July!
This is a super sparkly card today. I love making sparkly things!
I started with three wooden tree embellishments and inked up a swirly Debbi Moore stamp with Versamark. I stamped on to the trees and then added Cosmic Shimmer embossing powder which was heated with a heat tool. I added Tim Holtz Bundled Sage Distress Ink over the top of the embossing so that the swirls resisted and made more of an impact.
To make the backgournd, I took a piece of Create and Craft pearlescent cardstock and used the same DM stamp with Versamark to make the patterns around the edge. I also used the Cosmic Shimmer embossing powder here too. The ribbon was originally cream seam binding which I coloured with the Bundled Sage DI. I added a Creative Expressions dazzler to the centre of the ribbon with Pinflair Glue Gel.
Hope you are all having a good week with plenty of crafty time.
Happy crafting,
Rachel x
Second post this week already! Can you tell I've been on holiday since last week?! I said I was going to make 3 Christmas cards a day while I was off but I've only managed 3 so far and I've been off for a week! Ah well, it's only July!
This is a super sparkly card today. I love making sparkly things!
I started with three wooden tree embellishments and inked up a swirly Debbi Moore stamp with Versamark. I stamped on to the trees and then added Cosmic Shimmer embossing powder which was heated with a heat tool. I added Tim Holtz Bundled Sage Distress Ink over the top of the embossing so that the swirls resisted and made more of an impact.
To make the backgournd, I took a piece of Create and Craft pearlescent cardstock and used the same DM stamp with Versamark to make the patterns around the edge. I also used the Cosmic Shimmer embossing powder here too. The ribbon was originally cream seam binding which I coloured with the Bundled Sage DI. I added a Creative Expressions dazzler to the centre of the ribbon with Pinflair Glue Gel.
Hope you are all having a good week with plenty of crafty time.
Happy crafting,
Rachel x
Sunday, 20 February 2011
In the beginning...
As this is my first blog post it would only be polite to introduce my crafting to you. This is one of the first computer crafted cards that I have made. I used the My Craft Studio Fab Glam Fifties CD-ROM for the images and mounted the main image and sentiment onto mirri-paper. The main image has been highlighted using Cosmic Shimmer Embossing Powder and a heat gun.
Subscribe to:
Posts (Atom)
