Followers

Showing posts with label Tonic. Show all posts

Wednesday, 20 November 2013

Fab'n'Funky Challenges #194 - Birthday Celebrations Week 2 (Anything Goes)

Hi Everyone,

It's Wednesday again already!  Where are these weeks going?!  We are still celebrating our 4th Birthday over at Fab'n'Funky Challenges and we would love to see your creations this week.  Thank you to everyone who entered our challenge last week.  I think the Anything Goes is a popular choice with everyone!  The winners have been announced on the blog so head on over to see if you've been lucky.


The challenge this week is about as easy as it can get!


'Anything Goes'

So play along! We have an amazing array of prizes to be won and it could be you!

Our wonderful sponsors
and
Prizes


Our brand new sponsor! 
Hello! My name is Joanna Munster, owner/designer/illustrator of Inspired by Stamping. I started crafting 12 1/2 years ago when I started capturing my daughter’s special moments with scrapbooking. I quickly fell in love with all things crafty including cross stitch, crocheting, knitting, drawing, jewelry making but my love has always been towards the paper crafty industry. It is a place where I can lose myself in creating for hours. 
Three years ago, my hubby, myself and our three children moved from the United States to Australia. While waiting for my working visa, I started drawing and paper crafting full time with my blog. One of my dear friends suggested that I make a stamp set with one of my drawings and this is where Inspired by Stamping started.
We love every moment of working in this industry from the beautiful women and men that we meet daily, to the amazing and creative designs that we see when a friend uses an Inspired by Stamping set. 
You as our customer will ALWAYS be our top priority! If you have any questions or if something is not right, please let us know. We will get back to you ASAP! Our email is customerservice@inspiredbystamping.com


Prize is 3 digis of the winners choice from
The Doodle Pantry shop


Prize is a voucher to spend in store at
Lili of the Valley


Prize - 5 digis of the winners Choice from
Stampart Design by Kathryne
 - and a GDT spot at Fab'n'Funky Challenges


Prize is a class of the winner's choice


My Creative Classroom is an online arts and crafts learning center. Our interactive and in-depth courses are instructor led and filled with wonderful projects and techniques to help you get the most out of your supplies. Our Fall Semester  offers over 100 classes to choose from. We also offer Library classes which feature retired classes at 40-50% off their original price!  New this fall we are offering deals on bundled classes. 
Register for any class beginning in the month of November and you'll be automatically enrolled in the FREE class, Tag It!  It's our way of saying Thank You for your continued support.

Tag It!
We are excited to be sponsoring Fab'n'Funky Challenges. You can view our entire class list on our website at My Creative Classroom. You can also view classes on our Facebook Page too! One lucky winner will receive a free seat to a Workshop class of their choice.....Good Luck!

Prize is 3 digis of the winners choice from the Inky impressions Shop


Prize is 3 images of the winners choice from 
the Lacy Sunshine Shop


I have chosen to use Christmas Candle from StampArt Design by Kathryne as it was so festive.


I started with my image and coloured it in with ProMarkers in Forest Green, Leaf Green, Ruby, Lipstick Red, Yellow, Sunshine, Mustard, Ivory and Cool Grey 3.  I used a Tonic Die to cut out the circle shape.  Using the super sticky red liner tape I went around the back of the die cut and then attached some seam binding in a pleated pattern.  To get the perfect colour match, I coloured this ribbon using the Ruby ProMaker.  The red glitter dots were added using Stickles glitter glue.  I had originally only planned to do three on each side but as you can see I didn't stop there!


My decorative paper came from a paper pad by Creata and I added a tiny layer to make it pop by colouring the edge of a piece of white card using the Leaf Green ProMarker.  The embossed background was made using one of the Christmas Embossalicious folders.  My card blank is 6" in size.

I really hope you'll be able to join our party and link up your creation this week.  We look forward to seeing you at Fab'n'Funky Challenges.

Happy crafting,
Rachel x

Wednesday, 29 May 2013

Fab'n'Funky Challenges #173 - One for the Girls

Hi Everyone,

We are back to Wednesday again and I'm not sure I like how fast this year seems to be going!  I doubt it will slow down though!

Wednesday means a new challenge at Fab'n'Funky Challenges but it also means that the winners and Top 3 from last week have been chosen.  All the details can be found over at on the F'n'F blog.

We have our blogging Mama as our host this week - the fabulous Judith.  I love the theme this week as it it totally me!  So without further ado our theme is...


One for the Girls

Just make a female-themed project and link it up - couldn't be simpler!  We have two sponsors this week too.  My Creative Classroom and StampArt Design by Kathryne.  Two sponsors means two winners so let's get crafting!  

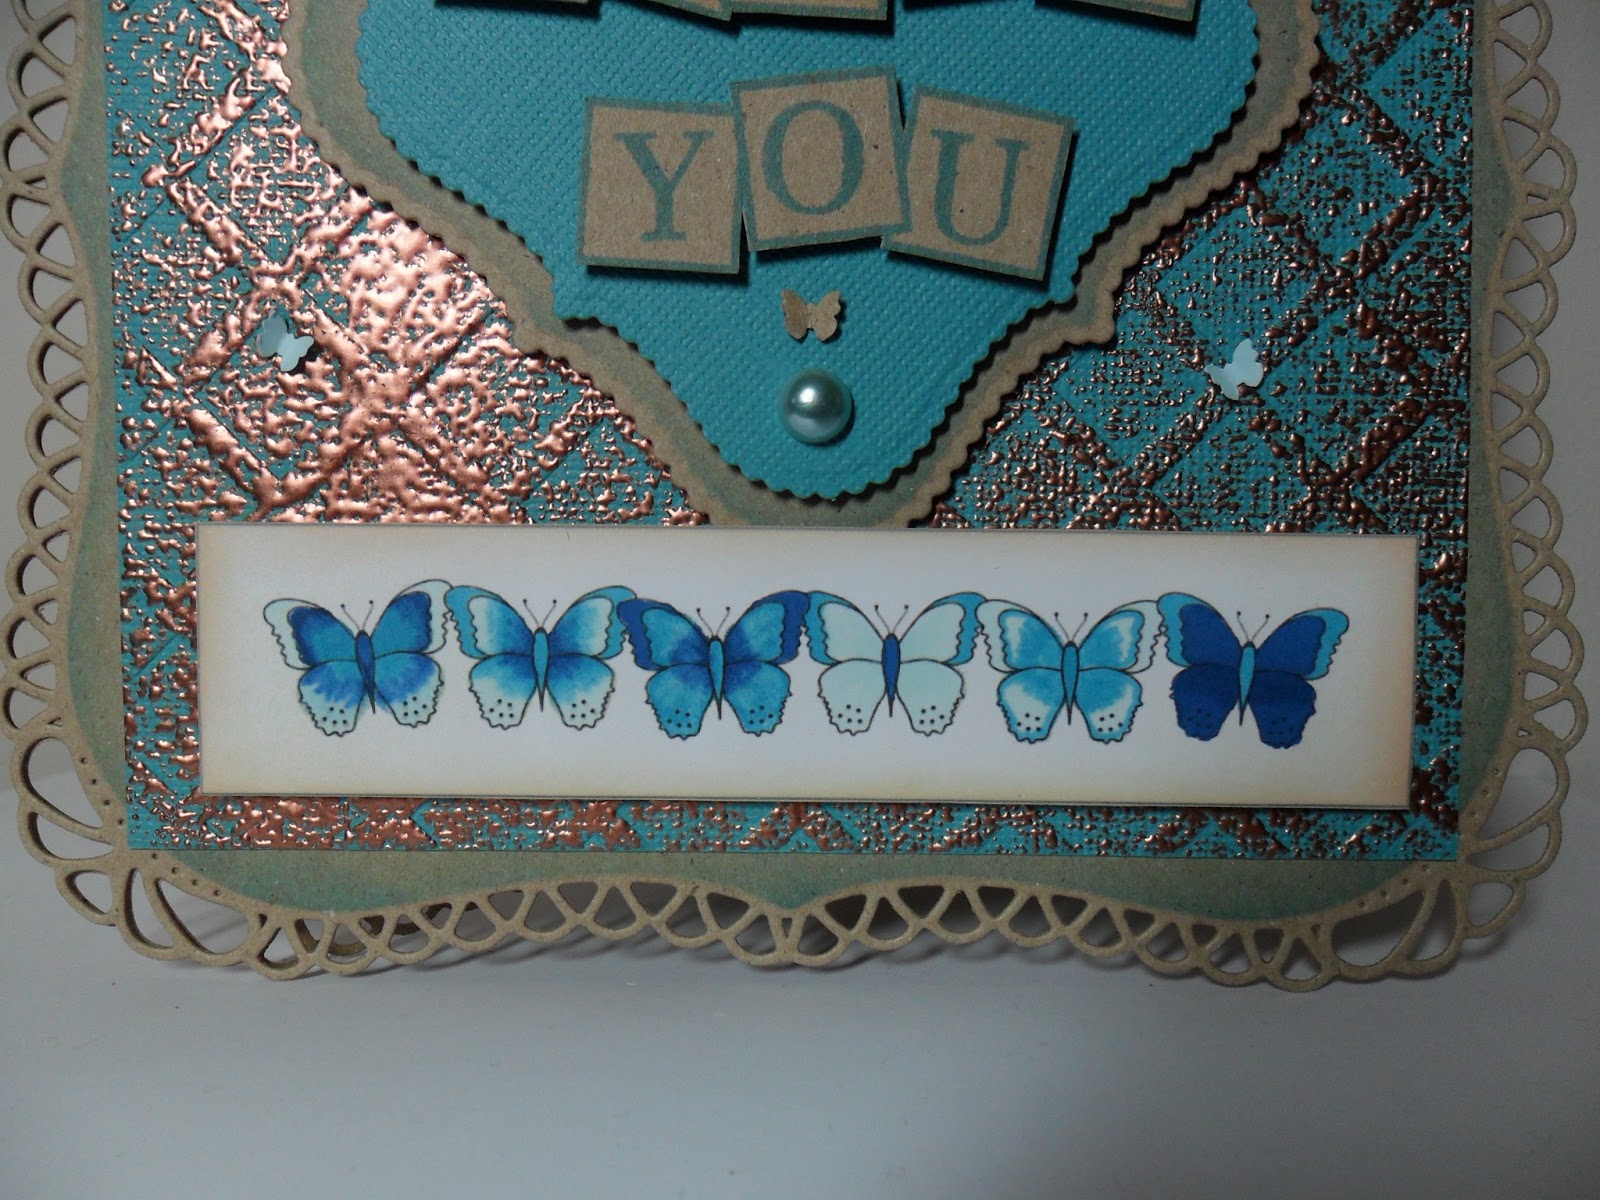
This is my card for the challenge - the girly elements are the butterflies, pearls and decorative edging.  


I used a StampArt Design by Kathryne image for my card called Butterfly Border 1 and coloured with FlexMarkers in Aquamarine, Surf Blue and Navy Blue.  I inked the edge with Tim Holtz Distress ink in Antique Linen for an aged effect.


My base card was made from two of the Spellbinders Grand Decorative Labels One cut in kraft card.  I attached with the super stick red liner tape.  While still in the die I inked through with Tim Holtz Distress Ink in Broken China.  My main background was made with Coredinations cardstock.  I embossed using the lattice Embossalicious folder from Crafter's Companion and then lightly brushed a Versamark inkpad over the top.  I added Debbi Moore's metal magic and heated from behind with a heat tool.  I really like the effect that this has created.


My sentiment topper was created with Spellbinders Scalloped Labels One in kraft and Coredinations.  Using Claritystamp's Letterbox Alphabet set and Broken China Distress Ink I made the sentiment as I wanted.  The squares come as triple, double and single boxes so I after stamped the triple box, I masked it off and then used the double box stamp to create a five letter space for my wording.  Claritystamps really are the best quality I've ever had the pleasure to use.  My tiny butterflies were punched using a Tonic punch and I just coloured a piece of super smooth paper with the Aquamarine FlexMarker to get the perfect match.  The pearls came free from Create and Craft a while back.

I really hope to see you join us for our girly challenge this week.

Happy crafting,
Rachel x

I'd like to enter this card into the following challenge:-
Shelly's Images - Show Us What You Got

Friday, 25 January 2013

On Your Anniversary - Debbi Moore

Hi Everyone,

It's the weekend! Yippie!  That means non-stop crafting for me!  Well, I might have to give in and tackle the ironing at some point!

I've been playing with the paper kit that came with my latest Debbi Moore Inspirations magazine and have made an anniversary card for you tonight. 


I went with the red and black colour combo and really like the papers that came in the magazine.  I have to admit that I have ordered the matching Create and Craft Pick of the Week even though the crafty budget has been well and truly blown this month.  Oh well, it's an investment!

I started with an 8" cardblank but cut it down to 7.5" square on my Tonic guillotine.  I certainly couldn't craft without my guillotine.  I added a layer of red mirri-card and then topped with the four squares of lacy patterned paper.  I fussy cut the topper and added with shaker tape for a slightly raised look.  I topped with a red heart gem using Cosmic Shimmer glue to adhere.  

My finishing touch was to add the three gems to each corner.  These weren't self adhesive so were a little bit fiddly.  I used the same glue here.

Here is a close-up of that lovely topper


And now for a sideways view


I hope you are all having a great weekend and have avoided the dreaded snow.  We've been really lucky here and only had a little flurry that hasn't stuck around.  I really hate the ice though and that has appeared a bit more than I would have liked.  Anyway, wishing you all a great and crafty weekend.

Happy crafting,
Rachel x

Tuesday, 22 January 2013

The Cuttelbug Spot DT Card - Squares

Hi All,

I hope you're well and are enjoying a great week. 

We have a great new challenge at The Cuttlebug Spot in our "Get Into Shape" season.  We would like you to use...

Squares

It couldn't be simpler - just use a square in your project, link it up and you're done!

Now, onto my card.  I decided to use a new die that I received for Christmas.  It is a butterfly-edged square from Tonic and is super pretty.


I started with a handmade pearlescent pink card blank at 5" and rounded the bottom two corners with a corner punch.  I added a layer of gold textured and embossed cardstock from Create and Craft, also rounded with my corner punch. 


My dies are the main feature and I used brown and pink pearlescent cardstock here.  The top butterflies were cut using Spellbinders Les Papillion and I inked the pink layer with Tim Holtz Distress Ink in Antique Linen.  The top butterfly is only attached in the centre so the wings stand off from the page.

The photos really don't do this card justice but I hope you like it and have fun entering our squares challenge. 

Happy crafting,
Rachel x