Hi Everyone,
I have another Spellbinders butterfly card for you today. My very favourite type of card to make. If you were eagle-eyed you might have spotted this card on the Tool Shed on Create and Craft TV a few weeks ago. I had my email read out and my card shown whilst Sue Wilson was making a gorgeous creation.
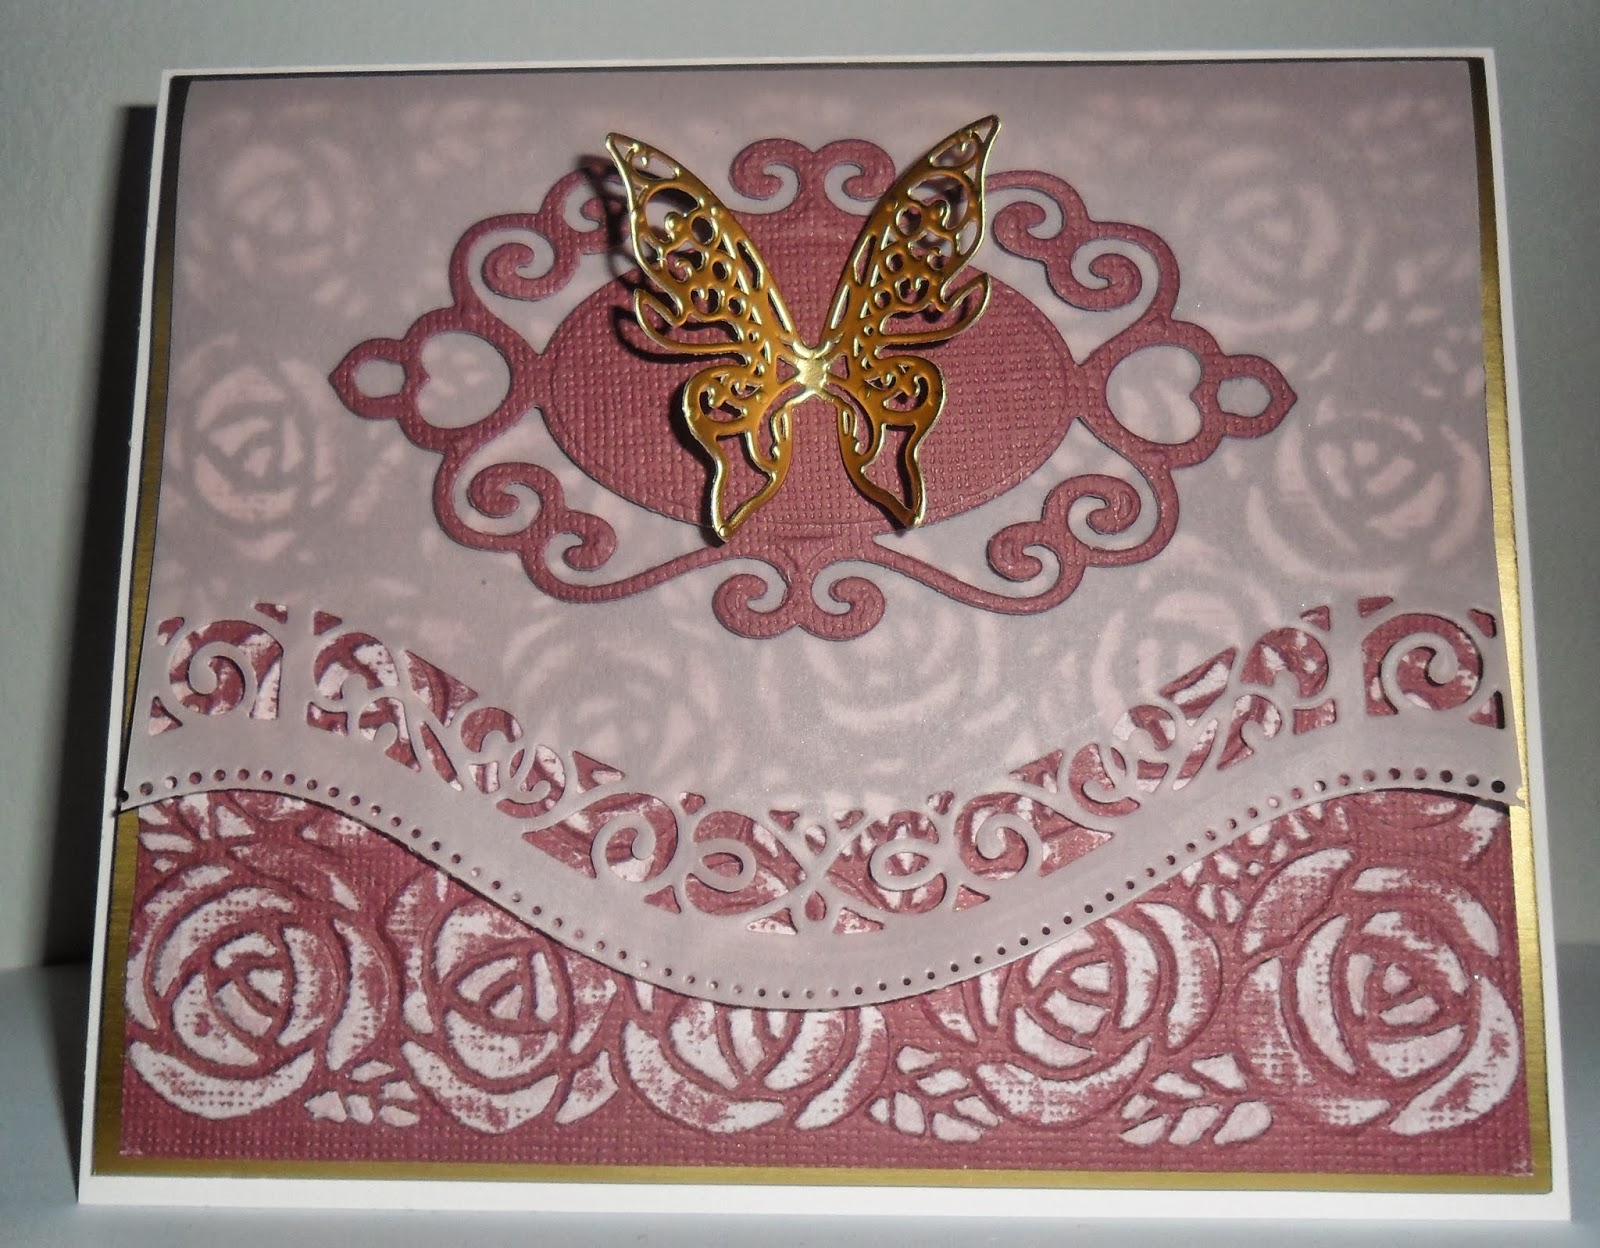
I started with a piece of Creative Expressions Coconut White cardstock and scored on my Ultimate Pro to make the card blank. I added a piece of mat gold card and then to make my "topper", I embossed a piece of Coredinations with the Spellbinders Cabbage Rose M-bossability folder and sanded back. My vellum was cut using the Spellbinders Borderabilities Curved Borders 2. I added a Spellbinders Fancy Tags Two die and finally finished off with a butterfly from Les Papillion die cut in the same mat gold card.
I hope you like my card.
Happy crafting,
Rachel x
Followers
Showing posts with label Create and Craft. Show all posts
Sunday, 20 October 2013
Monday, 14 October 2013
A Beautiful Birthday
Hello All,
I have something a bit different for you today. I have finally tried out my gilding flakes! I must have bought my very first one pot about two years ago but have never had the guts to get them out and play. Well, after seeing Sue Wilson on the Tool Shed this month, I just knew it was time to get gilding. Oh what fun they are but boy do they go everywhere! I think my gluing technique could be improved but it wasn't too shabby for a first attempt! Anyway, I'm waffling and I'm sure you'd like to see the card in question so here goes!
I stared with a piece of black card and the Leafy Background Stamp from JustRite. I inked up my stamp with the Cosmic Shimmer Flake and Glitter Glue and then quickly pressed it onto the card. You have to be quick or the card will tear. I know this from experience - it only happened the second time though!
Once the glue was in position I cleaned my stamp under the tap and then left to air dry. This is an important step as you don't want the glue to dry on your stamp. I added the Cosmic Shimmer gilding flakes in Sunrise Dawn and rubbed clean with my scoochy sponge from IndigoBlu. For added texture I ran the piece of card through a Sizzix embossing folder which looks like a vintage sunrise. Sorry, I don't know the name of the folder.
Nearly all of my cardstock is from Creative Expressions but the gold card is from Create and Craft's own brand. I would love a large stock of this but I'm down to my last two sheets. Sob! I used my Ultimate Pro to make the card bland and then attached my topper with super sticky tape to the bottom part of the easel. The ribbon was from my stash and matched so well I just had to use it.
For the main sentiment I stamped using JustRite's Enjoy the Day Vintage Labels Four in Versamark and then heat embossing in gold. I cut out with scissors, leaving a tiny border of plain cardstock. My butterfly is from Spellbinders Les Papillion. The gems came from Create and Craft.
I would like to enter this card in to the following challenge:
Justrite Challenge #107 - Easel Cards
I hope you are all having a great start to your week. I have thoroughly enjoyed my playtime this evening and can't wait to start on my next project.
Happy crafting,
Rachel x
Wednesday, 10 July 2013
Fab'n'Funky Challenges - #179 Christmas in July
Ho Ho Ho!
No, I've not lost the plot, it is still July! We have a great new challenge over at Fab'n'Funky Challenges with the talented Anne-Marie as our host. She has chosen a fab theme...
Dig out your glitter, red and green paper and get festive! I love making Christmas cards so this was the perfect excuse to dig out my festive stash! We have two fab sponsors this week too. The first is My Creative Classroom who are offering one lucky winner the opportunity to participate in an online class of their choice. Our second sponsor is Dilly Beans - one of my favourites. The winner of this prize will receive 3 digital images of their choice.
The DT were so lucky to be able to work with great images from Dilly Beans and I chose to use Holly Penguin Framed (image #493) for my card.
What a cutie! I coloured my image with ProMarkers in Lilac, Winter Berry, Forest Green, Leaf Green, Ruby, Gold, Summer Sun, Pineapple Crush and all the Cool Greys.
I went a little bit wild last week and ordered loads of the new Christmas Memory Box dies. They are just scrummy! I have used the Gabriella Border die here with lilac glitter cardstock from Create and Craft. My card blank was embossed with the Spellbinders M-Bossabilities folder Holiday Magic.
I really hope you'll join us for some festive fun this week.
Happy crafting,
Rachel x
No, I've not lost the plot, it is still July! We have a great new challenge over at Fab'n'Funky Challenges with the talented Anne-Marie as our host. She has chosen a fab theme...
Christmas in July
Dig out your glitter, red and green paper and get festive! I love making Christmas cards so this was the perfect excuse to dig out my festive stash! We have two fab sponsors this week too. The first is My Creative Classroom who are offering one lucky winner the opportunity to participate in an online class of their choice. Our second sponsor is Dilly Beans - one of my favourites. The winner of this prize will receive 3 digital images of their choice.
The DT were so lucky to be able to work with great images from Dilly Beans and I chose to use Holly Penguin Framed (image #493) for my card.
What a cutie! I coloured my image with ProMarkers in Lilac, Winter Berry, Forest Green, Leaf Green, Ruby, Gold, Summer Sun, Pineapple Crush and all the Cool Greys.
I went a little bit wild last week and ordered loads of the new Christmas Memory Box dies. They are just scrummy! I have used the Gabriella Border die here with lilac glitter cardstock from Create and Craft. My card blank was embossed with the Spellbinders M-Bossabilities folder Holiday Magic.
I really hope you'll join us for some festive fun this week.
Happy crafting,
Rachel x
Wednesday, 6 March 2013
Fab'n'Funky Challenges #161 - Cute and Cuddly
Hi All,
We're back with another great challenge at Fab'n'Funky Challenges. But first, if you were one of the lovely people who entered our Pastel Colours challenge last week head over to the Fab'n'Funky Challenges blog to see our random winner and Top 3.
I'm sure you're all wondering what we have in store for you this week. Well, the glamourous Judith has picked a fab theme for you all...
We will be looking for cute makes featuring cuddlies! It's really up to you how you interpret this one.
Our sponsor this week is the wonderful Bugaboo Stamps. The winner will receive 7 digi stamps of their choice. Click here if you fancy checking out the great designs in advance.
The DT were lucky to be able to use Bugaboo stamps for this challenge and as soon as I saw this image I knew it would be perfect. This is Sock Monkey Boy...
I coloured my little cutie with ProMarkers in Walnut, Cocoa, Cinnamon, Starfish, Cornflower, Cobalt Blue and Capri Blue. Using the blender pen, I dotted around the image to add texture.
My brown and orange cardstock are Coredinations and I scrunched up the orange and then sanded back to reveal the core. I created the background with an embossing folder from Spellbinders - Twigs and Tweets. I hoped you can see the dimension. The dotty paper is from Create and Craft and I bought it ages ago in two sizes! My buttons started as plain white but I used the Walnut ProMarker to make them match my image. They dried really quickly too after I had blotted with some of the Hunkydory foam pad backings! Crafters really do use everything in sight for creating!
I would like to enter this card into the following challenges:
Sketch Saturday #248
Dutch Dare Card Challenges #206 - One for the Boys
Eclectic Ellapu - Something for a child
C.R.A.F.T. Challenge #196 - Use embossing
A Gem of a Challenge #69 - Button It
Send A Smile 4 Kids - For the Boys
I really hope you can make it cute and cuddly this week. Be sure to click onto my fellow Fab'n'Funky's blogs for inspiration.
Happy crafting,
Rachel x
We're back with another great challenge at Fab'n'Funky Challenges. But first, if you were one of the lovely people who entered our Pastel Colours challenge last week head over to the Fab'n'Funky Challenges blog to see our random winner and Top 3.
I'm sure you're all wondering what we have in store for you this week. Well, the glamourous Judith has picked a fab theme for you all...
Cute and Cuddly
We will be looking for cute makes featuring cuddlies! It's really up to you how you interpret this one.
Our sponsor this week is the wonderful Bugaboo Stamps. The winner will receive 7 digi stamps of their choice. Click here if you fancy checking out the great designs in advance.
The DT were lucky to be able to use Bugaboo stamps for this challenge and as soon as I saw this image I knew it would be perfect. This is Sock Monkey Boy...
I used the current layout from Sketch Saturday for this card and here is the example
I coloured my little cutie with ProMarkers in Walnut, Cocoa, Cinnamon, Starfish, Cornflower, Cobalt Blue and Capri Blue. Using the blender pen, I dotted around the image to add texture.
My brown and orange cardstock are Coredinations and I scrunched up the orange and then sanded back to reveal the core. I created the background with an embossing folder from Spellbinders - Twigs and Tweets. I hoped you can see the dimension. The dotty paper is from Create and Craft and I bought it ages ago in two sizes! My buttons started as plain white but I used the Walnut ProMarker to make them match my image. They dried really quickly too after I had blotted with some of the Hunkydory foam pad backings! Crafters really do use everything in sight for creating!
I would like to enter this card into the following challenges:
Sketch Saturday #248
Dutch Dare Card Challenges #206 - One for the Boys
Eclectic Ellapu - Something for a child
C.R.A.F.T. Challenge #196 - Use embossing
A Gem of a Challenge #69 - Button It
Send A Smile 4 Kids - For the Boys
I really hope you can make it cute and cuddly this week. Be sure to click onto my fellow Fab'n'Funky's blogs for inspiration.
Happy crafting,
Rachel x
Tuesday, 5 March 2013
All Kinds of Cuttlebug News
Hi Cuttlebuggers,
I have some good news, along with some sad news. The Cuttlebug Spot is closing. Boo! But.....there is a brand new Cuttlebug blog for you - Cuttlebug Mania.
Unfortunately, I've decided to step down, for now, from the design team. I'm so busy creating wedding stationery for my brother's wedding and some other things have come up so I'm not able to dedicate as much time to these challenges as I'd like. Hopefully once things settle down, I might be back at Cuttlebug Mania. Watch this space!
The first great challenge at Cuttlebug Mania is live right now. This week the theme is...
My absolute favourite thing to create on a project so this was an easy one for me and here is my card...
I have some good news, along with some sad news. The Cuttlebug Spot is closing. Boo! But.....there is a brand new Cuttlebug blog for you - Cuttlebug Mania.
Unfortunately, I've decided to step down, for now, from the design team. I'm so busy creating wedding stationery for my brother's wedding and some other things have come up so I'm not able to dedicate as much time to these challenges as I'd like. Hopefully once things settle down, I might be back at Cuttlebug Mania. Watch this space!
The first great challenge at Cuttlebug Mania is live right now. This week the theme is...
Butterflies
My absolute favourite thing to create on a project so this was an easy one for me and here is my card...
It's a twisted easel style and was the birthday card I gave to my best friend, Vicki. There was a chorus of "Wows" around the room when she opened it so I think it was a hit! For the topper, I started with matt silver card and then using a piece of designer paper from a free paper stack designed by Kate Knight I used the Spellbinders Butterfly Corner die in the top corners. I added a butterfly cut with Create and Craft textured cardstock in purple and spritzed with Mister Huey shine spray. I added gems to the centre to really bling it up. The ribbon is from Papermania.
My base layer was again made using the silver matt cardstock and Kate Knight designer paper. This was free with Cardmaking and Papercraft magazine a couple of years ago. To make my stopper I used Spellbinders Fancey Labels Two and then the sentiment was cut from white cardstock using Spellbinders Framed Tags One. I propped this up on foam pads to make sure my card stayed open. All my die cutting was done using my beloved Cuttlebug.
I hope you'll join the team at Cuttlebug Mania this week and for many weeks to come. They have some brilliant challenges coming up that are not to be missed. I'd really like to thank Jannie, Kerry and all the lovely ladies at Cuttlebug Mania, along with Nilda from The Cuttlebug Spot. I've loved using my Cuttlebug to create these cards and it'll always be my No 1 crafting tool. All the best with the new blog, ladies.
Happy crafting,
Rachel x
Sunday, 27 January 2013
CHA Spellbinders - With Love
Hello Everyone,
I hope you've had a great weekend so far. I've been enjoying plenty of crafty time. I'm just about to start tidying my crafty stash in preparation of a set of new storage drawers arriving next week. I think I'll still need a bigger house though!
I finally received my bundle of CHA Spellbinders on Wednesday and have been playing every day ever since! Here is one of the first cards I made and I really liked the way it turned out.
I started with two cuts using Spellbinders Detailed Scallops - love these dies. I had printed the yellow gingham (yeehaa!) paper for another project but ended up not using it but it was the perfect colour base for my card. I embossed the paper with a swirly Crafts-Too embossing folder and attached some My Paper Stash ribbon in black satin. My topper is made up from two cuts of the Stately Circles in black cardstock and yellow gingham, then two layers of the Decagons, all off-set. I stamped my sentiment in black although this is showing up slightly yellowy on the Centrua Pearl cardstock. Finally I added three black gems in each corner.
Has anyone else invested in these dies? I'd love to see what you've been making.
Happy crafting,
Rachel x
Friday, 25 January 2013
On Your Anniversary - Debbi Moore
Hi Everyone,
It's the weekend! Yippie! That means non-stop crafting for me! Well, I might have to give in and tackle the ironing at some point!
I've been playing with the paper kit that came with my latest Debbi Moore Inspirations magazine and have made an anniversary card for you tonight.
I went with the red and black colour combo and really like the papers that came in the magazine. I have to admit that I have ordered the matching Create and Craft Pick of the Week even though the crafty budget has been well and truly blown this month. Oh well, it's an investment!
I started with an 8" cardblank but cut it down to 7.5" square on my Tonic guillotine. I certainly couldn't craft without my guillotine. I added a layer of red mirri-card and then topped with the four squares of lacy patterned paper. I fussy cut the topper and added with shaker tape for a slightly raised look. I topped with a red heart gem using Cosmic Shimmer glue to adhere.
My finishing touch was to add the three gems to each corner. These weren't self adhesive so were a little bit fiddly. I used the same glue here.
Here is a close-up of that lovely topper
And now for a sideways view
I hope you are all having a great weekend and have avoided the dreaded snow. We've been really lucky here and only had a little flurry that hasn't stuck around. I really hate the ice though and that has appeared a bit more than I would have liked. Anyway, wishing you all a great and crafty weekend.
Happy crafting,
Rachel x
Tuesday, 22 January 2013
The Cuttelbug Spot DT Card - Squares
Hi All,
I hope you're well and are enjoying a great week.
We have a great new challenge at The Cuttlebug Spot in our "Get Into Shape" season. We would like you to use...
It couldn't be simpler - just use a square in your project, link it up and you're done!
Now, onto my card. I decided to use a new die that I received for Christmas. It is a butterfly-edged square from Tonic and is super pretty.
I started with a handmade pearlescent pink card blank at 5" and rounded the bottom two corners with a corner punch. I added a layer of gold textured and embossed cardstock from Create and Craft, also rounded with my corner punch.
The photos really don't do this card justice but I hope you like it and have fun entering our squares challenge.
Happy crafting,
Rachel x
I hope you're well and are enjoying a great week.
We have a great new challenge at The Cuttlebug Spot in our "Get Into Shape" season. We would like you to use...
Squares
It couldn't be simpler - just use a square in your project, link it up and you're done!
Now, onto my card. I decided to use a new die that I received for Christmas. It is a butterfly-edged square from Tonic and is super pretty.
I started with a handmade pearlescent pink card blank at 5" and rounded the bottom two corners with a corner punch. I added a layer of gold textured and embossed cardstock from Create and Craft, also rounded with my corner punch.
My dies are the main feature and I used brown and pink pearlescent cardstock here. The top butterflies were cut using Spellbinders Les Papillion and I inked the pink layer with Tim Holtz Distress Ink in Antique Linen. The top butterfly is only attached in the centre so the wings stand off from the page.
The photos really don't do this card justice but I hope you like it and have fun entering our squares challenge.
Happy crafting,
Rachel x
Saturday, 6 October 2012
Spellbinding Fun!
Hi Crafty People,
I'm having a rather lazy Saturday. It started off great with a workout and then some crafting but I've really done nothing this pm! I thought I would show you what I've been working on this weekend though. I sent in an email to Leonie on Create and Craft this morning but I think I was just out of time. :( There's always next time though.
The world exclusive Spellbinders Pick of the Day that was on C&C a couple of weeks ago was just to die for! Geddit?! The dies are called D-Lites as they are smaller but more intricate in style. I can't chose my favourite yet but this one is definitely in my top 5!
I used the smallest of the Spellbinders Grand Dahlia dies to make my card blank and then stamped around with Tim Holtz Dusty Concord Distress Ink, using a Debbi Moore flourish stamp. The centrepiece is made from the D-Lites and this is Medallion Four. The base is silver-mirri paper and then topped with an inked purple layer. I cut the sentiment stamp from the Ribbon Banners set and then inked thought with DC DI again. The butterfly is also a Spellbinders die and came from the Butterflies Two set, which was inked within an inch of it's life too! I added a diamante to the centre of the butterfly for extra bling.
I would like to enter this card into the following challenges:
Totally PaperCrafts #137 - Let's See Those Shapes
Make It Monday #109 - Anything Goes
By The Cute and Girly - Birthdays
Thanks for stopping by. I hope you are having a great World Card Making Day 2012.
Happy crafting,
Rachel x
Tuesday, 21 August 2012
Love is like a butterfly...
Hello Crafters,
I have a Spellbinders card for you tonight. I luuuurve Spellbinders! It's the Pick of the Day on Create and Craft and Ideal World tonight/tomorrow but would you believe it I have them all! Well, nearly all of them!
For this card, I started with some purple pearlescent card and embossed it with the Ornamental Iron M-Bossability folder. I managed to extend the pattern by placing the folder over the edge of the plates on the second embossing run.
I used a Debbi Moore stamp and then cut it out with Spellbinders Beaded Squares. I inked through the die with Tim Holtz Distress Ink in Dusty Concord. This is the first time I've used my proper blending tool and it was a doddle!
I cut two squares, one black and one silver mirri-paper with my flimsy knock-off dies - that'll teach me! The ribbon is also from Creative Expressions. The butterfly is another Spellbinder and came from the Wings of Hope set.
I really do love using Spellbinders and can't wait to see what will make it onto my next card. Hope you are all enjoying crafty days.
Happy crafting,
Rachel x
Saturday, 28 July 2012
Les Papillion Birthday
Hi All,
Hope you have been enjoying your Saturday. We've had a very sunny day but I've been enjoying it in my craft corner! I have a card made with the new Spellbinders for you today. I just couldn't resist the wonderful dies and had them ordered within about 3 minutes! Create and Craft will be the financial ruin of me! Did anyone else take the plunge and order them too?
I love the new butterfly dies called Les Papillion and knew these would have to feature on my first card. I started by matting and layering the pink pearlescent and gold cardstock. My embossed cardstock was made using the Elegance M-Bossability folder from Spellbinders. My border strips are from the Asian Accents set. I used Scalloped Labels One for underneath my butterfly. I cut the top layer of the butterfly from the Spellbinders packaging and actually passed it through the Grand Calibur about 30 times. Unfortunately, due to the intricacy of the die it just wouldn't quite cut through. So out came the old fashioned technique of cutting with scissors! I attached with Pinflair Glue Gel.
The sentiment stamp is from Create and Craft and layered onto Fancy Framed Tags One. These really need to be cut with greaseproof paper. I ended up ripping three just by not using this technique.
Have any of you got crafty plans for tomorrow? I'm hoping to work on a Fab'n'Funky challenge idea but I'll keep that one under wraps until Wednesday!
Happy crafting,
Rachel x
Wednesday, 20 June 2012
Fab'n'Funky Challenges # 126 - Polka Dots
Hi Everyone,
We sure do have a lot of wonderful Dads! One winner has been picked at random and Emma has also chosen her top 3. What a hard job she had with so many wonderful entries. Check out the Fab'n'Funky Challenges blog to see if it was you! Don't forget to grab your badges.
Now onto the challenge for this week and we have the lovely Anne-Marie as our host. She has chosen one of my favourite challenges so far...
I loved making this card. It just came together when I saw the wonderful Bugaboo image. We are so lucky to have them as our sponsor this week. Check out the brilliant Bugaboo Stamps website for some great digi's and inspiration.
Apologies for the slightly blurred image. I think my ribbon flower was so big that the camera kept trying to focus on that instead of the whole card!
I used Kanban Tutti Frutti pearlescent cardstock for the base card and scored it in half with my Ultimate Pro. I added a section of polka dot paper and then punched a scalloped edge into brown pearlescent cardstock. This was achieved with an EK Success punch. The glittery ribbon came from DoCrafts online store. I coloured the image with Promarkers in the following colours:
Cinnamon
Henna
Walnut
China Blue
Cobolt Blue
Blender
We sure do have a lot of wonderful Dads! One winner has been picked at random and Emma has also chosen her top 3. What a hard job she had with so many wonderful entries. Check out the Fab'n'Funky Challenges blog to see if it was you! Don't forget to grab your badges.
Now onto the challenge for this week and we have the lovely Anne-Marie as our host. She has chosen one of my favourite challenges so far...
Polka Dots
I loved making this card. It just came together when I saw the wonderful Bugaboo image. We are so lucky to have them as our sponsor this week. Check out the brilliant Bugaboo Stamps website for some great digi's and inspiration.
Apologies for the slightly blurred image. I think my ribbon flower was so big that the camera kept trying to focus on that instead of the whole card!
I used Kanban Tutti Frutti pearlescent cardstock for the base card and scored it in half with my Ultimate Pro. I added a section of polka dot paper and then punched a scalloped edge into brown pearlescent cardstock. This was achieved with an EK Success punch. The glittery ribbon came from DoCrafts online store. I coloured the image with Promarkers in the following colours:
Cinnamon
Henna
Walnut
China Blue
Cobolt Blue
Blender
The shape for my image is one of the Spellbinders Grand Labels Twenty Three. The ribbon rose actually started life as wired ribbon on a Christmas present! I pulled out the wire from one edge of the ribbon and then scrunched up the other edge, still on the wire, to make a ruffle effect. I attached it to a length of super sticky tape on my craft sheet and simply rolled it up and then secured the end into the tape. It is attached with another piece of super sticky. My sentiment came free from Create and Craft as part of the Club Member's free gift about a year ago.
Looking forward to seeing your dotty projects.
Happy Crafting,
Rachel x
Wednesday, 28 March 2012
Fab'n'Funky Challenge #114 - Easter
A lovely range of entries for our Honour Your Mum challenge last week. Very girly and cute. Check out the Fab'n'Funky Challenges blog to see if you are our lucky winner.
Now that the chocoholics' favourite holiday is almost here, we have chosen to celebrate with a seasonal challenge...
Our brilliant sponsor for this challenge is Joanna Sheen and the winner will recieve a £10 voucher for her website. Woo!
This is my Easter inspired card...
When I saw this image for the first time, I instantly fell in love with it. Tweety Pie is just so cute and I love the look on Sylvester's face. I printed the image from the Crafting with Looney Tunes CD-ROM, which I bought from Create and Craft last year.
I took a 5" square card blank and cut two squares, one purple and one yellow and offset them on the card with double sided sticky tape and large foam pads. The American seambinding was coloured using my Cyan Promarker. I added a strip of super sticky tape to the edge of the yellow card and folded the ribbon into it to attach.
The image was attached using foam pads to give dimension. I cut the sentiment shape using Spellbinders Ribbon Banners. I used a Quickie Glue Pen to glitter the edges with My Craft Studio Ultra Fine Glitter. The sentiment is from the Daisy and Dandelion "Some Bunny Loves You" stamp set.
Happy crafting,
Rachel x
Now that the chocoholics' favourite holiday is almost here, we have chosen to celebrate with a seasonal challenge...
EASTER
Our brilliant sponsor for this challenge is Joanna Sheen and the winner will recieve a £10 voucher for her website. Woo!
This is my Easter inspired card...
When I saw this image for the first time, I instantly fell in love with it. Tweety Pie is just so cute and I love the look on Sylvester's face. I printed the image from the Crafting with Looney Tunes CD-ROM, which I bought from Create and Craft last year.
I took a 5" square card blank and cut two squares, one purple and one yellow and offset them on the card with double sided sticky tape and large foam pads. The American seambinding was coloured using my Cyan Promarker. I added a strip of super sticky tape to the edge of the yellow card and folded the ribbon into it to attach.
The image was attached using foam pads to give dimension. I cut the sentiment shape using Spellbinders Ribbon Banners. I used a Quickie Glue Pen to glitter the edges with My Craft Studio Ultra Fine Glitter. The sentiment is from the Daisy and Dandelion "Some Bunny Loves You" stamp set.
Happy crafting,
Rachel x
Saturday, 6 August 2011
Art Nouveau in the 21st Century
This is the one and only challenge card that I have made, so far. It was for the weekly sketch challenge on the DoCrafts site that is set by Katy Goodbeer. I took the topper and decopage from the Nouveau Style CD-ROM by Sharon Duncan and teamed it with Create and Craft textured card. The black card was embossed with the same dotty folder from the previous post and then I added a strip of turquoise glitter card to bring out the colour in the wings of the butterfly. The ribbon was from DoCrafts and was as cheap as chips for 68p for 5m!
Subscribe to:
Posts (Atom)