Followers

Wednesday, 30 October 2013

Fab'n'Funky Challenges #191 - Halloween

Boo! 

Can you tell that we are celebrating Halloween over at Fab'n'Funky Challenges this week?!  Angelique is our very talented and kind host and you're going to be spooked by her chosen challenge...

Halloween

It couldn't be simpler!  Just make a Halloween themed project and link it up.  We also have a brilliant sponsor this week too - Bugaboo Stamps.  


They are offering 7 digis to the randomly chosen winner.  So make sure you're in it to win it!  I chose to use Magical Tidbits Bookshelf from Bugaboo and really love the versatility of this image.


I coloured my image with ProMarkers in Bright Orange, Soft Melba, Tropical Sunrise, Black, Forest Green, Apple Green, Green Shoot and all the Cool Greys.  To get the shape, I used Spellbinders Labels Twenty Five and then created a faux layer by drawing around the die and cutting out with scissors.  


My stripey paper is from Bo Bunny's Vicki B Collection.  The black card is from Creative Expressions and I embossed it using an Embossalicious folder.  To finish I added three green gems from Create and Craft which are a really light lime green but haven't shown up too well in the photo.

I really hope you'll come along to spook us this week at Fab'n'Funky Challenges.

Happy Crafting,
Rachel x

Wednesday, 23 October 2013

Fab'n'Funky Challenges #190 - Distress

Hi Crafters,

I hope you've been crafting away, enjoying using all your stash.  I've been in the kitchen instead of my crafty space - my friends and I started our annual Come Dine With Me last weekend and I was the first to host (things can only get better!).  I'm not known for my culinary skills but it seemed to go down a treat!

We have a super new challenge for you over at Fab'n'Funky Challenges with the winners and Top 3 from last week's Spots and Stripes challenge having been announced.  Take a peek at the blog to see if you were chosen.  

For this week, the wonderful Beccy is our host and she has chosen a great challenge that I'm sure you're going to love.


Distress

I don't think this one needs any explaining!  We also have two great sponsors this week - Flonzcraft and Lacy Sunshine.  Both have fab prizes on offer for the random winners.  Plus there will be a Top 3, as always.

I chose to use a Lacy Sunshine image, my first from this designer and I just fell in love with this Parisian image called Adele - Paris City Girl.


I coloured my image with ProMarkers in Marsh Green, Fresh Meadow, Walnut, Cinnamon, March Hare, Satin, Rose Pink, Pink Mittens, Blush and Dusky Pink.  To create the frame I cut out using Spellbinders Labels Twenty-Nine which I thought resembled an open book.  So that it stood out I inked through the die with Tim Holtz Distress Ink in Bundled Sage.


My mat was created from a piece of Coredinations cardstock which is also what I used for the Eiffel Tower, sanding it back to reveal the core.  This die came from the Spellbinders French Frills set.  I already had the doily coloured using a ProMarker and it seemed to match so I just used it to save colouring another.  I found the satin ribbon in my stash and I think it might have come from Create and Craft.  My DP is from Wild Rose Studio's Letters from Paris set.  It's a gorgeous collection of papers with a pink and green colour scheme.  I distressed the layers with a pair of scissors because, of course, I couldn't find my Tim Holtz paper distresser when I needed it!  Finally I finished with three square gems in the top right corner.  I bought these from my local craft shop when they were reduced to £1.  Bargain!  

I hope you can join in our distressing this week at Fab'n'Funky Challenges.  

Happy crafting,
Rachel x

Sunday, 20 October 2013

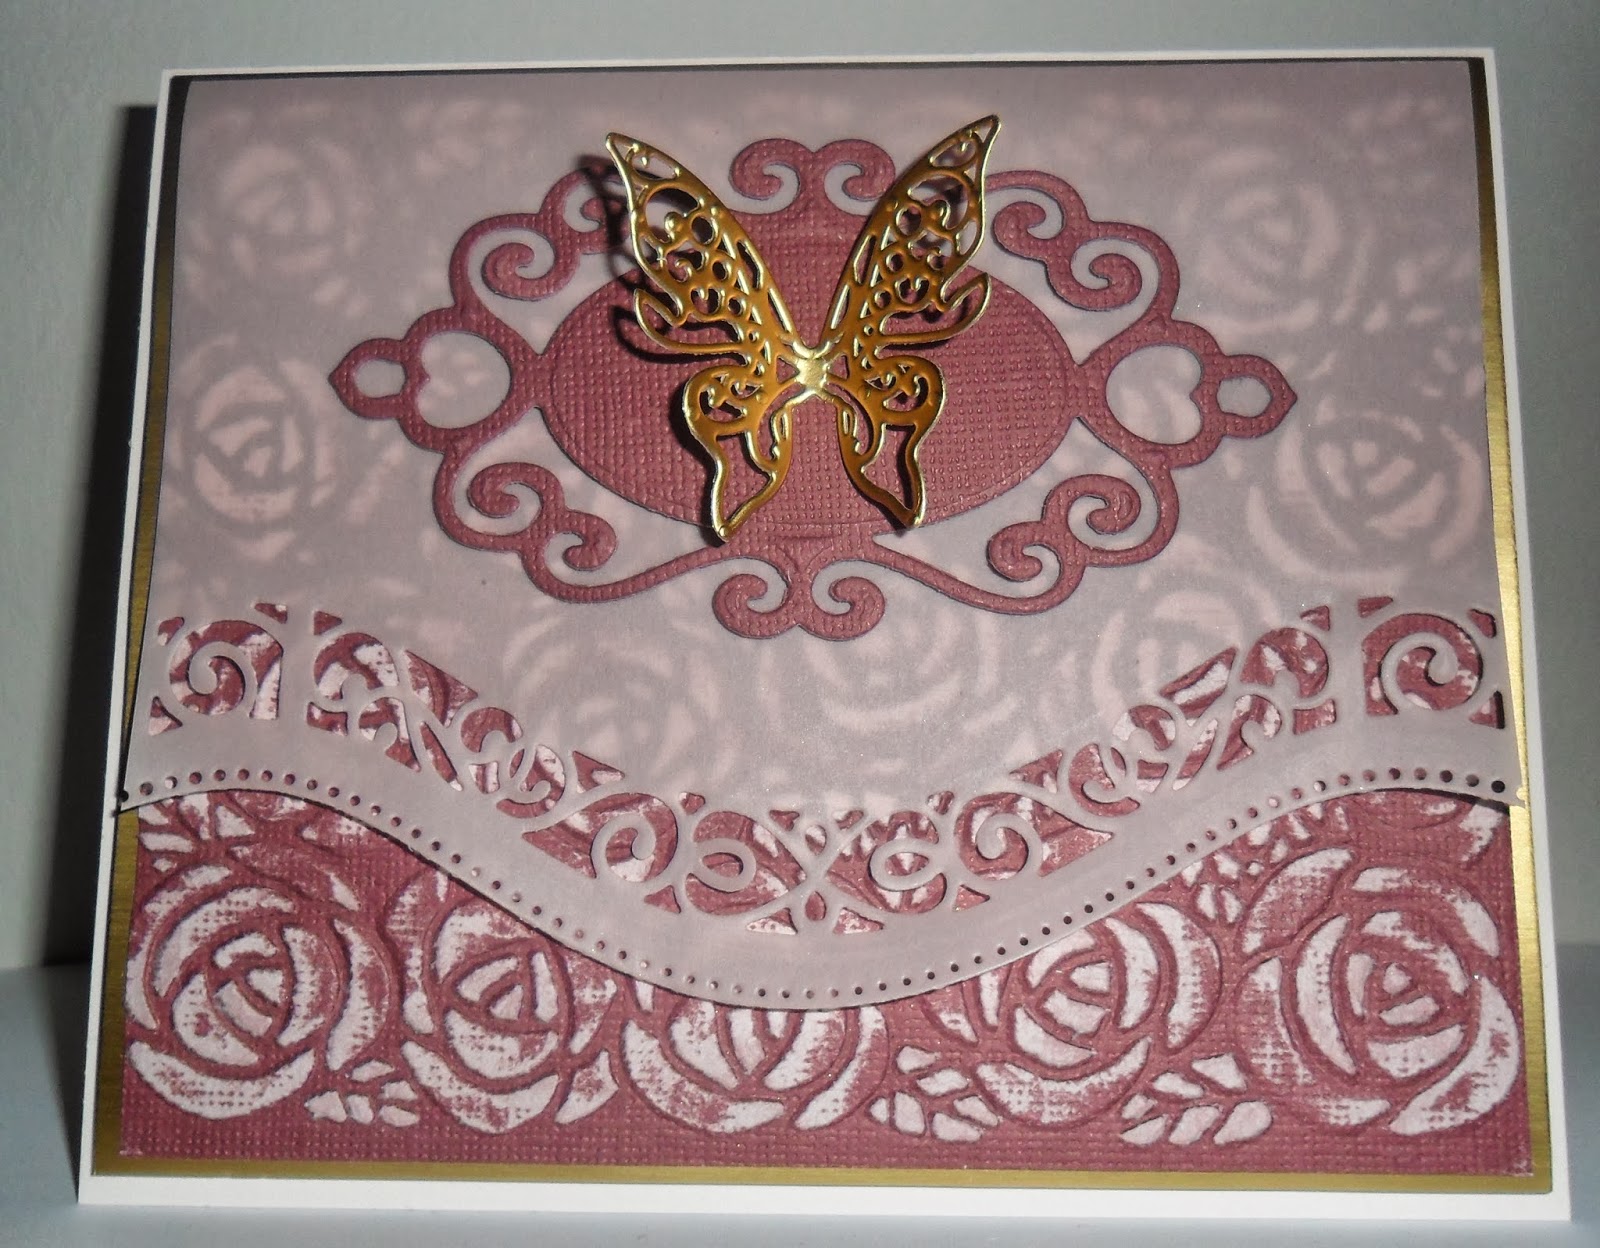
Cabbage Rose Butterfly Card

Hi Everyone,

I have another Spellbinders butterfly card for you today.  My very favourite type of card to make.  If you were eagle-eyed you might have spotted this card on the Tool Shed on Create and Craft TV a few weeks ago.  I had my email read out and my card shown whilst Sue Wilson was making a gorgeous creation.


I started with a piece of Creative Expressions Coconut White cardstock and scored on my Ultimate Pro to make the card blank.  I added a piece of mat gold card and then to make my "topper", I embossed a piece of Coredinations with the Spellbinders Cabbage Rose M-bossability folder and sanded back.  My vellum was cut using the Spellbinders Borderabilities Curved Borders 2.  I added a Spellbinders Fancy Tags Two die and finally finished off with a butterfly from Les Papillion die cut in the same mat gold card.

I hope you like my card.

Happy crafting,
Rachel x

Wednesday, 16 October 2013

Fab'n'Funky Challenges #189 - Spots and Stripes

Hi All,

We're back with another great challenge at Fab'n'Funky Challenges.  But first, if you were one of the lovely people who entered our last challenge head over to the Fab'n'Funky Challenges blog to see our random winner and Top 3.

I'm sure you're all wondering what we have in store for you this week.  Well, the super talented Pat has picked a fab theme for you all...

Spots and Stripes

Just make sure you use both spots and stripes and link up your creation for a chance to win.  We have two great sponsors this week - Inky Impressions and StampArt Design by Kathryne.  Two sponsors means two prizes!
The DT were lucky to be able to use images from both sponsors for this challenge and I chose to use a sentiment digi from StampArt Design by Kathryne.


This was a fairly simple card and it came together really quickly.  Great for all those Christmas cards I still have to make!  I started with a 5" kraft card blank and embossed with a Spellbinders M-bossability embossing folder.  The stripey paper is from Craft Artist but I'm not sure which digikit.  I cut my gold snowflake with Spellbinders 2011 Snowflake Pendant.  I simply cut my sentiment out with scissors and then ran a ProMarker around the edge.  I coloured the centre with ProMarkers too, in Ruby, Lipstick Red and Caramel.  

I hope you can join us to go dotty and stripey at Fab'n'funky Challenges this week.

Happy crafting,
Rachel x

Monday, 14 October 2013

A Beautiful Birthday

Hello All,

I have something a bit different for you today.  I have finally tried out my gilding flakes!  I must have bought my very first one pot about two years ago but have never had the guts to get them out and play.  Well, after seeing Sue Wilson on the Tool Shed this month, I just knew it was time to get gilding.  Oh what fun they are but boy do they go everywhere!  I think my gluing technique could be improved but it wasn't too shabby for a first attempt!  Anyway, I'm waffling and I'm sure you'd like to see the card in question so here goes!


I stared with a piece of black card and the Leafy Background Stamp from JustRite.  I inked up my stamp with the Cosmic Shimmer Flake and Glitter Glue and then quickly pressed it onto the card.  You have to be quick or the card will tear.  I know this from experience - it only happened the second time though!

Once the glue was in position I cleaned my stamp under the tap and then left to air dry.  This is an important step as you don't want the glue to dry on your stamp.  I added the Cosmic Shimmer gilding flakes in Sunrise Dawn and rubbed clean with my scoochy sponge from IndigoBlu.  For added texture I ran the piece of card through a Sizzix embossing folder which looks like a vintage sunrise.  Sorry, I don't know the name of the folder.


Nearly all of my cardstock is from Creative Expressions but the gold card is from Create and Craft's own brand.  I would love a large stock of this but I'm down to my last two sheets.  Sob!  I used my Ultimate Pro to make the card bland and then attached my topper with super sticky tape to the bottom part of the easel.  The ribbon was from my stash and matched so well I just had to use it.  


For the main sentiment I stamped using JustRite's Enjoy the Day Vintage Labels Four in Versamark and then heat embossing in gold.  I cut out with scissors, leaving a tiny border of plain cardstock.  My butterfly is from Spellbinders Les Papillion.  The gems came from Create and Craft.

I would like to enter this card in to the following challenge:
Justrite Challenge #107 - Easel Cards

I hope you are all having a great start to your week.  I have thoroughly enjoyed my playtime this evening and can't wait to start on my next project.  

Happy crafting,
Rachel x

Wednesday, 9 October 2013

Fab'n'Funky Challenges #188 - It's All Rock and Roll to Me (Music)

Hi Fellow Crafters,

We have the pleasure of launching a brand new challenge over at Fab'n'Funky Challenges today.  First though, we have winners from our Ribbon challenge from last week.  They are up on the blog now so head on over to take a look and see if you were lucky this time. 

The very talented and kind Judith is our host this week and she has chosen a brilliant theme...


It's All Rock and Roll to Me

We would like you to make a project with a music theme.  It can be hip hop, dance, rap, heavy metal, pop or any other genre you fancy.  Our sponsor this week is the fantastic Kenny K.  


I just love these images and the DT were lucky to be able to work with Kenny K images.  I chose to use Rock Chick.  Here is my finished card...


Isn't she cool?!  I started with an 8" card blank but honestly I cut my DP too small and ended up making a slightly smaller card.  I mat and layered with Coredinations and then some dotty paper for DCWV.  To make the broken disc I cut up an old CD and then coloured it with a black ProMarker.  The music notes were cut using the Cricut ages ago so I'm not sure of the cartridge as it was just by chance that I found them in time to add them to my card!  


My image layer is a piece of silver textured card which I embossed using a Craft Concepts embossing folder and then cut out using Spellbinders Matting Basics B.  I coloured my image with ProMarkers in Ruby, Lipstick Red, Sky Blue, True Blue, Arctic Blue, Cool Greys 1, 3 and 5 and then fussy cut.  Before adding my image with foam pads I glued on the music note die cut from Memory Box.

I hope you'll join us with your tune this week at Fab'n'Funky Challenges.

Happy crafting,
Rachel x

Wednesday, 2 October 2013

Fab'n'Funky Challenges #187 - Ribbon

Hi Crafters,

It's Wednesday again and that means a new challenge at Fab'n'Funky but first, head on over to the blog to see our winner from last week's button challenge.  We loved your great designs.

Again I predict a lot of love for our challenge this week!  The very talented Dawn is our host and she has chosen the theme of...

Ribbon

Simples!  I don't think this one needs any explaining!  Our sponsor this week is the wonderful Stamp Fairy.  Check out their great designs here.


The DT were lucky to be able to use Stamp Fairy images for our projects this week and here is what I came up with using Mimi Falltime 5.


I made a 7" card blank and then embossed using an Embossaliscious embossing folder.  I inked with Tim Holtz Distress Ink in Antique Linen.  My hexagon paper came free with a magazine and I really love all the patterns.  I added a piece of kraft crepe paper.  My ribbon was coloured using a ProMarker in Wild Cranberry.  


My image was coloured using ProMarkers in Blush, Walnut, Caramel, Pink Mittens, Rose Pink, Wild Cranberry, Apple Cider and Sandstone.  I cut her out using the new Spellbinders dies Branching Out which launched at CHA in the summer.  I also inked through the die with the Antique Linen to add depth and for dimension I added foam pads.

I really hope you'll add some ribbon to your project and join us this week at Fab'n'Funky Challenges.

Happy crafting,
Rachel x

Wednesday, 25 September 2013

Fab'n'Funky Challenges #186 - Button It

Hi All,

I hope you are well and crafting with plenty of lovely goodies.  We have a great new challenge over at Fab'n'Funky Challenges but firstly, I'd like to thank everyone who entered our Leaves challenge last week.  We had a lovely time looking at all the wonderful creations.  The winner and Top 3 are over on the blog now so check it out soon.

On to this week and Wendy is our brilliant host with a great theme that you can really put your own spin on...

Button It

We would like you to use buttons on  your project.  They can be real, paper, digital or just mahoosive!  Our sponsor this week is one of my favourite digital stamp companies - The Paper Shelter.  The random winner will receive a $20 voucher to spend in their online store.  I'm ever so slightly jealous!

The DT were very lucky to be able to work with The Paper Shelter images this week and I chose to use Rhythm Everywhere.


I started with a 6" scalloped card blank and my first layer was made using kraft card and a piece of Pebbles backing paper.  I then embossed the blue Coredinations with a Spellbinders M-bossability folder called Hearts.  This layer was also matted with kraft card.  My ribbon was recycled from some pajamas packaging!  My buttons were created with a die from the Spellbinders Sewing Elements set.


I used Spellbinders Circles to cut out my main image and layer and then mounted on foam pads from Hunkydory.  The little shiny bursts are the waste from another card!  I used a Memory Box die (Snowflake Burst) with Centura Pearl cardstock and they just went perfectly.

I really hope you can join us for our Button It challenge this week at Fab'n'Funky Challenges.

Happy crafting,
Rachel x

I would like to enter this card into the following challenges:
Allsorts Challenge Blog #225 - Button Up
Card Mania Challenge #30 - Cute as a Button

Wednesday, 11 September 2013

Fab'n'Funky Challenges #184 - Sweet Treats


Hi Crafters,

Well we are on Wednesday again and that means a brand new challenge at Fab'n'Funky.  It is my turn to host this week and as we are sponsored by the fabulous Digi Darla Designs, I picked a foodie-related challenge

Sweet Treats

You can use cake, chocolate, sweets or even a fruity cocktail in your design.  We would love for you to satisfy your sweet tooth with us!


The winner, picked by random.org, will receive 5 images of their choice from Digi Darla Designs.

Here is my card this week...


I used a pre-coloured image called Chocolate Cake from Digi Darla Designs and cut it out with my Spellbinders Romantic Rectangles.  I inked through the die with Tim Holtz Distress Ink in Red Brick.  My background paper is from DCWV and I embossed this with a Crafter's Companion Embossalicious folder.  I added a piece of Coredinations in dark pink which was embossed with a "Happy Birthday" folder and then sanded back.  The pearls came from Creative Expressions and my flowers were also from Crafter's Companion.


While I was thinking of my card design, I decided to make some sweet treats of my own and here is the end result - a chocolate cupcake with strawberry flavoured chocolate frosting.  This is for the true chocoholic!


The cupcakes in the background are actually my kitchen wallpaper - I really do love cupcakes!

I really hope you can join us in our Sweet Treats challenge this week at Fab'n'Funky.

Happy crafting,
Rachel x

Wednesday, 4 September 2013

Fab'n'Funky Challenges #183 - Opposites Attract

Hi Everyone,

We are back at Fab'n'Funky Challenges today with a brand new challenge but before you get crafting to join in, why not check out the winners from last week.  They are up on the blog right now.

Our challenge this week is hosted by the wonderful Alli and you can visit her blog here.  Alli has chosen a great colour challenge:-

Opposites Attract

We would like you to use two opposite colours from the following colour wheel:-


We also have two fabulous sponsors this week:- 


and 

I chose to use an image from StampArt Design by Kathryne called Butterfly Border 1.  Along with the border image, you also receive an individual butterfly image which is what I used here.  


You can probably guess by the photo which colours I chose!  Yellow and purple just seemed to scream out at me "Pick me, pick me!"  How could I refuse?!

My card blank was made using two cuts of the Spellbinders Fanciful Lattice in Centura pearl glued together on the left to create the spine.  I printed the purple paper from a Creative Crafting World CD-ROM.  To make the butterfly the vibrant shade of yellow I used My Craft Studio software.  Once printed, I embossed the wings using a Cuttlebug swirl folder.  I added glitter to the centre with a Quickie Glue Pen and attached with foam pads.  My ribbon is really old so I have no idea where it came from but my pearls are from Creative Expressions.


I really hope you can make your opposites attract this week and join us at Fab'n'Funky Challenges.

Happy crafting,
Rachel x