Hi Crafters,
I have a new blog and I would love you to join me at On The Wings Of Craft.
I am posting regularly and would love to hear from you on what you might like to see in my future posts. Is there any burning crafty question that you would like answered? Let me know over on my new blog.
My post today features a masculine card in navy, grey and white. It uses the Guy Greetings stamp set which you can find in the Product List at the end of the post.
Many thanks for your continued support.
Happy crafting,
Rachel x
Followers
Sunday, 26 March 2017
Friday, 24 June 2016
Stampin' Up! Colour Combo #GDP041
Hi Crafters,
There is a new challenge over at Global Design Project and this week they want to see us using a favourite colour combination of mine.
These colours really are lovely together and the Sweet Sugarplum is part of the new In Colours 2016-2018. I went with stamping and butterflies for my card.
I masked off a section of Whisper White cardstock and stamped using Sweet Sugarplum and Night of Navy with the Blooms and Wishes stamp set. After removing the masking tape, I added three butterflies, using the Bitty Butterfly and Elegant Butterfly punches, in matching cardstock, I shaped the wings for dimension. I created the sentiment with the Thoughtful Banners stamp set and Classic Label Punch also in Sweet Sugarplum and Night of Navy Stampin' Ink.
I would like to enter this card into the Global Design Project challenge #041.
Happy crafting,
Rachel x
Sunday, 5 June 2016
Global Design Project Challenge Entry - #038 Sketch Challenge
Hi,
As you may or may not know, I recently signed up as a Stampin' Up demonstrator and I have fallen head over heels in love with their products. Stampin' Up showcase their products in their annual catalogue which was launched for 2016/17 on 1 June. There are some really yummy new items and I had a open house party on Saturday to celebrate! Everybody had loads of fun testing out the new goodies and the Rolo cupcakes went down a treat!
Anyway, the reason I'm here is to post my entry for the latest Global Design Project challenge and this week we have been given a sketch.
I do love a sketch challenge - so many possibilities! Here is my entry:
My card started with many balloons punched from the Balloon Punch (140609) in two of the new In Colours of cardstock, Dapper Denim (141419) and Flirty Flamingo (141421), along with some punched in silver Glimmer Paper (135314). I created a channel using one of the new dies from the Swirly Scribbles set (141497) and added my balloons using Tombow wet glue (110755) and Dimensionals (104430). My sentiment was created using the new Thoughtful Banners bundle which includes a wide variety of greetings stamps and a punch (142330). I layered up my topper using more of the new cardstock in Dapper Denim and Flirty Flamingo, adding a touch of Whisper White cardstock (106549) to break up the layers.
If you would like to purchase any of the items above, simply click on my Stampin' Up page and shop as normal. If you have any questions, please feel free to drop me a line.
I would like to enter this card into the following challenge:
Global Design Project #038
Hope you can join me again soon.
Happy crafting,
Rachel x
As you may or may not know, I recently signed up as a Stampin' Up demonstrator and I have fallen head over heels in love with their products. Stampin' Up showcase their products in their annual catalogue which was launched for 2016/17 on 1 June. There are some really yummy new items and I had a open house party on Saturday to celebrate! Everybody had loads of fun testing out the new goodies and the Rolo cupcakes went down a treat!
Anyway, the reason I'm here is to post my entry for the latest Global Design Project challenge and this week we have been given a sketch.
I do love a sketch challenge - so many possibilities! Here is my entry:
My card started with many balloons punched from the Balloon Punch (140609) in two of the new In Colours of cardstock, Dapper Denim (141419) and Flirty Flamingo (141421), along with some punched in silver Glimmer Paper (135314). I created a channel using one of the new dies from the Swirly Scribbles set (141497) and added my balloons using Tombow wet glue (110755) and Dimensionals (104430). My sentiment was created using the new Thoughtful Banners bundle which includes a wide variety of greetings stamps and a punch (142330). I layered up my topper using more of the new cardstock in Dapper Denim and Flirty Flamingo, adding a touch of Whisper White cardstock (106549) to break up the layers.
If you would like to purchase any of the items above, simply click on my Stampin' Up page and shop as normal. If you have any questions, please feel free to drop me a line.
I would like to enter this card into the following challenge:
Global Design Project #038
Hope you can join me again soon.
Happy crafting,
Rachel x
Wednesday, 16 March 2016
Stampin' Up! - Thanks for being you
Hi Crafters,
I'm back with another entry for the Global Design Project challenge blog. This week is all about being thankful with a theme of thank you.
This a great challenge as everyone will think of something different and this is my entry:
For my sentiment I stamped onto Whisper White card in Pink Pirouette and Mint Macaron using stamp sets - Blooming Love and Suite Sayings. My sentiment is also popped up using Dimensionals. I layered three of the butterflies from the Butterfly and Bold Butterfly thinlits to give extra dimension.
I would like to enter this card into the following challenge:
Global Design Project - #GDP027
Happy crafting,
Rachel x
I'm back with another entry for the Global Design Project challenge blog. This week is all about being thankful with a theme of thank you.

This a great challenge as everyone will think of something different and this is my entry:
I started with Mint Macaron cardstock and made a bespoke card blank. I embossed a piece of pink card from the Love Blossoms card pack using the Fluttering embossing folder. I covered this with a piece of Stampin Up vellum which is superb quality and embosses like a dream. To create the top and bottom panels, I used the Birthday Bouquet designer paper series and cut the edge with the Large Scallop Edgelit die.
For my sentiment I stamped onto Whisper White card in Pink Pirouette and Mint Macaron using stamp sets - Blooming Love and Suite Sayings. My sentiment is also popped up using Dimensionals. I layered three of the butterflies from the Butterfly and Bold Butterfly thinlits to give extra dimension.
I would like to enter this card into the following challenge:
Global Design Project - #GDP027
Happy crafting,
Rachel x
Saturday, 12 March 2016
Stampin' Up Crafting - #GDP026
Hi,
I recently signed up as a Stampin' Up Demonstrator and really love their products. The stamps are so versatile and the matching dies make life so much easier. The Global Design Project challenge this week features a sketch and I've made a card to join in.
This is the sketch:

I've made a new baby themed card and here is my entry:
I started with a Crumb Cake card blank and used a piece of Whisper White card to stamp the Brushstrokes background stamp in Soft Sky. My main image is stamped using the Something for Baby set in Daffodil Delight and I used the matching dies called Baby's First. My sentiment is from a set called Teeny Tiny Sentiments and I love this set as it covers every occasion. I cut it out with the Bitty Banners die set, another favourite and mounted with Stamping Dimensionals. Finally, I added three white star sequins to complete my card.
I would like to enter this card into the following challenge:
Global Design Project - #GDP026
Thanks for stopping by,
Rachel
Thursday, 11 February 2016
Elliott's Angels DT - Sunflower Hi!
Hi!
I have another card on the Hope and Chances blog today and I've included a tutorial for the Spellbinders Create a Sunflower die set. Here is my card:-
And here is the side view to show off the dimension of the sunflower
I started with 7" card blank and added layers in yellow and pearlescent brown. My pattered paper is from the Lawn Fawn Sweater Weather pad and this is definitely my favourite! I used the Spellbinders A2 Curved Borders One die set to create my wave between the two patterned papers. My sentiment came from Spellbinders Phrase Set One and its layered onto a cut down die cut from Spellbinders Labels Thirty Seven and the speech bubble from Spellbinders Snapshot.
My sunflower was made from the Spellbinders Create a Sunflower die set and I loved watching it take shape. I started by cutting all the petals and centres.
Then I shaped around my finger before gluing in place with Cosmic Shimmer dries clear glue.
It's important to offset each layer to give a full flower.
I'm sure this would look great in different colours and no one needs to know it's meant to be a sunflower! I attached my sunflower to my card with some 3D foam pads for added dimension. If you fancy having a go, head on over to the Hope & Chances Shop to pick up the sunflower die set and it's on sale.
Happy crafting,
Rachel x
I have another card on the Hope and Chances blog today and I've included a tutorial for the Spellbinders Create a Sunflower die set. Here is my card:-
And here is the side view to show off the dimension of the sunflower
I started with 7" card blank and added layers in yellow and pearlescent brown. My pattered paper is from the Lawn Fawn Sweater Weather pad and this is definitely my favourite! I used the Spellbinders A2 Curved Borders One die set to create my wave between the two patterned papers. My sentiment came from Spellbinders Phrase Set One and its layered onto a cut down die cut from Spellbinders Labels Thirty Seven and the speech bubble from Spellbinders Snapshot.
My sunflower was made from the Spellbinders Create a Sunflower die set and I loved watching it take shape. I started by cutting all the petals and centres.
Then I shaped around my finger before gluing in place with Cosmic Shimmer dries clear glue.
It's important to offset each layer to give a full flower.
I'm sure this would look great in different colours and no one needs to know it's meant to be a sunflower! I attached my sunflower to my card with some 3D foam pads for added dimension. If you fancy having a go, head on over to the Hope & Chances Shop to pick up the sunflower die set and it's on sale.
Happy crafting,
Rachel x
Saturday, 23 January 2016
Stampin' Up! - Love and Global Design Project #GDP019
Hi,
I'm back again but this time with a card for the latest Global Design Project challenge #GDP019 and the theme this week is Love! We had our SU! Team Training this morning and I used this challenge as my inspiration.
I started with the Love Blossoms card pack and stamped from the Bloomin' Love set to make a background in Pink Pirouette. I attached two small slivers of Silver Glimmer Paper to a piece of White Whisper paper which I had stamped with another of the Bloomin' Love stamps in Night of Navy. I cut my heart from the Bloomin' Heart thinlit die set and stamped again with the Bloomin' Love set to enhance the flowers. My sentiment also came from that set and was cut with the Bitty Banners die set. This is definitely a firm favourite of mine.
Happy crafting,
Rachel x
Elliott's Angels DT Post - Celebrate Shaker Style!
Hi Crafters,
I'm back with a first! My first ever shaker card - but definitely not the last! I have used products from Hope & Chances Creativity and found they co-ordinated really well.
Here is my shaker card
I started with a white card blank and embossed the front using an A4 Spellbinders folder called Garden Lattice. My patterned papers are from Lawn Fawn's pad called Sweater Weather. The papers really are lush! My main shaker element was made with the Spellbinders Labels Forty Nine Decorative Elements die set. I added an inked background which had been stamped with Spellbinders Celebra'tions #Sweet set in Metallic Brass Wow Embossing Powder. To cut the aperture, I used the Spellbinders 6 x 6 Matting Basic B set.
I started by fussy cutting each of the elements from the paper but realised this would take most of the year so I switched to a hole punch! One of the fussy cut acorns can be seen peeking above the Celebrate stamp!
My tree was cut from the Spellbinders Trees set and I love this design - so versatile and pretty. Here's a close-up which shows the lovely pattern on the paper from Lawn Fawn.
Don't forget to visit Hope & Chances Creativity. You might see some pre-order Spellbinder sets! Ssshhhh!
Happy crafting,
Rachel x
I'm back with a first! My first ever shaker card - but definitely not the last! I have used products from Hope & Chances Creativity and found they co-ordinated really well.
Here is my shaker card
I started with a white card blank and embossed the front using an A4 Spellbinders folder called Garden Lattice. My patterned papers are from Lawn Fawn's pad called Sweater Weather. The papers really are lush! My main shaker element was made with the Spellbinders Labels Forty Nine Decorative Elements die set. I added an inked background which had been stamped with Spellbinders Celebra'tions #Sweet set in Metallic Brass Wow Embossing Powder. To cut the aperture, I used the Spellbinders 6 x 6 Matting Basic B set.
I started by fussy cutting each of the elements from the paper but realised this would take most of the year so I switched to a hole punch! One of the fussy cut acorns can be seen peeking above the Celebrate stamp!
My tree was cut from the Spellbinders Trees set and I love this design - so versatile and pretty. Here's a close-up which shows the lovely pattern on the paper from Lawn Fawn.
Don't forget to visit Hope & Chances Creativity. You might see some pre-order Spellbinder sets! Ssshhhh!
Happy crafting,
Rachel x
Monday, 11 January 2016
Elliott's Angel DT Post - Celebrate You
Hi Crafters,
I'm back on the Hope-Chances blog today featuring a card with Spellbinders dies and stamps. Yes, you read right - Spellbinders stamps! Woo Hoo!
My main topper was made using the Spellbinders Labels 49 Decorative Elements, inked with Tim Holtz Distress Ink in Spiced Marmalade. I added a die cut wreath from the Spellbinders Wreath set and inked with Tim Holtz Distress Ink in Aged Mahogany. My patterned paper is from a Lawn Fawn paper pad called Sweater Weather and is also available in the Hope Chances shop. I love this paper pad and the quality is great.
I created my embellishments from the Spellbinders Acorns set and curved them around my finger to give dimension, raising up with foam pads.
My sentiment was stamped in Versamark and heat embossed with WOW Embossing Powder. The original stamp says "For You" but I masked the "For" before inking, then uncovered and only the "You" stamped.
And now for a close-up!
Be sure to check out the Hope and Chances shop - loads of great products at fantastic prices.
Happy crafting,
Rachel x
I'm back on the Hope-Chances blog today featuring a card with Spellbinders dies and stamps. Yes, you read right - Spellbinders stamps! Woo Hoo!
I created my embellishments from the Spellbinders Acorns set and curved them around my finger to give dimension, raising up with foam pads.
My sentiment was stamped in Versamark and heat embossed with WOW Embossing Powder. The original stamp says "For You" but I masked the "For" before inking, then uncovered and only the "You" stamped.
And now for a close-up!
Happy crafting,
Rachel x
Wednesday, 9 December 2015
Global Design Project
Hi Everyone,
I've made a card for the Global Design Project challenge (#GDP014) and this week the theme is a sketch.
Of course I used Stampin' Up products and this was my creation.
I used Mint Macaron cardstock for the base card and the layered a piece of Whisper White cardstock on top. My main topper was made from the grey cardstock from the Neutrals pack and I embossed this with the Softly Falling embossing folder. I lighted coated the embossing with white ink.
I made the trees from the Peaceful Pines set using Soft Sky and Elegant Eggplant inks. I used the Perfect Pines framelits to cut out the trees. I popped the middle tree up using dimensionals.
The Stars Confetti Punch was used for the top of the card and my sentiment was from the Happy Scenes stamp set, cut with the Bitty Banners, which fit perfectly. I stamped this with the Elegant Eggplant ink.
And now for a side view
How about a close up!
Happy Crafting,
Rachel x
Labels:
#GDP014,
Christmas,
embossing,
Global Design Project,
ink,
stampin,
Stampin Up,
stars,
trees
Saturday, 5 December 2015
My Take on Sketch Saturday
Happy Saturday Crafters,
This morning I have been crafting away in my craft room with the Christmas music on full blast! You can't beat a bit of Jim Reeves to get you in the Christmassy mood! Sketch Saturday have a brand new challenge up so I thought I would join in and this is the sketch.

This is what I made, using mostly Stampin' Up products as I've recently become a demonstrator.
I started with a 7" card blank in white and layered up some navy card and then white glimmer paper on top. It's super sparkly and perfect for Christmas. My light blue layer is embossed with the Softly Falling Stampin' Up embossing folder. I added a strip of white glimmer paper and topped this with a piece of navy paper that had been punched with the Stars Confetti Punch from SU. My ovals were cut and embossed using Spellbinders Classic Ovals. I used the Cozy Christmas stamp, in Soft Sky, set for my sentiment and added some stars for the finishing touch.
Now for a close-up of the sparkle!
I would like to enter this card into the following challenges:
Sketch Saturday #390
A Gem of a Challenge #159 - Anything Christmas Goes
Happy crafting,
Rachel x
Sunday, 15 November 2015
Elliott's Angels DT - Dec 25
Hi Crafters,
I have been cracking on with my Christmas crafting and I have another post on the Hope and Chances blog. This time I've used three Spellbinders die sets.
I started with a white card blank and added a green patterend paper. This paper actually came free with a magazine. I cut the Spellbinders Holiday Greetings die in kraft card and layered on top. My twine is from Creative Expressions and I've had it for quite a while.
I used Spellbinders Lacey Circles for my topper and added some Tim Holtz Distress Ink in Mowed Lawn, popping it up on foam pads. My numbers were cut from Coredinations cardstock from the Spellbinders Victorian Numbers set. The embossing and debossing on these dies are really fabulous.
Check out the blog and shop for more inspiration and to treat yourself to some lovely new crafty goodies. There are some amazing sale prices too.
Happy crafting,
Rachel x
I have been cracking on with my Christmas crafting and I have another post on the Hope and Chances blog. This time I've used three Spellbinders die sets.
I started with a white card blank and added a green patterend paper. This paper actually came free with a magazine. I cut the Spellbinders Holiday Greetings die in kraft card and layered on top. My twine is from Creative Expressions and I've had it for quite a while.
I used Spellbinders Lacey Circles for my topper and added some Tim Holtz Distress Ink in Mowed Lawn, popping it up on foam pads. My numbers were cut from Coredinations cardstock from the Spellbinders Victorian Numbers set. The embossing and debossing on these dies are really fabulous.
Check out the blog and shop for more inspiration and to treat yourself to some lovely new crafty goodies. There are some amazing sale prices too.
Happy crafting,
Rachel x
Saturday, 7 November 2015
Elliott's Angel DT - Holiday Greetings
Hi Crafters,
It's Christmas again over on the Hope and Chances blog and this time I've used the Spellbinders Holiday Greetings die. This one is on sale too - grab it now!
I matt and layered navy and silver mirri card. My main white layer has been embossed with the Spellbinders Holiday Magic M-bossabilities folder. For my main image, I cut two strips of navy card and two of silver mirri card from the snowflake row on the die. I relaid the opposite colour snowflakes into the negative.
My snowflakes were cut from white card and layered onto 3D foam pads. I added a gem to the biggest snowflake for some bling. I stamped my sentiment in Versamark ink and then heat embossed with silver embossing powder. I cut the banner shape using scissors. The trick for this is to cut a straight line in the centre and then use that as a guide, cutting from each corner inwards.
I hope you are all well on your way with your Christmas crafting now. Keep an eye out on the Hope and Chances blog for more inspiration.
Happy crafting,
Rachel x
It's Christmas again over on the Hope and Chances blog and this time I've used the Spellbinders Holiday Greetings die. This one is on sale too - grab it now!
I matt and layered navy and silver mirri card. My main white layer has been embossed with the Spellbinders Holiday Magic M-bossabilities folder. For my main image, I cut two strips of navy card and two of silver mirri card from the snowflake row on the die. I relaid the opposite colour snowflakes into the negative.
My snowflakes were cut from white card and layered onto 3D foam pads. I added a gem to the biggest snowflake for some bling. I stamped my sentiment in Versamark ink and then heat embossed with silver embossing powder. I cut the banner shape using scissors. The trick for this is to cut a straight line in the centre and then use that as a guide, cutting from each corner inwards.
I hope you are all well on your way with your Christmas crafting now. Keep an eye out on the Hope and Chances blog for more inspiration.
Happy crafting,
Rachel x
Monday, 12 October 2015
Flower Power
Hello Crafters,
It's another exciting day - I have another post on the Hope-Chances blog as one of Elliott's Angels! This card was made using the Spellbinders Holly Tags set again but there is nothing Christmas in sight!
I started with a 7" card blank and cut the sentiment in matte silver card from the Spellbinders Sentiment Five set. The flowers were made from the oval insert of the Holly Tags set. I used the circle insert for the centre of the flowers and added ink by stenciling through the die. The colours were Salty Ocean, Squeezed Lemonade and Worn Lipstick from Tim Holtz Distress Ink range.
I shaped the petals with a flower shaping kit using a stylus and a rubber mat. The centres were popped up on a double set of 3D foam pads.
You'll see some exciting new Spellbinders on the Hope-Chances blog too so head on over for a sneak peek or pre-order the great new sets at the shop.
Happy Crafting,
Rachel x
It's another exciting day - I have another post on the Hope-Chances blog as one of Elliott's Angels! This card was made using the Spellbinders Holly Tags set again but there is nothing Christmas in sight!
I started with a 7" card blank and cut the sentiment in matte silver card from the Spellbinders Sentiment Five set. The flowers were made from the oval insert of the Holly Tags set. I used the circle insert for the centre of the flowers and added ink by stenciling through the die. The colours were Salty Ocean, Squeezed Lemonade and Worn Lipstick from Tim Holtz Distress Ink range.
I shaped the petals with a flower shaping kit using a stylus and a rubber mat. The centres were popped up on a double set of 3D foam pads.
You'll see some exciting new Spellbinders on the Hope-Chances blog too so head on over for a sneak peek or pre-order the great new sets at the shop.
Happy Crafting,
Rachel x
Sunday, 11 October 2015
Gold Shimmer Christmas
Hi Crafters,
I have started Christmas crafting early this year - shock horror! This is a card I made for my boss. It's really shimmery in real life which hasn't shown up too well in the photos.
I started with a 7" card blank and layered up black and cream card. I added a strip of gold shimmer card with stars punch out using the Stampin' Up Confetti Stars punch. A new favourite of mine. My main topper image was made using circles from Tattered Lace. I stamped snowflakes in Versamark and heat embossed in gold. My sentiment is a die from Sue Wilson's latest Christmas release. I love this one. My wooden embellishment was dipped into Versamark and heat embossed with the same gold powder.
Thursday, 8 October 2015
Elliott's Angels DT - First Post
Hi Everyone,
I have my first showcase post on the Hope and Chances blog today. I'm still amazed I made it onto the team. A dream come true!
I used the Spellbinders Holly Tags set which is lovely and so versatile. You can find this set in the Hope and Chances Creativity store here. They have great offers on Spellbinders and other crafty goodies too. I used the oval tag for this card:-
I started with a 7" card blank and layered up a piece of red Core'dinations cardstock. My patterned paper is from Craftwork Cards and I edged with Pebeo gold gilding wax. My three layers are made up of a banner using Spellbinders Holiday Magic M-Bossabilities folder in red with gold gilding wax applied. The gold card has been stamped with a JustRite Holly Background stamp in Tim Holtz Distress Ink - Mowed Lawn. My third layer is a piece of green ribbon with a gold interference.
For my main sentiment topper, I started with 300gsm white card and die cut and embossed the oval holly tag from Spellbinders. I added gold gilding wax again to the embossed sections by stenciling through the die. I stamped the sentiment in the same Distress Ink to give a lovely bright focal point and added dimension with 3D foam pads.
Looking forward to sharing more projects with my favourite crafty brand. Keep a look out at the Hope and Chances blog.
Happy Crafting,
Rachel x
I have my first showcase post on the Hope and Chances blog today. I'm still amazed I made it onto the team. A dream come true!
I used the Spellbinders Holly Tags set which is lovely and so versatile. You can find this set in the Hope and Chances Creativity store here. They have great offers on Spellbinders and other crafty goodies too. I used the oval tag for this card:-
I started with a 7" card blank and layered up a piece of red Core'dinations cardstock. My patterned paper is from Craftwork Cards and I edged with Pebeo gold gilding wax. My three layers are made up of a banner using Spellbinders Holiday Magic M-Bossabilities folder in red with gold gilding wax applied. The gold card has been stamped with a JustRite Holly Background stamp in Tim Holtz Distress Ink - Mowed Lawn. My third layer is a piece of green ribbon with a gold interference.
For my main sentiment topper, I started with 300gsm white card and die cut and embossed the oval holly tag from Spellbinders. I added gold gilding wax again to the embossed sections by stenciling through the die. I stamped the sentiment in the same Distress Ink to give a lovely bright focal point and added dimension with 3D foam pads.
Looking forward to sharing more projects with my favourite crafty brand. Keep a look out at the Hope and Chances blog.
Happy Crafting,
Rachel x
Tuesday, 15 September 2015
Huge Announcement!
Hello Crafters,
I have a huge announcement for you all today! I have been chosen to be part of Elliott's Angels Design Team! I'm so excited to start working with this wonderful team. For more information on the Design Team click here.
We will be working with Spellbinders dies - my absolute favourite crafty company. Check out the Hope and Chances website here.
Keep your eyes peeled for our first projects!
Happy crafting,
Rachel x
I have a huge announcement for you all today! I have been chosen to be part of Elliott's Angels Design Team! I'm so excited to start working with this wonderful team. For more information on the Design Team click here.
We will be working with Spellbinders dies - my absolute favourite crafty company. Check out the Hope and Chances website here.
Keep your eyes peeled for our first projects!
Happy crafting,
Rachel x
Tuesday, 9 June 2015
Rock On!
Hello Crafters!
I'm back! I never really left the land of craft, just the land of blogging! Today, I'd like to share something brand new for me - colouring I'm proud to show off! I took the plunge and purchased the Chameleon Pens from Create and Craft a couple of months ago. This was my first proper practice image and I love how easy the pens blend. I used Sketch Saturday's current sketch for the layout.
My image is from Mo's Digital Pencil and is called Jamming Janice - she's so cool. You can find her here. I cut her out with a Tattered Lace die and mounted onto DCWV glitter cardstock. I used a Simon Says Stamp die to make the star pattern underneath my image. The sentiment is a new die from Crafter's Companion's Only Words Collection.
Happy crafting,
Rachel x
I would like to enter this card into the following challenges:-
Sketch Saturday - #364
Sweet Stampin' - Something Old, Something New (old papers, new dies)
Stamping Sensations - Dies and Punches
I'm back! I never really left the land of craft, just the land of blogging! Today, I'd like to share something brand new for me - colouring I'm proud to show off! I took the plunge and purchased the Chameleon Pens from Create and Craft a couple of months ago. This was my first proper practice image and I love how easy the pens blend. I used Sketch Saturday's current sketch for the layout.
My image is from Mo's Digital Pencil and is called Jamming Janice - she's so cool. You can find her here. I cut her out with a Tattered Lace die and mounted onto DCWV glitter cardstock. I used a Simon Says Stamp die to make the star pattern underneath my image. The sentiment is a new die from Crafter's Companion's Only Words Collection.
Happy crafting,
Rachel x
I would like to enter this card into the following challenges:-
Sketch Saturday - #364
Sweet Stampin' - Something Old, Something New (old papers, new dies)
Stamping Sensations - Dies and Punches
Tuesday, 22 July 2014
Christmas in July!
Hi Crafters,
I'm back with another Christmas card! Shock horror! I was really itching to get going with my Christmas crafting and this card practically made itself! Although judging by the craftermath left behind, I think I had something to do with it!
Anyway, enough of my rambling and on to the card in question.
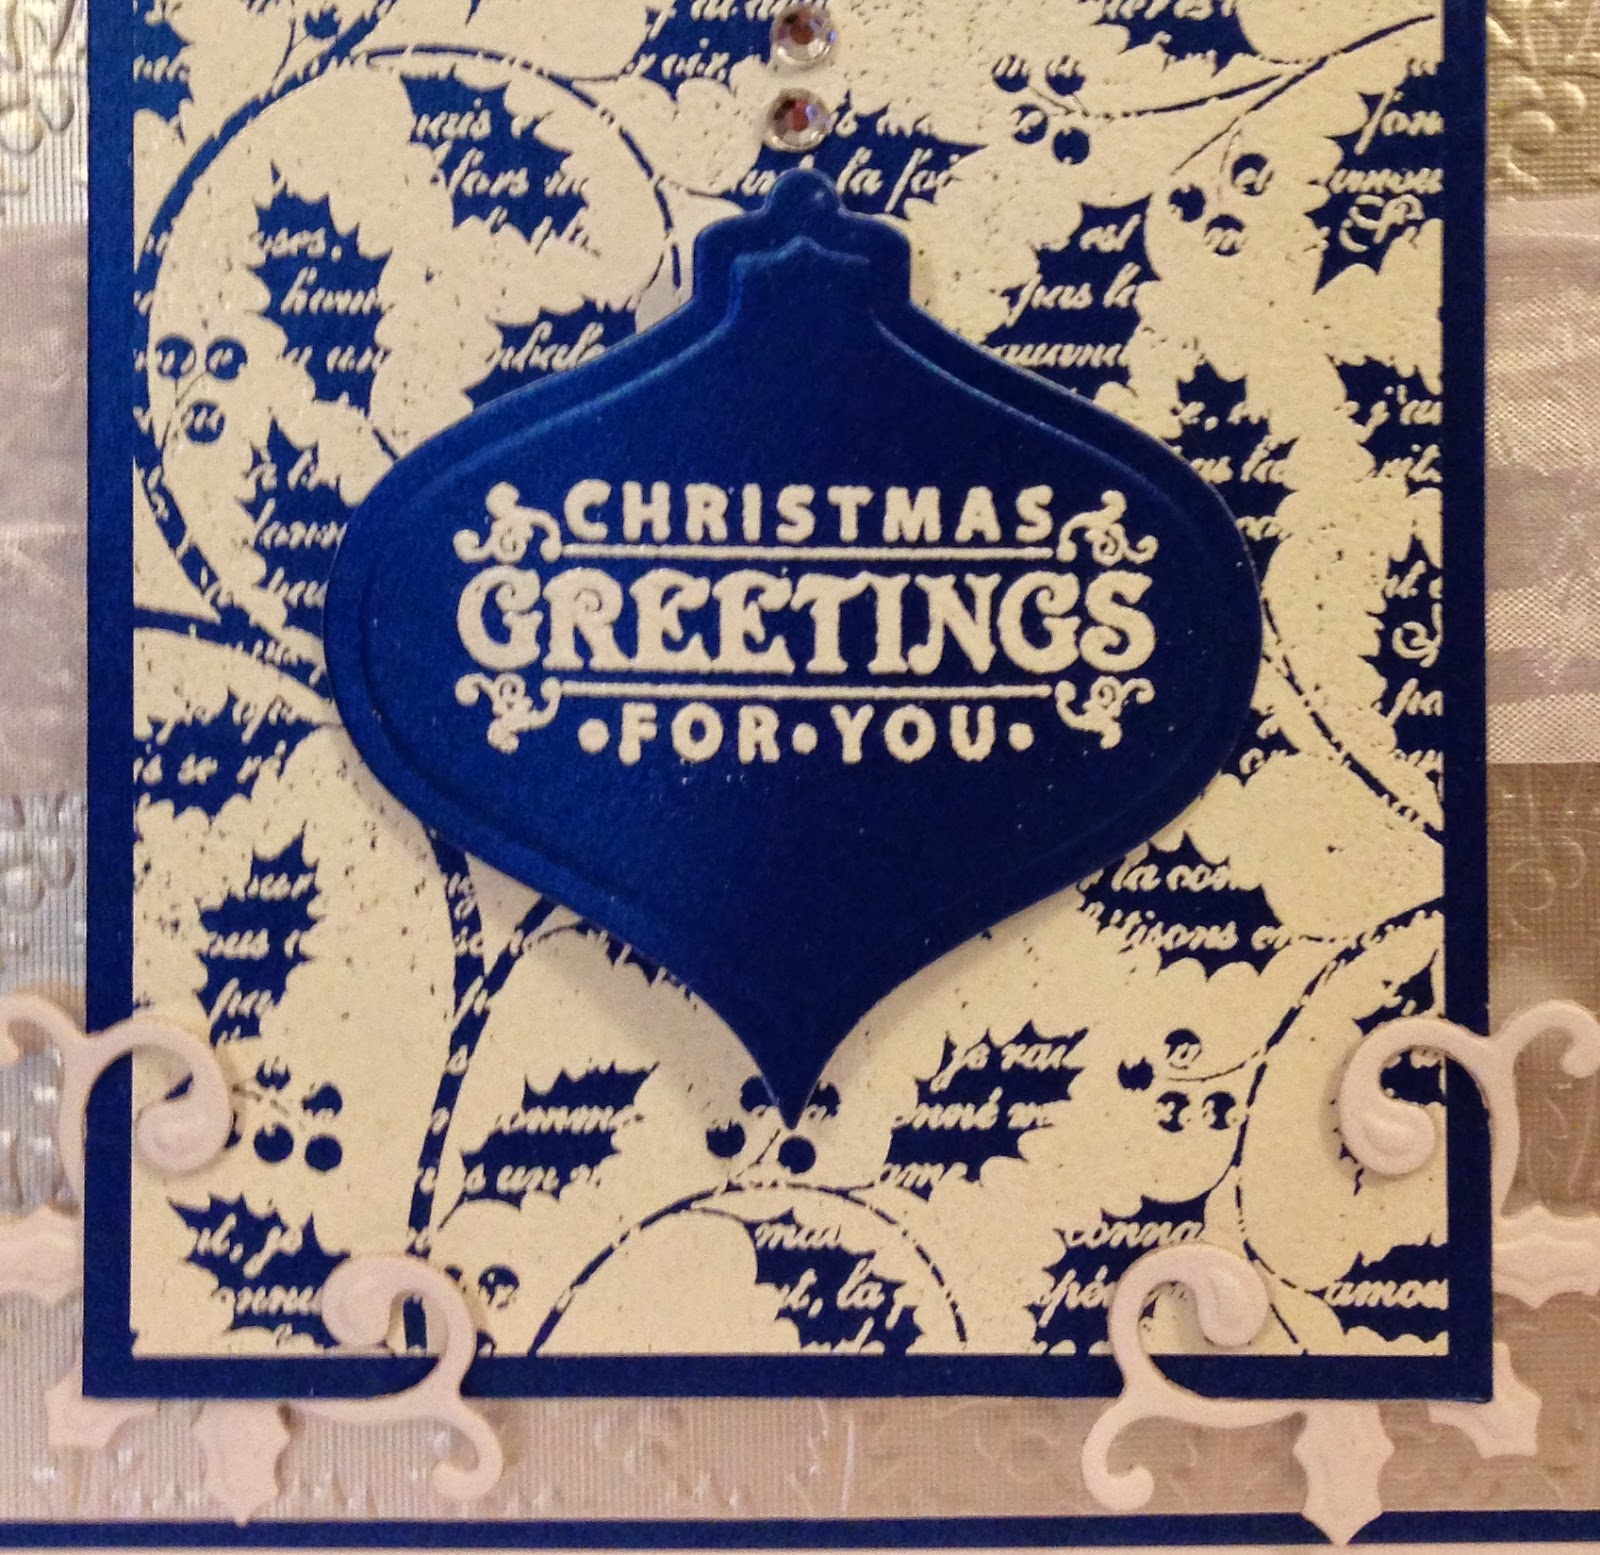
I started with Centura Pearl cardstock in royal blue and made my first layer. Next I embossed a piece of silver linen cardstock with a holly embossing folder from Crafter's Companion. For my main topper I heat embossed the JustRite Holly Swirls background stamp using Versamark and then added white detail embossing powder. I love the result. My bauble was cut using Spellbinders 2011 Heirloom Ornaments and then I stamped the sentiment from the JustRite Merry Wishes Vintage Labels Seven set and heat embossed that too.
My corner dies came from the Spellbinders Holly Accents set and the ribbon is from Creative Expressions. Using a ruler for accuracy, I attached a line of faceted gems to create the string for the bauble, which was layered with two sets of foam pads to give dimension.
I would like to enter this card into the following challenge:
JustRite Challenge #125 - Non-Traditional Christmas
Happy crafting,
Rachel x
I'm back with another Christmas card! Shock horror! I was really itching to get going with my Christmas crafting and this card practically made itself! Although judging by the craftermath left behind, I think I had something to do with it!
Anyway, enough of my rambling and on to the card in question.
I started with Centura Pearl cardstock in royal blue and made my first layer. Next I embossed a piece of silver linen cardstock with a holly embossing folder from Crafter's Companion. For my main topper I heat embossed the JustRite Holly Swirls background stamp using Versamark and then added white detail embossing powder. I love the result. My bauble was cut using Spellbinders 2011 Heirloom Ornaments and then I stamped the sentiment from the JustRite Merry Wishes Vintage Labels Seven set and heat embossed that too.
My corner dies came from the Spellbinders Holly Accents set and the ribbon is from Creative Expressions. Using a ruler for accuracy, I attached a line of faceted gems to create the string for the bauble, which was layered with two sets of foam pads to give dimension.
I would like to enter this card into the following challenge:
JustRite Challenge #125 - Non-Traditional Christmas
Happy crafting,
Rachel x
Sunday, 13 July 2014
It's Christmas - But Not As We Know It!
Hello lovely crafters,
You may think I've vanished into a storm of glitter but I've emerged to share a Christmas card with you! This is one from last year that I never had the chance to blog. It is made using the JustRite Snowflake background stamp and works perfectly for their Non-Traditional Christmas challenge this fortnight.
I was really pleased with how this turned out and I hope you like it too. I haven't even started on my Christmas cards for this year yet. How is everyone else getting on?
I would like to enter this card into the following challenges:
JustRite Inspiration #125 - Non-Traditional Christmas
Happy crafting,
Rachel x
You may think I've vanished into a storm of glitter but I've emerged to share a Christmas card with you! This is one from last year that I never had the chance to blog. It is made using the JustRite Snowflake background stamp and works perfectly for their Non-Traditional Christmas challenge this fortnight.
I love this stamp and thought it would look great embossed in black detail powder. I inked in Versamark and then heated the powder to achieve this result. My sentiment is from JustRite too. I used Spellbinders dies for the snowflakes, inking through the die on the white cardstock and then layered onto shocking pink glitter card.
I was really pleased with how this turned out and I hope you like it too. I haven't even started on my Christmas cards for this year yet. How is everyone else getting on?
I would like to enter this card into the following challenges:
JustRite Inspiration #125 - Non-Traditional Christmas
Happy crafting,
Rachel x
Subscribe to:
Posts (Atom)