Followers

Wednesday, 24 July 2013

Fab'n'Funky Challenges #180 - Make a Set

Hi Everyone,

We are back at Fab'n'Funky Challenges with a great new challenge.  Be sure to head over to the blog to check out our winners from the Christmas in July challenge though.  They are just waiting to be seen!

On to this week's challenge which is hosted by the wonderful Shirley who is a fab cake decorator too.  She has chosen a brilliant challenge to get those creative juices flowing! 

Make a Set

That's right this week we would love to see you make a set of cards, maybe a card and a matching tag or envelope. You could make a gift box with a matching card and tag. 

This week you have three times the luck of winning a wonderful prize as we have three wonderful sponsors - Doodle Pantry, StampArt Design by Kathryne and Digital Delights.  Just click on their names to see their super designs.

I chose to work with an image from Doodle Pantry and when I came across "Oh Baby" I knew it would be perfect.  I have so many friends who are expecting babies this year!  Must be something in the water!

I made a set of four cards all using the pre-coloured yellow baby bottle from Doodle Pantry and some yellow gingham paper from Craft Artist 2 Professional.


I chose to use blue and pink card blanks for to differentiate the boys and girls cards.  I also added embossing and die cutting to each to help tie them together.  The folders I used were from Crafter's Companion Embossalicious range.  I created the die cuts with Spellbinders Grand Splendid Circles, Labels One and Labels Eight and the "baby" was cut with a Provo Craft die.  My stamps came from a set I received free from Create and Craft for being a club member.  

Here they are one by one...


As you'll see I used my X-Cut corner rounder punch on two of the cards and added some pretty pearls to the girly cards.  

As we are in our summer season, this challenge will run for two weeks so you have until 6 August to post your entry.  

Happy crafting,
Rachel x

Wednesday, 10 July 2013

Fab'n'Funky Challenges - #179 Christmas in July

Ho Ho Ho! 

No, I've not lost the plot, it is still July!  We have a great new challenge over at Fab'n'Funky Challenges with the talented Anne-Marie as our host.  She has chosen a fab theme...

Christmas in July

Dig out your glitter, red and green paper and get festive!  I love making Christmas cards so this was the perfect excuse to dig out my festive stash!  We have two fab sponsors this week too.  The first is My Creative Classroom who are offering one lucky winner the opportunity to participate in an online class of their choice.  Our second sponsor is Dilly Beans - one of my favourites.  The winner of this prize will receive 3 digital images of their choice.  

The DT were so lucky to be able to work with great images from Dilly Beans and I chose to use Holly Penguin Framed (image #493) for my card.


What a cutie!  I coloured my image with ProMarkers in Lilac, Winter Berry, Forest Green, Leaf Green, Ruby, Gold, Summer Sun, Pineapple Crush and all the Cool Greys.  


I went a little bit wild last week and ordered loads of the new Christmas Memory Box dies.  They are just scrummy!  I have used the Gabriella Border die here with lilac glitter cardstock from Create and Craft.  My card blank was embossed with the Spellbinders M-Bossabilities folder Holiday Magic.  

I really hope you'll join us for some festive fun this week.

Happy crafting,
Rachel x

Wednesday, 3 July 2013

Fab'n'Funky Challenges #178 - Anything but Square

Hi Everyone,

I'm Back!  We all had a lovely time at my brother's wedding.  The family came from all over the UK - London, Glasgow, Moffat, Alford, Forres, Aberdeen, Perth and Comrie.  It was brilliant to see everyone again and the photos will be a great keepsake.  

I'm sure you are all waiting to hear about the new challenge over at Fab'n'Funky but first we have announced our winner and Top 3 from last week.  Just head over to the blog to take a peak.

We have the wonderful Angelique as our host this week and she has picked a great challenge to inspire you...

Anything but Square

That's right - we don't want to see any squares this week!  Just so long as your project isn't square, feel free to it link up.  We also have two great sponsors - Digi Darla Designs and StampArt Design by Kathryne.  Take a look at their designs by clicking on the links.  You won't be disappointed.

As we are into wedding season I have chosen to use the Tall Wedding Couple image from Digi Darla Designs as the focus of my card.


I used Spellbinders Grand Labels Twenty Three for my base card and then embossed through one of the Creative Expression folders designed by Sue Wilson.  I think this one is called Cascading Hearts.  To add definition to the edge of the card, I inked very lightly with Tim Holtz Distress Ink in Dusty Concord.  This is barely noticeable in the photo but does show up better in real life.


My image was coloured with ProMarkers in Blossom, Almond, Black, Marsh Green and all the Cool Greys.  I also inked the edge with Dusty Concord.  My flowers are from Wild Orchid Crafts and I've had them for over a year but have been loathe to use them as they are so pretty!  I think I've made up for it here!  Finally I added my sentiment which is from a really old Hunkydory kit.  It was a little too pink so I went over with the Dusty Concord here too.

I really hope you'll join us this week - just leave those squares at home!

Happy crafting,
Rachel x

Wednesday, 19 June 2013

Fab'n'Funky Challenges #176 - Animals

Hi All,

Apologies for the late post - brain wasn't engaged!  It's my brother's wedding on Saturday and I'm not sure where the time has gone.  It actually doesn't seem real yet and we've already had the rehearsal!  Fingers crossed everything goes smoothly.

Enough of my jibbering though!  We have a brand new challenge over at Fab'n'Funky Challenges and this week we are hosted by the wonderful Zoe.  The theme is a fab one too...

Animals

So as long as there is an animal on your project, feel free to link it up.  We also have two great sponsors - Flonzcraft and StampArt Design by Kathryne.  As always, that means two great prizes!

I chose to use a StampArt image this week called Ari and Toby which features the most adorable little dog.  I went with bright colours to fend off those raindrops.


Isn't she cute?!  I made this card using Serif's Craft Artist Professional 2.  As soon as I saw those wellies I knew they would make the perfect background and all the elements came from the Backyard Bumper digikit.  I left my image blank so that the recipient - my friend's 7 year old daughter - can colour it herself.  

I really hope you can join us this week with your animals!

Happy crafting,
Rachel x

Wednesday, 12 June 2013

Fab'n'Funky Challenges #175 - Birthday

Hi Crafters,

It's Wednesday again and that means a new challenge at Fab'n'Funky but first, head on over to the blog to see our winner from last week's fruity challenge.  We loved your great designs.

I predict a lot of love for our challenge this week!  The very talented Dawn is our host and she has chosen the theme of...


Birthday

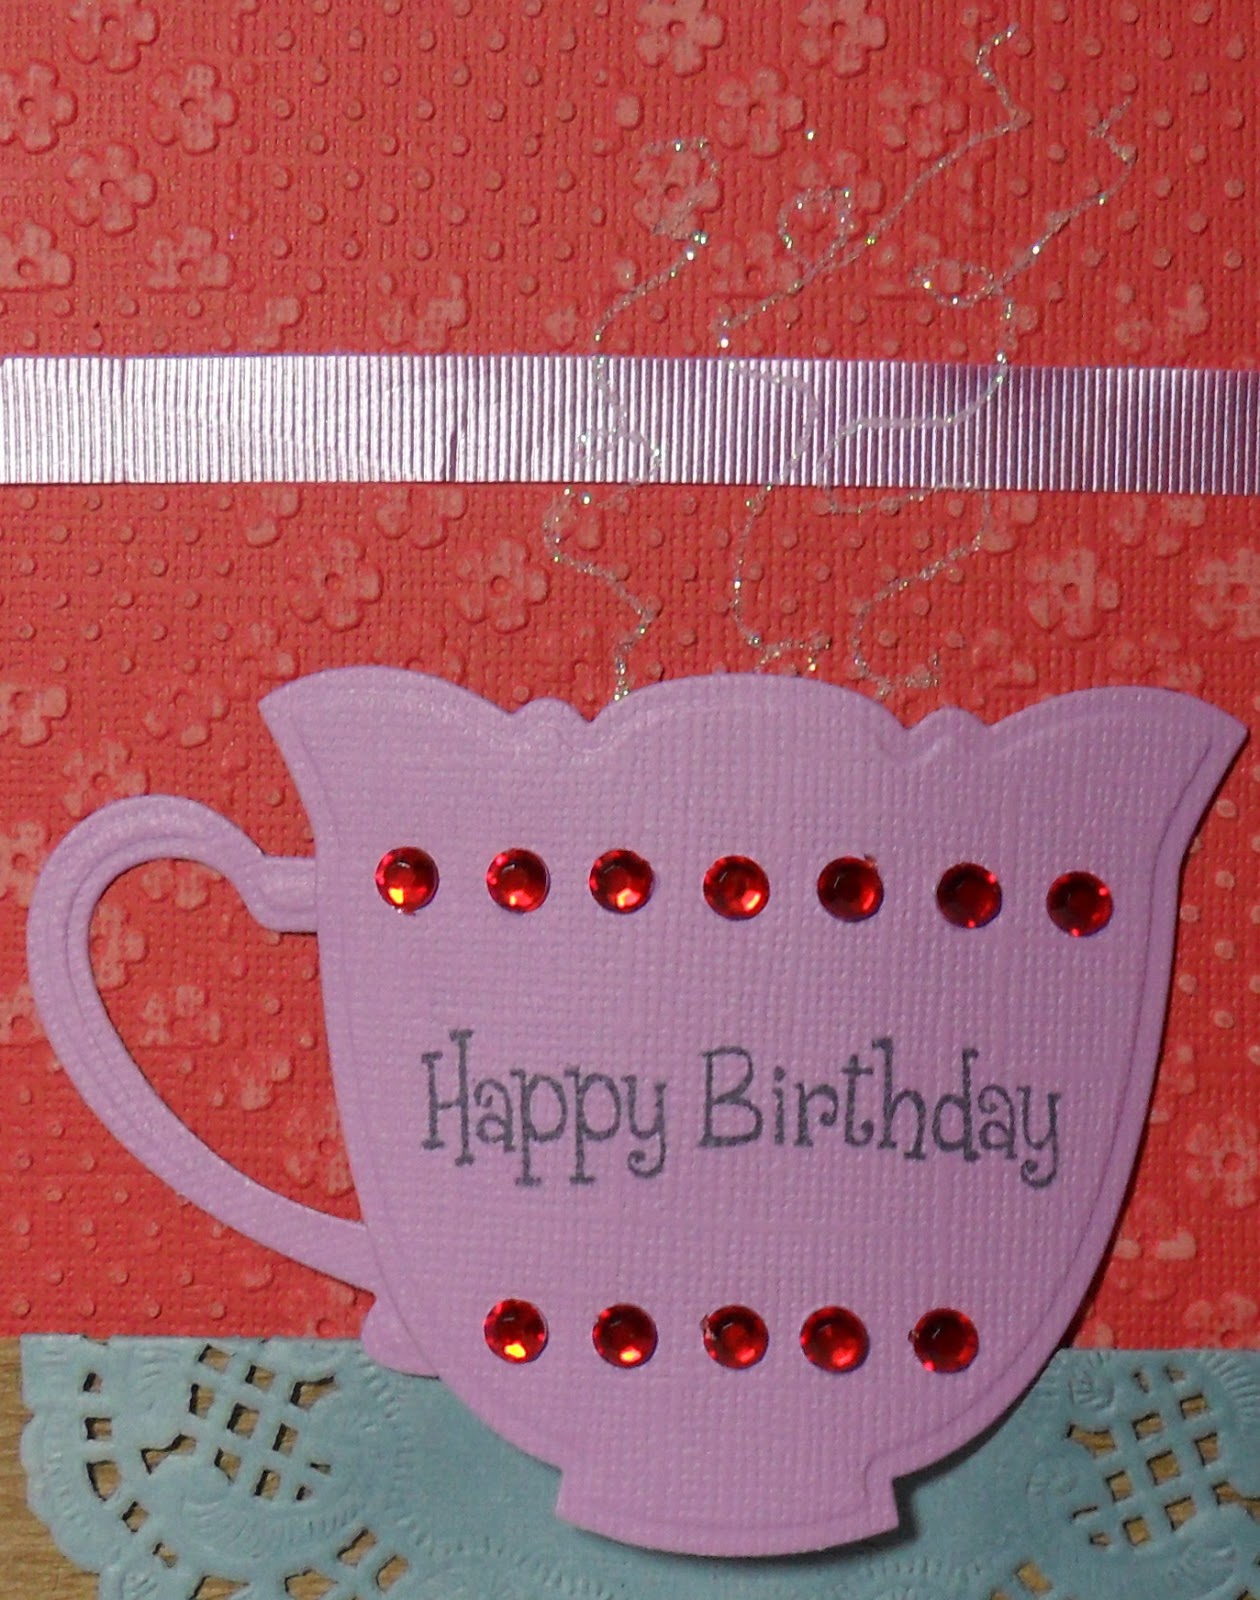
Simples!  I don't think this one needs any explaining!  Our sponsor is the totally awesome Mayzyart and the DT were so lucky to work with her fab images.  I used Maurine with Tea for my card.


I started with a piece of Coredinations cardstock and I embossed this several times to extend the pattern with an embossing folder that I received free with the last Crafter's Companion magazine.  I really like the flower and dotty patchwork pattern.  To reveal the core I sanded back using the Crafter's Companion Coredinations Accessory Kit.  The lilac ribbon was on sale at Hobbycraft a few years back and this is the first time I've used it.  

I used Creative Expressions crinkle paper for the bottom and then added half a doily coloured using the Twilight Sky ProMarker.  My cup was made from Spellbinders Tea Cups and I stamped the sentiment with Momento Tuxedo Black ink.  The gems were affixed  by hand using Cosmic Shimmer dries clear glue.  


I coloured Maurine with ProMarkers in Blush, Dusky Pink, Caramel, Cocoa, Henna, Ruby, Lipstick Red, Indigo Blue, Reef Blue, Twilight Sky, Polar Blue, Amethyst, Peony and Lilac.  I cut down some Hunkydory foam pads to attach her to my card.  I finished by adding some glitter to make stream from the tea cup.


I really hope you'll join us this week to celebrate someone's birthday.  The more the merrier!

Happy crafting,
Rachel x

Wednesday, 5 June 2013

Fab'n'Funky Challenges #174 - Let's Get Fruity

Hi Everyone,

Wednesday's seem to be here before I know it just now.  It's only two and a half weeks until my brother's wedding.  Eek!  I'm sure it'll be more hectic before then too!

But I have a post to do and the Fab'n'Funky Challenges blog has been updated with the winners and Top 3 from last week's challenge of One for the Girls.  We were bowled over with all the great entries.  Thanks to everyone for making our job so hard but enjoyable!

For this week we have the brilliant Beccy as our host and she has chosen a super theme...

Let's Get Fruity

We would like to see fruit in your design.  You could add a fruity embellishment, digi or backing paper.  Our sponsor is the awesome Stamp Fairy and the DT were lucky to be able to work with their images.  I used Lenny Fruits 3 and you can find him here.


I started with a 6" scalloped card blank and printed the checked paper from Craft Artist Professional 2 after changing the colour to monochrome.  I ran this though an Embossalicious embossing folder from Crafter's Companion with a chevron design.  


My image was coloured with ProMarkers in Cool Grey 1, CG2, CG3, CG4, CG5, Ruby, Heatwave, Apple Cider and Pear Green.  I cut out the little guy with Spellbinders Grand Labels Eleven.  Finally, I added a big green satin bow and ribbon border. My button is recycled from a piece of clothing.  

I really hope you'll get fruity with us this week!  Can't wait to see your makes.

Happy crafting,
Rachel x

Wednesday, 29 May 2013

Fab'n'Funky Challenges #173 - One for the Girls

Hi Everyone,

We are back to Wednesday again and I'm not sure I like how fast this year seems to be going!  I doubt it will slow down though!

Wednesday means a new challenge at Fab'n'Funky Challenges but it also means that the winners and Top 3 from last week have been chosen.  All the details can be found over at on the F'n'F blog.

We have our blogging Mama as our host this week - the fabulous Judith.  I love the theme this week as it it totally me!  So without further ado our theme is...


One for the Girls

Just make a female-themed project and link it up - couldn't be simpler!  We have two sponsors this week too.  My Creative Classroom and StampArt Design by Kathryne.  Two sponsors means two winners so let's get crafting!  

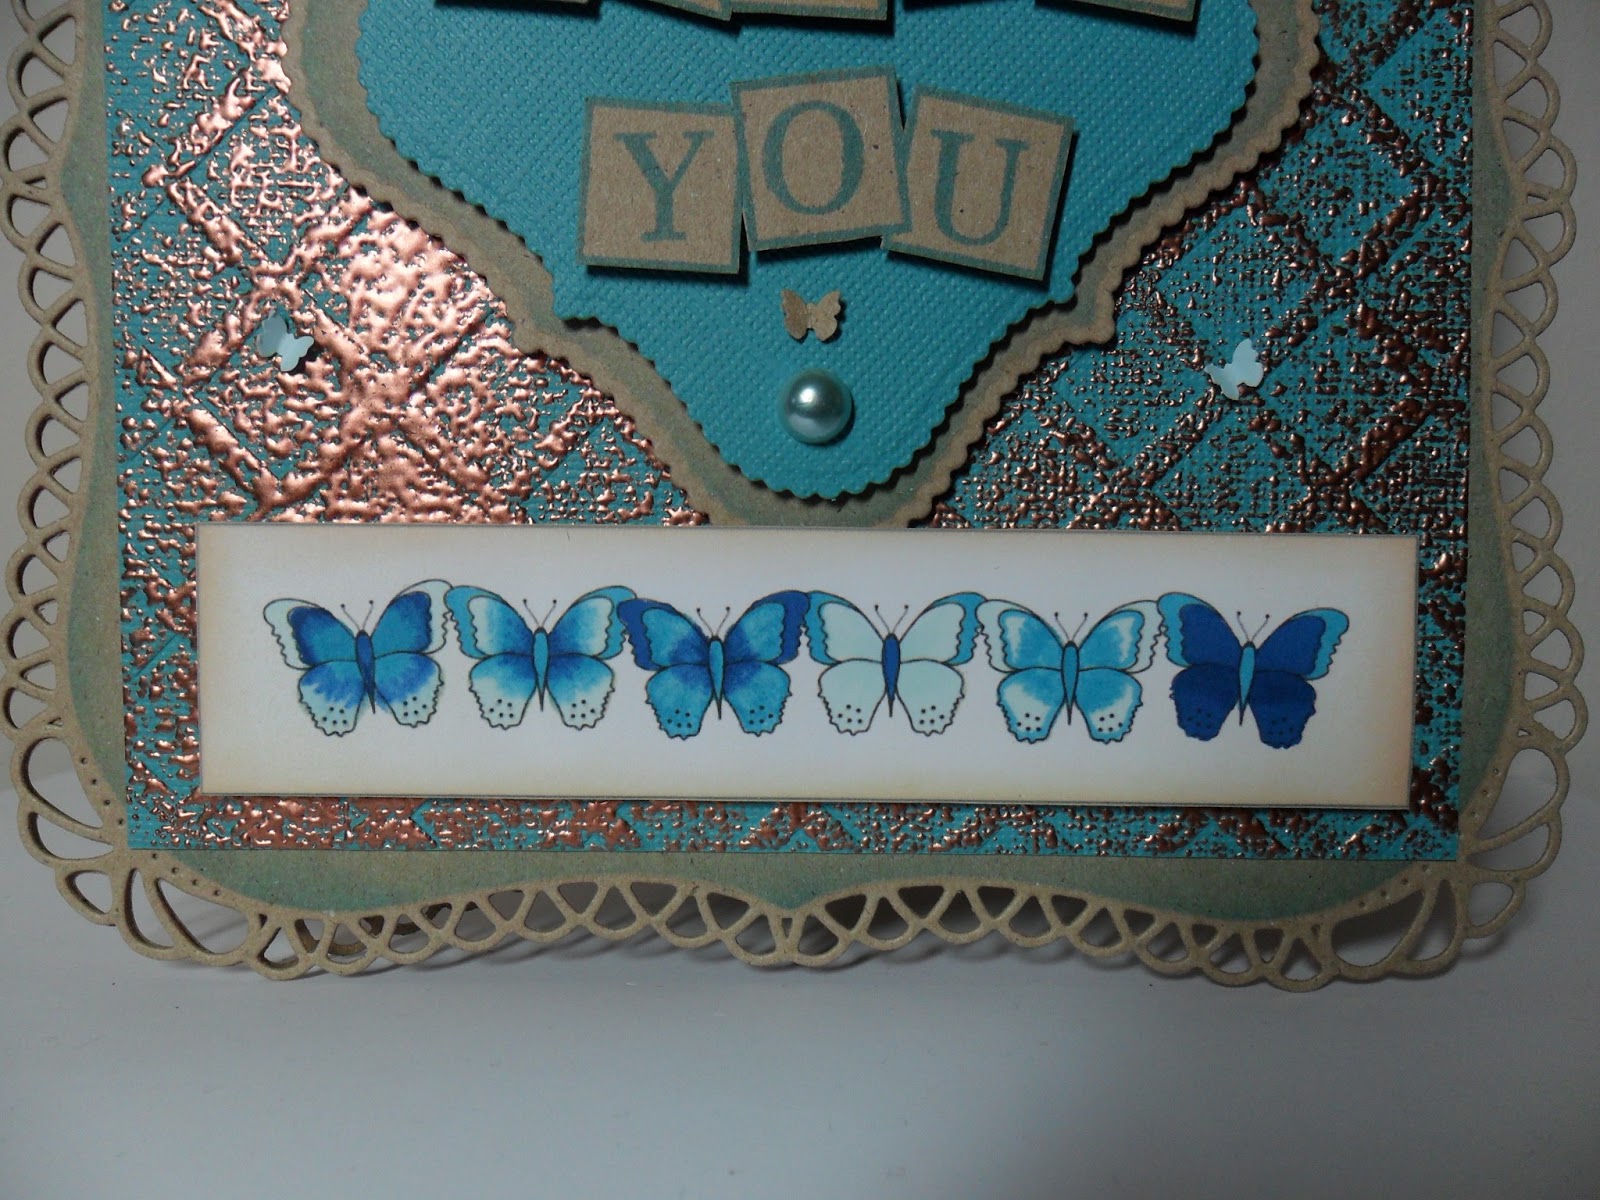
This is my card for the challenge - the girly elements are the butterflies, pearls and decorative edging.  


I used a StampArt Design by Kathryne image for my card called Butterfly Border 1 and coloured with FlexMarkers in Aquamarine, Surf Blue and Navy Blue.  I inked the edge with Tim Holtz Distress ink in Antique Linen for an aged effect.


My base card was made from two of the Spellbinders Grand Decorative Labels One cut in kraft card.  I attached with the super stick red liner tape.  While still in the die I inked through with Tim Holtz Distress Ink in Broken China.  My main background was made with Coredinations cardstock.  I embossed using the lattice Embossalicious folder from Crafter's Companion and then lightly brushed a Versamark inkpad over the top.  I added Debbi Moore's metal magic and heated from behind with a heat tool.  I really like the effect that this has created.


My sentiment topper was created with Spellbinders Scalloped Labels One in kraft and Coredinations.  Using Claritystamp's Letterbox Alphabet set and Broken China Distress Ink I made the sentiment as I wanted.  The squares come as triple, double and single boxes so I after stamped the triple box, I masked it off and then used the double box stamp to create a five letter space for my wording.  Claritystamps really are the best quality I've ever had the pleasure to use.  My tiny butterflies were punched using a Tonic punch and I just coloured a piece of super smooth paper with the Aquamarine FlexMarker to get the perfect match.  The pearls came free from Create and Craft a while back.

I really hope to see you join us for our girly challenge this week.

Happy crafting,
Rachel x

I'd like to enter this card into the following challenge:-
Shelly's Images - Show Us What You Got

Saturday, 25 May 2013

A Flower for You!

Happy Saturday Everyone!

I have a new crafty cupboard courtesy of Storage 4 Crafts and this morning it was an absolute pleasure to make my first card with a place for everything and everything in its place!  I think I may even turn into a tidy crafter - shock horror!  

I saw that the latest challenge over at the Tiddly Inks challenge blog was to use a Wryn image and being a huge fan, I decided to give it a go.  It's also Saturday and that means a new sketch over at the Sketch Saturday blog.  I love their ideas and this one was no different...

I think this sketch will be so useful for a whole variety of cards.  So I'm sure you'd like to see my card by now!  I'll not keep you in suspense any longer!


Isn't this image just adorable?!  It's called Bugs and Kisses!  I started with a 5.25" kraft card blank and then layered up a piece of Me To You red dotty paper which came free with a magazine.  I thought the jaunty angle might add an extra dimension so squint it was!  I took a piece of Dawn Bibby paper and chopped the silver bubble border off to give me a purple stripey layer.  My ribbon is from DoCrafts and I've had it for ages.  


I coloured my image with ProMarkers in Cinnamon, Vanilla, Dusky Pink, Blush, Ruby, Lipstick Red, Spring Lilac, Lilac, Henna, Cocoa, Caramel, Cool Grey 1, Yellow, Marsh Green and I also used the blender pen on the little hedgehog.  My flowers are from Wild Orchid Crafts and I really love them.  

I'd like to enter this card into the following challenges:

Sketch Saturday - #260
Tiddly Inks Challenge Blog #110 - Use a Wryn

Thanks for stopping by today.

Happy crafting,
Rachel x
Wednesday, 22 May 2013

Fab'n'Funky Challenges #172 - Ribbon or Lace

Hi All,

What a glorious morning!  Until I hung out the washing!  Story of my life!  I hope you are all well and enjoying some crafty time this week.  

We have a great new challenge over at the Fab'n'Funky Challenges blog but first the winner and Top 3 from last week have been posted.  Head on over to the blog to see our lucky winners.

Now, on to this week's challenge and we have the wonderful Vicky as our host.  She has chosen a great theme and I'm sure you'll all be eager to join in.  Our theme this week is...

Ribbon and Lace

You can add ribbon or lace or both to your project and then link it up to be in with a chance of a prize or Top 3 position.  Our sponsors this week are Doodle Pantry and StampArt Design by Kathryne.  Just click on their names to view the brilliant range of images.

I used a Doodle Pantry image for my card this week.  It's called Pitcher and Basin and can be found here.


I saw a similar design in a magazine and thought I'd have a go myself.  I started with an A4 piece of kraft card and cut it length-ways and then scored each piece in half to make two 6" x 4" card blanks.  I used my Tonic guillotine to cut the fronts on the diagonal.  I attached the two blanks together the Collall All Purpose Glue.  It really is the best glue in the world!  

The image came with two patterned backing papers but I made the plain blue paper by using the colour picker feature in My Craft Studio.  I used the flowery backing paper to cover the fronts of my card and then added a piece of kraft cardstock that had been embossed with one of the A4 Sue Wilson embossing folders from Creative Expressions.


My image was cut using Spellbinders Grand Labels Eleven.  I added the lace to close the card and also for an extra girly finish.  

I hope you can join us for our ribbon/lace challenge this week.

Happy crafting,
Rachel x

Wednesday, 15 May 2013

Fab'n'Funky Challenges #171 - Favourite Embellishment

Good Morning,

I hope this Wednesday morning finds you all well with lovely creations just waiting to be made.  Thank you to everyone who joined in for our beady challenge last week.  You really showed how beads can be a great addition to any crafty stash.  The winner and Top 3 have been posted on the Fab'n'Funky Challenges blog, so why not head on over for a peek! 

So I'm sure you are all waiting to find out our current challenge and boy do we have a great one for you this week.  The amazing Pat K is our host and the theme is...

Favourite Embellishment

So simple - just add your favourite embellishment to your project and tell us about it!  I'm sure this is going to be a popular challenge!

We have a fantastic new sponsor - Dilly Beans.  Their images are really quirky but so useable.  The DT were so lucky to be able to work with some brilliant images and you can see all our work on the Fab'nFunky Challenges blog.

Now without further ado, here is my card...


I started with a 6" square scalloped card blank and made a background using a piece of silver mirriboard.  I embossed using one of the new Cuttlebug embossing folders and then used my Adirondack and Pinflair alcohol inks to add the colours of the rainbow.  As soon as I saw this image on the Dilly Beans site, I immediately thought rainbow colours! 


My image is called Daisy Framed Girl and is available here.  I coloured her with ProMarkers in Ruby, Lipstick Red, Bright Orange, Gold, Canary, Yellow, Forest Green, Grass, True Blue, Cobolt Blue, Plum Preserve and Amethyst.  Once I had finished colouring the flowers, I didn't want to spoil the rest so I've left her black and white.  I really need to get more confidence with my colouring techniques.  I do have another idea in mind for this image so watch this space!

I used a corner rounder to chomp the corners of my background and black layer.  I added my favourite embellishment - gems - to the centre of each of the flowers.  But of course my card wouldn't be complete without a butterfly so added one to the inside...


I used the same technique as the background to make my butterfly but used bigger drops of the alcohol inks.  I cut out using Spellbinders Wonderful Wings and layered with black card again.  My frame was doodled with a Micron pen.  Totally out of my comfort zone but I think that's a good thing, now and again!

I hope you can join us with your favourite embellishments.  Don't forget to tell us why you love them so much.

Happy crafting,
Rachel x